Driveshaft balancing the Ford way?

GlassTop09

Senior Member
Joined
May 24, 2019
Posts
1,150
Reaction score
531
Location
Farmington, NM
Ok, the verdict is..........fact check-TRUE!

This S197 center carrier bearing assembly setup does exactly everything the folks at JXBPerformance said it would do to the letter........

The Track version durometer bushings are very stout when fully compressed into assembly........I could only move the center bearing 1\8" of movement.......most of this movement was found at the 2 mounts to unibody......not in the center bearing sandwich bushings inside the JXBPerformance carrier assembly. So, when JXBPerformance said this setup removes the driveshaft slop in the center carrier area of the OEM Ford 2-piece DS.......they ain't lying.

Driveshaft is quiet as a church mouse during rotation (tested up to 70 MPH to date.......so far, so good) w\o any harsh NVH anywhere........but since I have a fully trans mounted MGW shifter (installed on a Blowfish Racing Remote Shifter Mount bracket.......the V2 version.....is now discontinued) I can feel the extra NVH from this firmer mounting thru the shifter handle (mostly thru the front U-joint at the trans flange) but the connectivity improvement thru to the rear axle is very noticeable thru my Eaton Detroit Tru-Trac diff when the clutch is engaging\disengaging........in a lot of ways it seems to have the connectiveness feel of a 1-piece driveshaft (I also own a Ford Performance 1-piece DS w\ the 2 Spicer 1350 U-joints & ran it in this car from 2018 thru 2022 on a full BMR 05-09 S197 rear suspension setup before I put my OEM Ford 2-piece DS back in so I know of what I'm talking about) but is much smoother due to the 2 CV joints in the rear 2-piece DS half shaft section along w\ the Roush 3rd Link UCA assembly (a Roush-modified OEM Ford 07-09 GT\GT500 UCA assembly.......is now discontinued) & OEM Ford 07-14 GT500 rear LCA's I have installed replacing all the BMR suspension parts as well but retaining all the full rear axle control under full WOT launches........at the OEM Ford 08-09 Bullitt ride height (have a full set of OEM 08-09 Ford Bullitt take-off springs installed).

IMHO, I give this JXBPerformance S197 DS Center Carrier Assembly a thumbs up as I find all the descriptions given by JXBPerformance are indeed true as I also felt\observed as well.
I believe y'all will like the Street durometer version bushings just as well.......they're just a bit softer than the Track version but not by a lot......FYI.

As usual, YMMV............

The install was pretty straight forward..........I did the install w\ my Kooks mid pipe still mounted (detached the exhaust pipes from the mid pipe & bungiee'd the pipes out of the way......video showed to remove the mid pipe section) & the DS still mounted in the car on jackstands..........but if you have a set of the HF Daytona 6-Ton jackstands w\ a 20" stand height set under a pair of Steeda Jacking Rails it ain't half bad........but a lift is THE way to go if you have access to 1. I found that if you have a 4" hand held grinder using either a 4" grinding wheel or cutoff wheel, I could access the top area section just behind the old carrier mounting flanges thru the area between the mid pipe ends & cut the upper flange section out to remove the metal housing part then a good & sharp 2" pocket knife made short work of the rubber section right down to the part of the rubber that will be reused (found 4 sections already had cracked & separated). The rest is as shown in the install video. I used some blue Loctite on all the bolts for insurance. Install w\ the lettering facing towards the front of car (or towards the transmission) so all properly centers up inside the carrier assembly when mounted.........as instructed in the video.

Good luck!


PS edit--install video won't run here so go on JXBPerformance web site & run it.
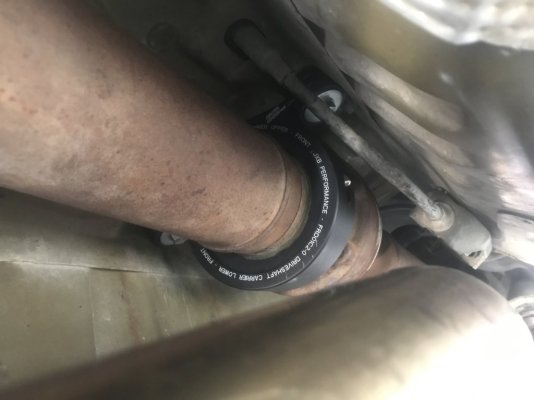
JXBPerformance S197 Driveshaft Center Carrier Assembly Installed 09 GT.JPG
 

Gladams

Member
Joined
Mar 14, 2022
Posts
111
Reaction score
84
Location
Oak Grove, Missouri
Ok, the verdict is..........fact check-TRUE!

This S197 center carrier bearing assembly setup does exactly everything the folks at JXBPerformance said it would do to the letter........

The Track version durometer bushings are very stout when fully compressed into assembly........I could only move the center bearing 1\8" of movement.......most of this movement was found at the 2 mounts to unibody......not in the center bearing sandwich bushings inside the JXBPerformance carrier assembly. So, when JXBPerformance said this setup removes the driveshaft slop in the center carrier area of the OEM Ford 2-piece DS.......they ain't lying.

Driveshaft is quiet as a church mouse during rotation (tested up to 70 MPH to date.......so far, so good) w\o any harsh NVH anywhere........but since I have a fully trans mounted MGW shifter (installed on a Blowfish Racing Remote Shifter Mount bracket.......the V2 version.....is now discontinued) I can feel the extra NVH from this firmer mounting thru the shifter handle (mostly thru the front U-joint at the trans flange) but the connectivity improvement thru to the rear axle is very noticeable thru my Eaton Detroit Tru-Trac diff when the clutch is engaging\disengaging........in a lot of ways it seems to have the connectiveness feel of a 1-piece driveshaft (I also own a Ford Performance 1-piece DS w\ the 2 Spicer 1350 U-joints & ran it in this car from 2018 thru 2022 on a full BMR 05-09 S197 rear suspension setup before I put my OEM Ford 2-piece DS back in so I know of what I'm talking about) but is much smoother due to the 2 CV joints in the rear 2-piece DS half shaft section along w\ the Roush 3rd Link UCA assembly (a Roush-modified OEM Ford 07-09 GT\GT500 UCA assembly.......is now discontinued) & OEM Ford 07-14 GT500 rear LCA's I have installed replacing all the BMR suspension parts as well but retaining all the full rear axle control under full WOT launches........at the OEM Ford 08-09 Bullitt ride height (have a full set of OEM 08-09 Ford Bullitt take-off springs installed).

IMHO, I give this JXBPerformance S197 DS Center Carrier Assembly a thumbs up as I find all the descriptions given by JXBPerformance are indeed true as I also felt\observed as well.
I believe y'all will like the Street durometer version bushings just as well.......they're just a bit softer than the Track version but not by a lot......FYI.

As usual, YMMV............

The install was pretty straight forward..........I did the install w\ my Kooks mid pipe still mounted (detached the exhaust pipes from the mid pipe & bungiee'd the pipes out of the way......video showed to remove the mid pipe section) & the DS still mounted in the car on jackstands..........but if you have a set of the HF Daytona 6-Ton jackstands w\ a 20" stand height set under a pair of Steeda Jacking Rails it ain't half bad........but a lift is THE way to go if you have access to 1. I found that if you have a 4" hand held grinder using either a 4" grinding wheel or cutoff wheel, I could access the top area section just behind the old carrier mounting flanges thru the area between the mid pipe ends & cut the upper flange section out to remove the metal housing part then a good & sharp 2" pocket knife made short work of the rubber section right down to the part of the rubber that will be reused (found 4 sections already had cracked & separated). The rest is as shown in the install video. I used some blue Loctite on all the bolts for insurance. Install w\ the lettering facing towards the front of car (or towards the transmission) so all properly centers up inside the carrier assembly when mounted.........as instructed in the video.

Good luck!


PS edit--install video won't run here so go on JXBPerformance web site & run it.

View attachment 95971
Outstanding write up. I can’t wait to get mine installed. I have the Barton Hybrid 3 trans mounted and the boomba race transmission mount, so NVH through the shifter hopefully won’t be too bad. Thanks for doing the write up. If I can’t get a lift, my son said he would do the crawling around on the floor for me. He’s 26 and about the size of a toothpick. Thanks.
 

GriffX

Member
Joined
Sep 28, 2017
Posts
583
Reaction score
223
Outstanding write up. I can’t wait to get mine installed. I have the Barton Hybrid 3 trans mounted and the boomba race transmission mount, so NVH through the shifter hopefully won’t be too bad. Thanks for doing the write up. If I can’t get a lift, my son said he would do the crawling around on the floor for me. He’s 26 and about the size of a toothpick. Thanks.
If you remove the old bracket, alternatively to cut it through, there are 4 tiny tack welds at the top, which can be grind off very easy.

After my DIY rubber mod the movement of the shaft is less than 1/8". Will see next week.....
 

GlassTop09

Senior Member
Joined
May 24, 2019
Posts
1,150
Reaction score
531
Location
Farmington, NM
If you remove the old bracket, alternatively to cut it through, there are 4 tiny tack welds at the top, which can be grind off very easy.
You're correct.....................if you also remove the midpipe. I tried to cut these tack welds initially........the 2 facing towards the rear I could get to, but the 2 facing over the midpipe, there just wasn't enough room to safely maneuver a 4" handheld grinder w\ disc & reach these 2 tack welds.......but I could easily do what I described w\ the midpipe still mounted thus the direction I took.

I understand the option of cutting the tack welds to preserve the parts...........but that wasn't in the cards for me as I fully understood that this setup is a 1-way affair.........once done you're committed to it going forward.......I didn't have a problem w\ that since this part exudes of being a well thought out & engineered design thus any perceived outstanding issues were already resolved by the folks at JXBPerformance.

So, I just installed it essentially according to the instructions given...................the rest is history. The part performs exactly as described that it would.

My take on this..............................
 

JC SSP

Senior Member
Joined
Nov 8, 2022
Posts
1,119
Reaction score
502
Location
FL
What’s made you go from 1-piece shaft back to factory one?
 

GriffX

Member
Joined
Sep 28, 2017
Posts
583
Reaction score
223
So, finally, first impression. The drone at 67 is gone, no noise so far, but must test it with higher speed also.
I got some NHV in my seat with medium load acceleration from low rpm, it's like some growl so not annoying (not yet).

I guess I can improve it further by changing the aluminum spacer with rubber disks like JXB does?
Overall the drivetrain feels very solid. I call it an improvement. :)
 

Gladams

Member
Joined
Mar 14, 2022
Posts
111
Reaction score
84
Location
Oak Grove, Missouri
So, finally, first impression. The drone at 67 is gone, no noise so far, but must test it with higher speed also.
I got some NHV in my seat with medium load acceleration from low rpm, it's like some growl so not annoying (not yet).

I guess I can improve it further by changing the aluminum spacer with rubber disks like JXB does?
Overall the drivetrain feels very solid. I call it an improvement. :)
Got mine installed today using Jack stands. I agree that the JXB works as stated. I’m so glad I bought this and so far saved money on a one piece DS. Thanks JXB and thanks to everyone for your write up’s.
 

GriffX

Member
Joined
Sep 28, 2017
Posts
583
Reaction score
223
BTW, am I crazy, or does the tires brake loose much sooner now?
 

GriffX

Member
Joined
Sep 28, 2017
Posts
583
Reaction score
223
You are not crazy. Have to watch take offs, but I like how solid it feels. No more slow speed clunky sounds.
Exactly, so far very worth the work.
An other mod I wished I did much earlier, together with the noise insulation and the aerodynamic stuff.
 

GlassTop09

Senior Member
Joined
May 24, 2019
Posts
1,150
Reaction score
531
Location
Farmington, NM
BTW, am I crazy, or does the tires brake loose much sooner now?
You are not crazy. Have to watch take offs, but I like how solid it feels. No more slow speed clunky sounds.
Now y'all can understand why I said that after this mod the 2-piece DS now has the connectiveness of a 1-piece DS........by tightening up the lateral side to side & vertical up\down flexing inside of the front CV joint from the center carrier moving about & maintaining the axial (or rotational if preferred) driveline centerline throughout, this stops soaking up the transmission of engine TQ output thru the driveline thus "feels" more connected (or solid if preferred) to the rear axle while also reducing the "load" thru the front CV joint at the same time.........the main joint that commonly fails when this 2-piece DS is put under high initial TQ loads............

This also vastly improves the rolling moment of these 2-piece DS's making acceleration quicker as well due to the 2-piece DS being much easier\free to roll (or turn if preferred) .........which is also part of what y'all are experiencing.............as long as the rear axle suspension\tires can get it put to the ground w\o wheel spin.........

For those so inclined to know\understand the physics behind all this................

2 different methods of achieving the same goal.....................
 

GlassTop09

Senior Member
Joined
May 24, 2019
Posts
1,150
Reaction score
531
Location
Farmington, NM
Driveshaft is quiet as a church mouse during rotation (tested up to 70 MPH to date.......so far, so good) w\o any harsh NVH anywhere........but since I have a fully trans mounted MGW shifter (installed on a Blowfish Racing Remote Shifter Mount bracket.......the V2 version.....is now discontinued) I can feel the extra NVH from this firmer mounting thru the shifter handle (mostly thru the front U-joint at the trans flange)
FYI for those so interested...........................

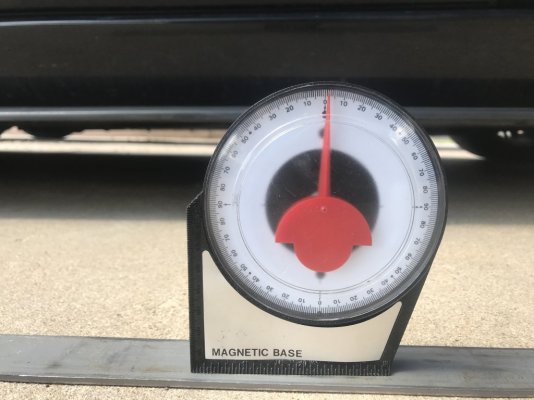
After running this setup for a while, it came to mind to whip out my angle finder & physically check the actual operating angle of the front U-joint DS section since installation of this JXBPerformance S197 Center Carrier Assembly using their Track version rubber inserts (stiffest durometer) as I surmised that by stiffening this carrier up this has to have an effect on this..........also remembering that I also had this Blowfish Racing Remote Shifter bracket installed (V2 version which installs between the trans & trans isolator mount thus will raise the trans up by the thickness of the V2 bracket "square slot".......) thus the engine\trans flange angle wouldn't be at std OEM design front DS operating angle........which may be what I was detecting thru my shifter handle.

Been had this Blowfish Racing bracket installed since early 2018 & never crossed my mind to check this out...............

So, I got her in the air & checked this............found it to be out of alignment by a fair amount (according to Ford design for a typical 2-piece DS layout, the front U-joint in DS section between the trans flange & center carrier\U-joint or CV joint should be operating between .5*-1.5*......just enough deflection to facilitate adequate grease distribution thruout the U-joint needle bearing caps).......found trans flange to be at 2* down w\ front shaft & rear shaft sections at 6* down which put the front CV joint at 0* operating angle thus the 2-piece DS was indeed mimicking a 1-piece DS alignment for a front U-joint operating angle of 4*.......which is outside of the max recommended operating deflection angle of 3* for a typical single U-joint.........thus explains why the low RPM flutter I was feeling\experiencing. Since the rear shaft pinion flange has a CV joint mounted to it, this made up for any vibration issue coming from the pinion flange, so all is coming from the U-joint off the trans flange.

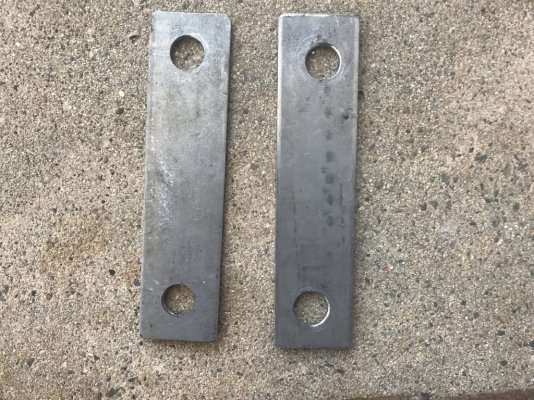
So, to fix this I needed to lower the trans flange to reduce the U-joint operating angle & I wasn't gonna remove my Blowfish bracket, so I made some trans crossmember shims out of 1-1/2" W flat steel plate I picked up at Home Depot (1/8" & 3/16" thickness to try to counter the Blowfish V2 bracket slot thickness.......guessing between 3/16" to 5/16"........have slept a few days since installing this part) to bring the front U-joint DS section operating angle back to specs.

Found that the OEM Ford M12 x 1.75 x 50mm (actual 38mm of thread) trans crossmember bolts would only accommodate the 3/16" shims & get a full thread thru the nut insert in unibody so I didn't install the 1/8" shims yet (but I did have to buy 2 M12 x 1.75 x 50mm Grade 10.9 bolts.....longest O'Reilly's had in stock.....to facilitate my 2 mid pipe exhaust hangers & maintain full thread to safely\securely achieve the 46 ft-lbs TQ spec) then rechecked alignment afterwards & found I got pretty close.......trans flange now reads 3* down, front DS section reads 5* down (which sets front U-joint at 2* operating angle now instead of 4*) & rear DS section at 8* down & rear axle pinion flange at 5* down (which sets the front CV joint in rear DS section at 3* operating angle & pinion CV joint at 3* operating angle.......so meaningless for CV joints & is why Ford used these in this manner in the rear DS section along w\ solid non-adjustable UCA & LCA's thus a fixed rear suspension geometry in the 3-link rear suspension).

Test drive after work was finished showed that the low RPM DS flutter once felt was now practically gone so is now verified that this was being caused by the front U-joint being operated outside of its max deflection range of 3* while running the JXBPerformance S197 Center Carrier using the Track version rubber inserts. Another item observed is that this DS realignment affirmatively improved the DS rolling moment even further.........as it should be due to the front U-joint binding being reduced (car will now start rolling down my driveway on its own upon clutch disengagement w\o brakes applied as seen in pictures provided below...........this driveway section is on a 2* incline slope.......just enough to ensure water runoff). Rotational smoothness also improved as well as the connectiveness feeling that the Track version rubber inserts in the JXBPerformance S197 carrier assembly already gave.

I've got some uxcell M12 x 1.75 x 60mm grade 10.9 flanged head full thread bolts coming along w\ some M12 x 37.7mm OD x 3 mm thick flat washers coming off Amazon to finish this out so that I can get my 1/8" shims installed as well.........hoping this will get me to\within the 1.5* operating angle spec of a front U-joint DS section in a 2-piece Ford DS design parameter.

Just putting all this here for anyone considering installing 1 of these setups.......especially if using the Track version rubber inserts........to also consider checking the front DS section U-joint alignment angles afterward to ensure that the front U-joint operating angles are at least within 3* but optimally within 1.5* while you're under there.

The shim measurements are 6 1\4" L x 1 1/2" W w\ hole centers @ 4 9\16"........I opened the holes up to 9\16" ID instead of 1\2" ID to allow some wiggle room just in case 1 of the holes got a little off during drilling.

You'll have to make these yourself as I've yet to find anyone making them commercially.........

Realistically, you could use steel body shims for 1\2" bolt shanks slid in at each end of crossmember holes parallel to unibody section since the crossmember only clamps to unibody around each bolt hole, but I like this 1-piece design better from a looks perspective.

As usual, YMMV.

Ford S197 1.5 in W x 6.25 in L x .125 in D Homemade Trans Crossmember Shims.JPG

Dale12.JPG

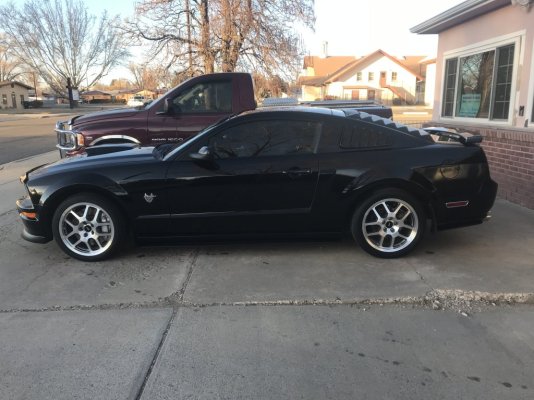
Driveway Slope Incline Angle.JPG
 
Last edited:

GriffX

Member
Joined
Sep 28, 2017
Posts
583
Reaction score
223
Any idea what side effect or NVH a too big pinion angle has? I measured the angle at the transmission flange which was in spec, but I was not able to measure the pinion angle. My home build solution pushed the center bearing up 5 mm. I know it is a CV joint but I guess it has some optimum also?
 

GlassTop09

Senior Member
Joined
May 24, 2019
Posts
1,150
Reaction score
531
Location
Farmington, NM
Any idea what side effect or NVH a too big pinion angle has? I measured the angle at the transmission flange which was in spec, but I was not able to measure the pinion angle. My home build solution pushed the center bearing up 5 mm. I know it is a CV joint but I guess it has some optimum also?
As best I can find........the 2 CV joints Ford uses are a Rzeppa derivative design called a Birfield design (most commonly used on trans-to-rear axle driveshafts due to improved strength vs an original Rzeppa).......the front CV joint is a 932-type plunging design (means that this joint will slide in\out as well as deflect\articulate......to accommodate the slight in\out movement of the rear shaft as well as deflection angle when rear axle is traveling thru its arc) & the rear CV joint is a 932-type fixed design. Typical Rzeppa\Birfield design CV joint deflection swing range is between 15* to 28* max but can be designed to deflect as far as 80* max, depending on manufacture\application criteria, but when used in pairs (the most common usage orientation for any type of driveline use........includes IFS\IRS sub axle drivelines as well) this reduces by 1\2 at each CV joint thus can accommodate very high shaft angles between them w\o any binding thus should produce little to no NVH during operation.

Again, this is why Ford used 2 of these type CV joints in the rear section of this 2-piece DS design. The larger issue when extreme shaft angles are used is CV joint longevity due to the amount of ball to groove wear incurred over time. Naturally, the less deflection they are run under, the longer they will last w\o incurring internal damage or excessive wear, but also like a U-joint, you don't want them to sit stationary at a 0* operating angle either........lubrication properties are dependent on some movement within the joint.

So, going by this info.............unless you've modified the S197's rear axle\driveline geometry far enough away from the Ford OEM designed angles (like would occur if a 1-piece DS using 2 single U-joints at each end is installed w\o any adjustment to correct front\rear U-joint operating angles from full rear suspension compression thru full extension travel arc as well as lateral movement......chassis was not originally setup for this type of driveline, or like I did unknowingly w\ this initial Blowfish Racing Remote Shifter Bracket install that exposed itself after installing the JXBPerformance part, or like some folks do when knowingly\unknowingly install\use adjustable height engine mounts, or installing aftermarket rear LCA's\UCA's that don't match the Ford S197 OEM rear LCA\UCA hole centers--been there, done that w\ a set of BMR aftermarket LCA's.... BMR LCA hole centers were 1\4" longer than OEM thus will alter the set pinion angle or lowered the rear suspension below OEM ride height for starters.......) ........shouldn't have any issues\concerns w\ the 2 CV joint operating angles in rear DS section at all concerning NVH.........unless the actual CV joint(s) itself is\are damaged internally.

The only concern then should be the front DS section of this Ford S197 2-piece DS design that contains the single U-joint since these don't travel a true 360* circle when deflected away from 0* operating angles under a load & the CV joint on the other end will not cancel it out as it DOES travel a true 360* circle when deflected thus no phasing between the 2 is occurring........thus the NVH issue arises. This is why the U-joint operating angles of this front DS section are set so tight.

The beauty of all this though is that the front DS section operating angles of a 2-piece DS aren't affected by any rear suspension articulation angles as the front DS operating angles are fixed\set by the engine\trans mount thru to the center carrier mount......so once this section is properly set\corrected the rest should be golden thru the 2 CV joints.

Amazing how all these little things that we assume to not be an issue can actually intersect to cause very noticeable issues.

My take on all this..............

Hope this helps.

PS edit----Just thought of this............if your home remedy raised the driveshaft centerline by 5mm at the carrier, try putting a couple of M10 x 2mm thick washers under each carrier spacer to shim this back down & see what this does...............easy enough IMHO......
 
Last edited:

Support us!

Support Us - Become A Supporting Member Today!

Click Here For Details

Sponsor Links

Banner image
Back
Top