
acrophobia13
eat. sleep. drive.
Hey there S197Forum!
I wanted to share with you guys a little on-going side project for me… a bottlecap table!
I’ve been wanting to make one of these for YEARS! I’ve been saving bottle caps from my house, dorm room(s), bars, etc… long story short, we started with a pretzel jar with an estimated 1500 caps.
This is what we ended up with: (all images are thumbnails!)

This is how we did it:
Our first step was to acquire a basic table to work with… Our original plan was to build a pong-sized table from scratch (6’x2’) but that didn’t pan out.
On a whim, we decided to steal a used wire spool to use as a coffee table in the dorm…. You can see where this is going!
So our first step was to cover the table in something that would allow us a smooth surface to glue on. Duct tape, of course:

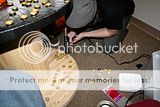
While I worked on duct taping the table (yes that’s me in the picture) my suitemates sorted out the bottle caps by brand. Early on, we decided to use a concentric rings pattern.
Our first row was all Miller Lite caps. These caps were turned upside down and filled with hot glue, to form tiles. We wanted the outside ring to be as strong as possible to help hold all the caps in place when pouring the epoxy.


The next row was Coors Light. This row (and all subsequent rows) we used a “two-dot” method – 2 dots of glue on the table, then stick the cap into it (so that each dot of glue held 1 side of 2 caps, if that makes sense).
At this point, we had a nice little assembly line going. One guy glued, one guy put down the caps, one guy trimmed excess glue with a hobby knife.

Row #2 done!:


The rest of the rows continued as you’d imagine:


And now, after 8 (yes, 8!) hours of gluing… all the caps are glued down! (all 600…. I think the total was right around 660)

The two holes you see both have a purpose. When the spool was used for wire, the central hole would be the mounting hole and the other hole would be a carrying hole.
We decided to leave the holes open (mostly because we could not figure out a good way to cover them permanently) but that’s ok, we found new uses for them: the central hole is for dutch guts ( ;-) ) and garbage, and the other hole is now an ashtray with removable tray. But more on that later.
The next step was to create “barriers” for the coating. These were index cards, covered in duct tape, lining the edges of the table and the holes, to control overflow.

Now, it was time for a coating for the caps. The “gentleman” (read: moron) at Lowe’s insisted we needed to use a water-based polyurethane… I disagreed, but went against my better judgement and followed his advice.
So we carried the table upstairs to our spare bathroom for the polyurethane-ing, and poured a coat.

See how it’s all cloudy? No bueno. This is because this polyurethane is 100% the WRONG “covering” for this project. Really, we should’ve used epoxy or shellac of some sort.

That’s me, with a wifebeater wrapped around my face (to protect from the fumes, our bathroom’s tiny and unventilated) inspecting the table.
So we decided we were VERY unhappy with the outcome. The only solution was to wash the table as much as we could with acetone and try a different coating.
This is the stuff we ended up using:
http://www.glazecoat.com/GlazeCoat.htm
It’s a two-part epoxy. This stuff is nuts! DEFINITELY the correct coating for this job. I HIGHLY recommend this product for anyone trying to do something similar. 1 box (I think it was $60?) was enough for our “small” project.
After the epoxy cured for 72 hrs, we removed the edge guards.
This is what we had:

Now these pics were taken 2 months ago. I’ve since come home from college (bringing the table with me, of course) and started on the next phase of the project: wrapping the entire non-bottle-cap portion of the table in black felt.
I’ve also cut a section out of the “middle” portion of the table so that the central cylinder can be made into a hidden cabinet.
I don’t have any recent project pics, yet, but as I finish more on the table I’ll be sure to post ’em up!
Feel free to ask any questions! This was a hell of a learning experience for us!
I wanted to share with you guys a little on-going side project for me… a bottlecap table!
I’ve been wanting to make one of these for YEARS! I’ve been saving bottle caps from my house, dorm room(s), bars, etc… long story short, we started with a pretzel jar with an estimated 1500 caps.
This is what we ended up with: (all images are thumbnails!)

This is how we did it:
Our first step was to acquire a basic table to work with… Our original plan was to build a pong-sized table from scratch (6’x2’) but that didn’t pan out.
On a whim, we decided to steal a used wire spool to use as a coffee table in the dorm…. You can see where this is going!
So our first step was to cover the table in something that would allow us a smooth surface to glue on. Duct tape, of course:

While I worked on duct taping the table (yes that’s me in the picture) my suitemates sorted out the bottle caps by brand. Early on, we decided to use a concentric rings pattern.
Our first row was all Miller Lite caps. These caps were turned upside down and filled with hot glue, to form tiles. We wanted the outside ring to be as strong as possible to help hold all the caps in place when pouring the epoxy.


The next row was Coors Light. This row (and all subsequent rows) we used a “two-dot” method – 2 dots of glue on the table, then stick the cap into it (so that each dot of glue held 1 side of 2 caps, if that makes sense).
At this point, we had a nice little assembly line going. One guy glued, one guy put down the caps, one guy trimmed excess glue with a hobby knife.

Row #2 done!:


The rest of the rows continued as you’d imagine:


And now, after 8 (yes, 8!) hours of gluing… all the caps are glued down! (all 600…. I think the total was right around 660)

The two holes you see both have a purpose. When the spool was used for wire, the central hole would be the mounting hole and the other hole would be a carrying hole.
We decided to leave the holes open (mostly because we could not figure out a good way to cover them permanently) but that’s ok, we found new uses for them: the central hole is for dutch guts ( ;-) ) and garbage, and the other hole is now an ashtray with removable tray. But more on that later.
The next step was to create “barriers” for the coating. These were index cards, covered in duct tape, lining the edges of the table and the holes, to control overflow.

Now, it was time for a coating for the caps. The “gentleman” (read: moron) at Lowe’s insisted we needed to use a water-based polyurethane… I disagreed, but went against my better judgement and followed his advice.
So we carried the table upstairs to our spare bathroom for the polyurethane-ing, and poured a coat.

See how it’s all cloudy? No bueno. This is because this polyurethane is 100% the WRONG “covering” for this project. Really, we should’ve used epoxy or shellac of some sort.

That’s me, with a wifebeater wrapped around my face (to protect from the fumes, our bathroom’s tiny and unventilated) inspecting the table.
So we decided we were VERY unhappy with the outcome. The only solution was to wash the table as much as we could with acetone and try a different coating.
This is the stuff we ended up using:
http://www.glazecoat.com/GlazeCoat.htm
It’s a two-part epoxy. This stuff is nuts! DEFINITELY the correct coating for this job. I HIGHLY recommend this product for anyone trying to do something similar. 1 box (I think it was $60?) was enough for our “small” project.
After the epoxy cured for 72 hrs, we removed the edge guards.
This is what we had:

Now these pics were taken 2 months ago. I’ve since come home from college (bringing the table with me, of course) and started on the next phase of the project: wrapping the entire non-bottle-cap portion of the table in black felt.
I’ve also cut a section out of the “middle” portion of the table so that the central cylinder can be made into a hidden cabinet.
I don’t have any recent project pics, yet, but as I finish more on the table I’ll be sure to post ’em up!
Feel free to ask any questions! This was a hell of a learning experience for us!

