
Tron
forum member
i actually did the work over a year ago now so i am doing this all out of memory to match the pictures i took lol. this will also only cover the control arm portion of the work. one tip though is to remove the outer tie rod end from the knuckle and you can sneak the front bolt out without having to remove the rack bolts.
i used prothane and energy suspension bushings(cant remember which was which) and J&M taller balljoints(koni yellows with frpp k springs).
i started with removing the rear mount as it seamed to be the one that would be the biggest pain in the ass...and i was pretty much correct. in reading the directions from the bushing company they suggested using a drill to make holes in the bushing to allow for the fluid in the bushing to drain. dont do this. its a waste of time and doesnt work. use a press to press the inside down with the flange portion of the mount supported. have a bucket under the control arm or at least be ready for a good rush of fluid to come out. you should at this point have something that looks like this:

the next step will be to remove the large section of bushing. i used a cutoff wheel(use some eye protection) to make a cut down the side and then used a an air hammer and a chisel bit to remove it from the inner sleeve:

now onto the next part which is this sleeve:

i used the same method as above, a cutoff wheel to make a cut down the length followed by using an air hammer and chisel bit to break it away from the control arm and drive it off.

then i used a scotch brite pade on a 90* grinder to clean up the peg.


now onto the front bushing.

i used the same method as i and some others have used to remove the rear diff bushing. i drilled a bunch of holes around the center sleeve and then pressed it out with an air hammer and hammer bit. then i switched over to the chisel bit and folded the outer sleeve in and pushed it out. on this one you actually do remove the outer sleeve as well unlike the diff bushing.

then i used a flapper wheel to clean up the inside of the control arm to smooth out any marks the chisel bit made and to remove any rust.


now i was also installing a BMR tubular k at the same time and there was no way in hell i was going to put those nice new bushings and balljoints in those shitty looking control arms. so a call to my powdercoater and SPLADOW!

also the coater wasnt able to see the tubular K so i told him "red solo cup" as the color and it matches perfect lol.
this is with everything installed and the balljoints pressed in

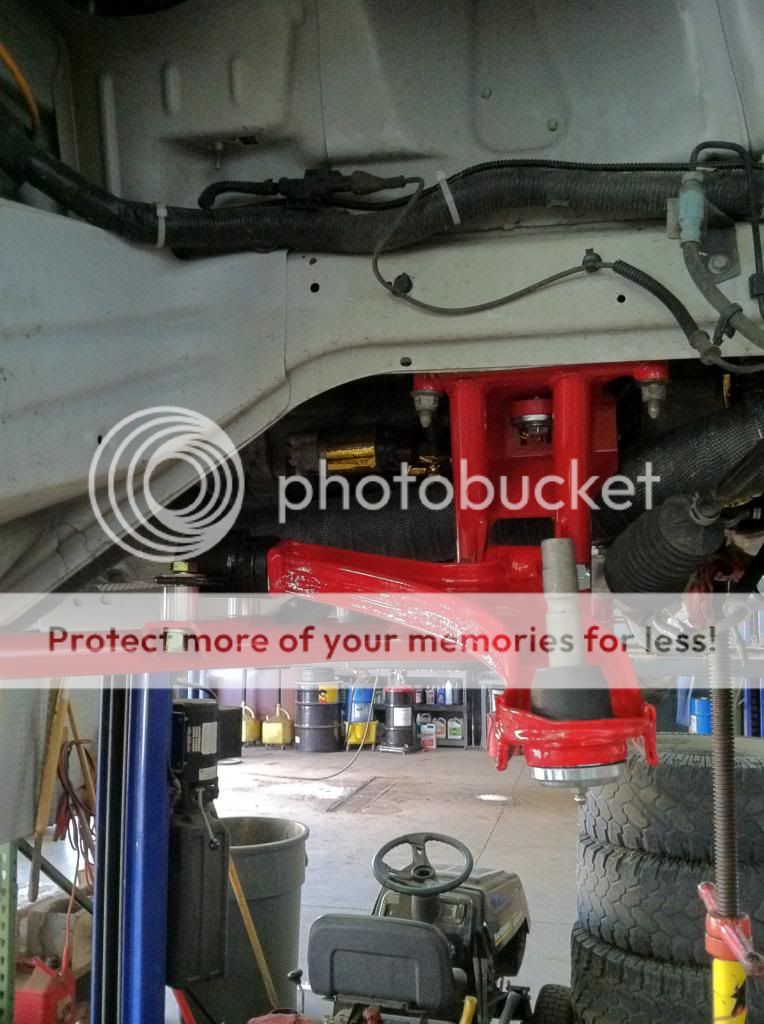
installed in the k member
now a word of caution with the ball joints is that i did end up having one come out of the control arm. luckily it was on the drive on rack while i was aligning the car so i pulled the arm real quickly, pressed it back in, and gave it 3 tacks from the Miller Glue Gun on each one and havent had a problem since.
the finished product

i feel like i might have missed something but give me a break, its been awhile and the army is eating my brain away haha...feel free to ask any questions.
i used prothane and energy suspension bushings(cant remember which was which) and J&M taller balljoints(koni yellows with frpp k springs).
i started with removing the rear mount as it seamed to be the one that would be the biggest pain in the ass...and i was pretty much correct. in reading the directions from the bushing company they suggested using a drill to make holes in the bushing to allow for the fluid in the bushing to drain. dont do this. its a waste of time and doesnt work. use a press to press the inside down with the flange portion of the mount supported. have a bucket under the control arm or at least be ready for a good rush of fluid to come out. you should at this point have something that looks like this:

the next step will be to remove the large section of bushing. i used a cutoff wheel(use some eye protection) to make a cut down the side and then used a an air hammer and a chisel bit to remove it from the inner sleeve:

now onto the next part which is this sleeve:

i used the same method as above, a cutoff wheel to make a cut down the length followed by using an air hammer and chisel bit to break it away from the control arm and drive it off.

then i used a scotch brite pade on a 90* grinder to clean up the peg.


now onto the front bushing.

i used the same method as i and some others have used to remove the rear diff bushing. i drilled a bunch of holes around the center sleeve and then pressed it out with an air hammer and hammer bit. then i switched over to the chisel bit and folded the outer sleeve in and pushed it out. on this one you actually do remove the outer sleeve as well unlike the diff bushing.

then i used a flapper wheel to clean up the inside of the control arm to smooth out any marks the chisel bit made and to remove any rust.


now i was also installing a BMR tubular k at the same time and there was no way in hell i was going to put those nice new bushings and balljoints in those shitty looking control arms. so a call to my powdercoater and SPLADOW!

also the coater wasnt able to see the tubular K so i told him "red solo cup" as the color and it matches perfect lol.
this is with everything installed and the balljoints pressed in

installed in the k member

now a word of caution with the ball joints is that i did end up having one come out of the control arm. luckily it was on the drive on rack while i was aligning the car so i pulled the arm real quickly, pressed it back in, and gave it 3 tacks from the Miller Glue Gun on each one and havent had a problem since.
the finished product

i feel like i might have missed something but give me a break, its been awhile and the army is eating my brain away haha...feel free to ask any questions.
