
eighty6gt
forum member
- Joined
- May 9, 2011
- Posts
- 4,299
- Reaction score
- 405
No pictures for now, the thing is in the tank, but a description would have helped me out when I was doing this job.
The new Ti Automotive F90000262 has a 50mm lower housing. The stock pump holder is 39 or so mm. Here's a picture of the stock setup for reference:
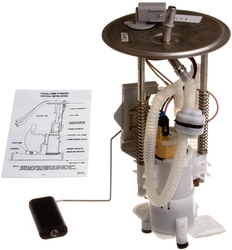
So you have a nice 3 toed plastic foot with rubber caps, and the stock inlet strainer goes out between them. I suppose you could just throw the new pump and sock in, discard the foot and go to town. I didn't like that idea too much.
So... I measured the stock plastic housing, and used a hacksaw to trim away enough that the installed height of the new pump would be the same as the old. There was a rubber insulator on the old pump - I had to cut the bottom away to allow it to just slide over the smaller diameter portion of the 405. After some careful die grinding to some protrusions on the inside of the white plastic holder to increase the diameter at the top, everything slid home. I could even use the original screw to tighten the grey level indicator plastic piece to the lower foot.
My factory strainer was in bad shape (dirty, had some kind of cardboard looking stuff sucked onto it! from the factory, from some fuel pump somewhere, who knows.) so I used the supplied strainer for now, and took the rubber pads off of the feet since that seemed to work best. I'm ordering a new OEM strainer today so I can run the rubber caps.
The supplied high pressure line was unbelievably difficult to slip over the white tee fitting that's on top of the pump. I would try to expand the line with a pair of needle nose pliers, and use some WD-40 or something on the barb. It goes on to the pump much easier, so I would make sure the clamp was clocked to miss everything (test fit,) install the line into the pump, clamp it, then slide it up, (with the extra clamp on the line,) lube the tee, push it together and clamp the final assembly.
The pump is clocked in the same exact position as the original. I did trim away some of the opening on the foot so that the pump inlet would clear.
Now for the hard part. If I was smart, I would have cut off the factory wiring connector leaving as much lead as possible, crimped on some non insulated terminals, put on a dab of solder, and had a nice elegant setup.
I did not do this - the pump came with some car audio wire terminated insulated female spade connectors on one end, and crimp connectors on the other. I sought out fuel resistant 3m shrink tube of the proper diameter to fit over the wire, and the crimp connectors. Crimped on the ground side, tugged a bit... failed crimp. Good grief. OK fine, I'm soldering. strip back the wires, twist together, put some flux on there, (I found out later you are to clean this off somehow?) and make a nice cold joint that hardens the leads for an inch in either direction. Cut that off, try again. Similar results. Eventually I give up on the supplied wire and grab a pre-terminated lead I had laying around, make another one, and, some spare butt connectors, trim the factory lead back to where the mechanical properties are somewhat acceptable... slip on some of the shrink tube, crimp it, shrink it, done.
I am not happy with this situation - not sure if the wire I used is fuel resistant. It probably is, since it's automotive wire, which should have cross linked polyethylene jacketing - this is what you need to look for. AKA "SXL." http://www.grote.com/family/sxl-heavy-duty-primary-wire/ (I have not yet been able to find this in a quantity less than 100', and NO WAY is it available where I live.)
SO. My ultimate OCD solution will be this: I am going to buy some new, heavier gauge wire (I have got stuff that is too thick and too thin right now,) terminate it with uninsulated female spade terminals as I described, drill a hole in the hat, build a bulkhead connector using a drilled out stainless bolt, rubber washers, and bolts, run the wires thru this, seal it with JB weld or a similar fuel resistant sealant (I have had good luck in the field with JB, it does not seem to be susceptible to gasoline, at least for a long time. If anyone knows of any other stuff that will work let me know,) make the solder joints on the OUTSIDE of the tank, shrink tube, DONE!
I will get pictures of the completed hat, etc, once I get my new fuel strainer from the parts store.
The new Ti Automotive F90000262 has a 50mm lower housing. The stock pump holder is 39 or so mm. Here's a picture of the stock setup for reference:
So you have a nice 3 toed plastic foot with rubber caps, and the stock inlet strainer goes out between them. I suppose you could just throw the new pump and sock in, discard the foot and go to town. I didn't like that idea too much.
So... I measured the stock plastic housing, and used a hacksaw to trim away enough that the installed height of the new pump would be the same as the old. There was a rubber insulator on the old pump - I had to cut the bottom away to allow it to just slide over the smaller diameter portion of the 405. After some careful die grinding to some protrusions on the inside of the white plastic holder to increase the diameter at the top, everything slid home. I could even use the original screw to tighten the grey level indicator plastic piece to the lower foot.
My factory strainer was in bad shape (dirty, had some kind of cardboard looking stuff sucked onto it! from the factory, from some fuel pump somewhere, who knows.) so I used the supplied strainer for now, and took the rubber pads off of the feet since that seemed to work best. I'm ordering a new OEM strainer today so I can run the rubber caps.
The supplied high pressure line was unbelievably difficult to slip over the white tee fitting that's on top of the pump. I would try to expand the line with a pair of needle nose pliers, and use some WD-40 or something on the barb. It goes on to the pump much easier, so I would make sure the clamp was clocked to miss everything (test fit,) install the line into the pump, clamp it, then slide it up, (with the extra clamp on the line,) lube the tee, push it together and clamp the final assembly.
The pump is clocked in the same exact position as the original. I did trim away some of the opening on the foot so that the pump inlet would clear.
Now for the hard part. If I was smart, I would have cut off the factory wiring connector leaving as much lead as possible, crimped on some non insulated terminals, put on a dab of solder, and had a nice elegant setup.
I did not do this - the pump came with some car audio wire terminated insulated female spade connectors on one end, and crimp connectors on the other. I sought out fuel resistant 3m shrink tube of the proper diameter to fit over the wire, and the crimp connectors. Crimped on the ground side, tugged a bit... failed crimp. Good grief. OK fine, I'm soldering. strip back the wires, twist together, put some flux on there, (I found out later you are to clean this off somehow?) and make a nice cold joint that hardens the leads for an inch in either direction. Cut that off, try again. Similar results. Eventually I give up on the supplied wire and grab a pre-terminated lead I had laying around, make another one, and, some spare butt connectors, trim the factory lead back to where the mechanical properties are somewhat acceptable... slip on some of the shrink tube, crimp it, shrink it, done.
I am not happy with this situation - not sure if the wire I used is fuel resistant. It probably is, since it's automotive wire, which should have cross linked polyethylene jacketing - this is what you need to look for. AKA "SXL." http://www.grote.com/family/sxl-heavy-duty-primary-wire/ (I have not yet been able to find this in a quantity less than 100', and NO WAY is it available where I live.)
SO. My ultimate OCD solution will be this: I am going to buy some new, heavier gauge wire (I have got stuff that is too thick and too thin right now,) terminate it with uninsulated female spade terminals as I described, drill a hole in the hat, build a bulkhead connector using a drilled out stainless bolt, rubber washers, and bolts, run the wires thru this, seal it with JB weld or a similar fuel resistant sealant (I have had good luck in the field with JB, it does not seem to be susceptible to gasoline, at least for a long time. If anyone knows of any other stuff that will work let me know,) make the solder joints on the OUTSIDE of the tank, shrink tube, DONE!
I will get pictures of the completed hat, etc, once I get my new fuel strainer from the parts store.
Last edited:
