Dino Dino Bambino
I have a red car
In total there are four:
1. Floor/dash vent actuator on driver's side behind gauge cluster (Motorcraft part no. YH 1870).
2. Defrost vent actuator on passenger side behind the center console (upper) (Motorcraft part no. YH 1870).
3. Temperature blend door actuator on passenger side behind the center console (lower) (Motorcraft part no. YH 1865).
4. Recirculate vent actuator under glove compartment next to blower motor (Motorcraft part no. YH 1869).
I'm going to concentrate on the first two as these are the most challenging and the ones I've just replaced on my '06 GT. So what were the symptoms?
Firstly I could hear a brief whirring sound from behind the gauge cluster whenever I turned the heater switch in either direction from the 12 o' clock position (bad no.1 actuator).
Secondly, I noticed that cold air was blowing from the defrost vents as well as the dash vents whenever I'd turn on the AC (bad no.2 actuator).
Since the plastic gears inside the actuators are known to fail, I ordered all four from Rockauto and kept two of them as spares for a rainy day.
1. Floor/dash vent actuator on driver's side behind gauge cluster (Motorcraft part no. YH 1870).
Tools required:
Small 1/4" drive ratchet with short extension, 7mm & 8mm hex sockets.
Small but powerful flash light.
Small hands with long thin fingers.
Lots of patience.
Your favorite collection of expletives.
If you have gorilla-like hands with fat fingers, pay someone else to do the job! Fortunately I don't so I went the DIY route.
Procedure:
1. Lower the steering wheel as far as it'll go.
2. Carefully pull the gauge cluster bezel away from the dashboard.
3. Remove the four 7mm bolts that hold the gauge cluster in place, disconnect the wiring harness from the back of the cluster, and ease the cluster out of the way.
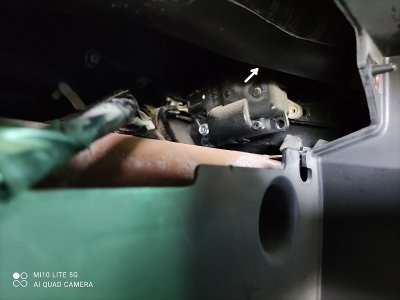
4. The floor/dash vent actuator will be visible on the right and it's held in place with two 8mm bolts that need to be removed. Begin by wedging an object between the dashboard structural bar and the vent duct to push the latter higher and gain better access. A screwdriver handle or an old gear knob would do, but I wedged in pieces of wood instead.
The front bolt is easily visible but space to get your hand in and rotate the ratchet is very limited so you'll be turning it a couple of clicks at a time with your left hand. Disconnect the wiring harness first to allow a bit more room for the ratchet. However the rear bolt (white arrow shows direction in first photo) is an absolute bitch to get to and this is where you'll need your collection of expletives. Approaching it from the top will be blind as it's obscured by the vent duct, and you'll need to feel the bolt head and somehow direct the socket onto it (again with your left hand). Turning it loose will be one click at a time and an exercise in extreme patience. If you lie face up with your head above the pedals, you can just about see it from underneath the dash and approach it from that side, but it'll be almost equally as frustrating and you'll be lying in an uncomfortable position unless you elect to remove the driver's seat, especially if you're large framed or very tall. Midgets with long thin fingers will have a definite advantage.
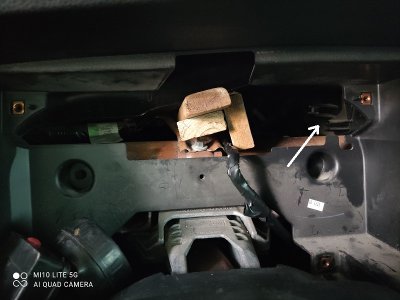
5. Eventually the old actuator will come out and this will be the view.
6. Take a break, grab a beer, and chill out for a few minutes.
7. Carefully position the new actuator ensuring that the swing arm pin sits in its slot, and that it's correctly seated with the bolt holes properly aligned.
8. Insert and tighten the two 8mm bolts one or two tedious, frustrating clicks at a time until they're eventually all the way down.
9. Plug the electrical connector into the new actuator.
10. Before you reinstall the gauge cluster and complete the procedure, start the engine and turn the heater control switch to all settings while observing the actuator swing arm to ensure that it moves in both directions.
11. Breathe a huge sigh of relief and have a second beer to celebrate the sweet smell of success!
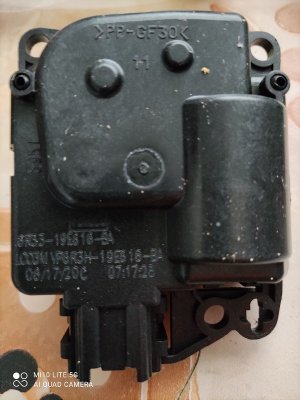
Old part:
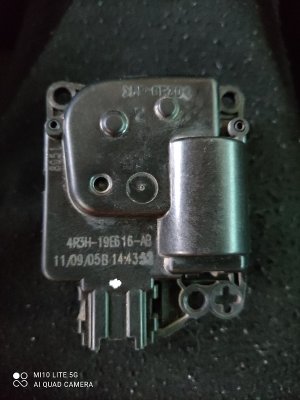
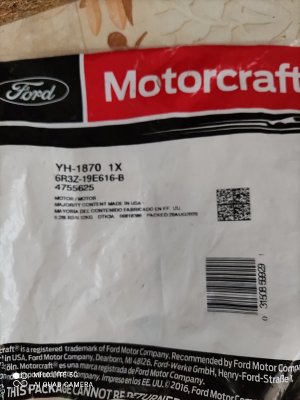
New part:
2. Defrost vent actuator on passenger side behind the center console (upper) (Motorcraft part no. YH 1870).
Tools required:
Small 1/4" drive ratchet with 8mm hex socket.
Small but powerful flash light.
Fortunately the procedure for replacing this actuator is much easier than the aforementioned and can be completed in less than an hour.
Procedure:
1. Move the passenger seat as far back as it'll go.
2. Open the glove compartment, empty the contents, push the sides inwards until the rubber stops clear the recess, and allow the glove box to drop all the way down.
3. If you look up behind the center console on the passenger side of the transmission tunnel, you'll see two actuators. The upper actuator operates the defroster vents while the lower actuator operates the temperature blend door.
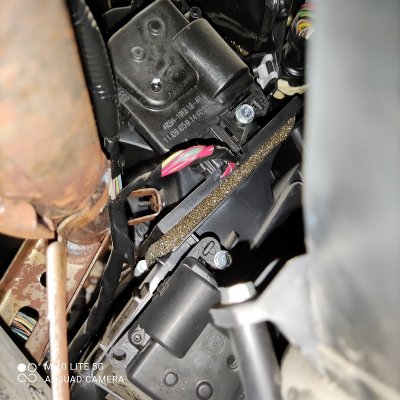
4. The procedure for removing either of the two actuators is essentially the same. The only difference is that the upper actuator has a swing arm (same part no. as floor/dash vent actuator) with a pin that needs to be engaged in the defroster vent swing arm slot during reinstallation, while the lower actuator just has a small gear that needs to slot into place (Motorcraft part no. YH 1865). You'll need to be lying on your back looking underneath the dash to perform this procedure.
5. Disconnect the wiring harness by pushing in the small tab on the side and gently pulling it out. Move it out of the way.
6. Using your left hand, loosen the two 8mm bolts and remove the actuator from its recess. Note the position of the swing arm as you remove it.
7. Insert the new actuator into its recess ensuring that its swing arm pin is engaged in the defroster vent swing arm slot before manipulating it into its final position.
8. Insert and tighten the two 8mm bolts, and plug in the electrical connector.
9. Restore the glove compartment to its original closed position.
To ensure correct operation of the new actuator, the HVAC system needs to be reset. This step is VERY important so don't skip it.
10. Remove the kick panel in the passenger side footwell to gain access to the smart junction box (SJB). It's only clipped in place so pull carefully and ease it out of the way. You'll need to unclip the front part of the door sill plate first to make it easier.
11. This will be the view of the SJB from the passenger side footwell.
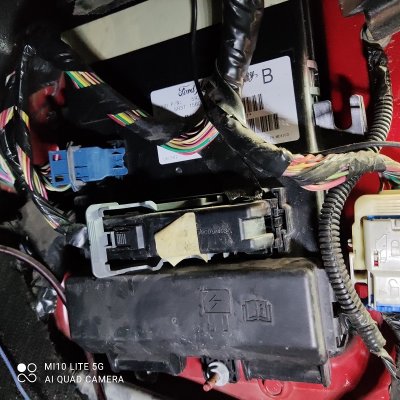
12. The fuse/relay box is at the bottom. After you carefully remove the cover, this will be the view.
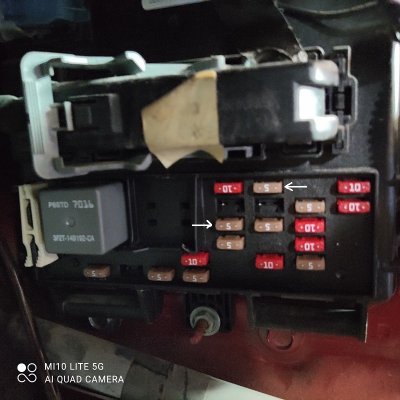
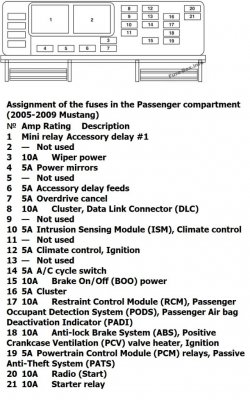
13. Use a pair of needle nose pliers to remove the two 5A fuses as indicated by the arrows (fuses no.10 & 12 in diagram). These control the HVAC system and the fuses need to be left out for at least one minute to reset it properly.
14. Reinsert the fuses into their original positions, clip the SJB cover back into place, and reinstall the kick panel.
3. Temperature blend door actuator on passenger side behind the center console (lower) (Motorcraft part no. YH 1865).
The procedure for replacing this actuator is the same as for the defroster vent actuator, but it's much easier to reach without lying on your back facing up in the passenger side footwell.
4. Recirculate vent actuator under glove compartment next to blower motor (Motorcraft part no. YH 1869).
This one is the easiest of all to replace as it's under the dash to the right of the blower motor behind the glove compartment, and access is very good if you lay on your back looking under the dash.
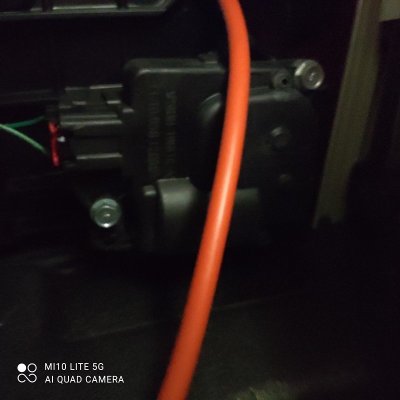
PS: I opened up both of the actuators that I'd removed to perform a post-mortem. Both had a broken plastic gear but since it was a different gear that broke in each actuator, I combined the good bits from both of them to create one good spare.
1. Floor/dash vent actuator on driver's side behind gauge cluster (Motorcraft part no. YH 1870).
2. Defrost vent actuator on passenger side behind the center console (upper) (Motorcraft part no. YH 1870).
3. Temperature blend door actuator on passenger side behind the center console (lower) (Motorcraft part no. YH 1865).
4. Recirculate vent actuator under glove compartment next to blower motor (Motorcraft part no. YH 1869).
I'm going to concentrate on the first two as these are the most challenging and the ones I've just replaced on my '06 GT. So what were the symptoms?
Firstly I could hear a brief whirring sound from behind the gauge cluster whenever I turned the heater switch in either direction from the 12 o' clock position (bad no.1 actuator).
Secondly, I noticed that cold air was blowing from the defrost vents as well as the dash vents whenever I'd turn on the AC (bad no.2 actuator).
Since the plastic gears inside the actuators are known to fail, I ordered all four from Rockauto and kept two of them as spares for a rainy day.
1. Floor/dash vent actuator on driver's side behind gauge cluster (Motorcraft part no. YH 1870).
Tools required:
Small 1/4" drive ratchet with short extension, 7mm & 8mm hex sockets.
Small but powerful flash light.
Small hands with long thin fingers.
Lots of patience.
Your favorite collection of expletives.
If you have gorilla-like hands with fat fingers, pay someone else to do the job! Fortunately I don't so I went the DIY route.
Procedure:
1. Lower the steering wheel as far as it'll go.
2. Carefully pull the gauge cluster bezel away from the dashboard.
3. Remove the four 7mm bolts that hold the gauge cluster in place, disconnect the wiring harness from the back of the cluster, and ease the cluster out of the way.

4. The floor/dash vent actuator will be visible on the right and it's held in place with two 8mm bolts that need to be removed. Begin by wedging an object between the dashboard structural bar and the vent duct to push the latter higher and gain better access. A screwdriver handle or an old gear knob would do, but I wedged in pieces of wood instead.
The front bolt is easily visible but space to get your hand in and rotate the ratchet is very limited so you'll be turning it a couple of clicks at a time with your left hand. Disconnect the wiring harness first to allow a bit more room for the ratchet. However the rear bolt (white arrow shows direction in first photo) is an absolute bitch to get to and this is where you'll need your collection of expletives. Approaching it from the top will be blind as it's obscured by the vent duct, and you'll need to feel the bolt head and somehow direct the socket onto it (again with your left hand). Turning it loose will be one click at a time and an exercise in extreme patience. If you lie face up with your head above the pedals, you can just about see it from underneath the dash and approach it from that side, but it'll be almost equally as frustrating and you'll be lying in an uncomfortable position unless you elect to remove the driver's seat, especially if you're large framed or very tall. Midgets with long thin fingers will have a definite advantage.

5. Eventually the old actuator will come out and this will be the view.
6. Take a break, grab a beer, and chill out for a few minutes.
7. Carefully position the new actuator ensuring that the swing arm pin sits in its slot, and that it's correctly seated with the bolt holes properly aligned.
8. Insert and tighten the two 8mm bolts one or two tedious, frustrating clicks at a time until they're eventually all the way down.
9. Plug the electrical connector into the new actuator.
10. Before you reinstall the gauge cluster and complete the procedure, start the engine and turn the heater control switch to all settings while observing the actuator swing arm to ensure that it moves in both directions.
11. Breathe a huge sigh of relief and have a second beer to celebrate the sweet smell of success!
Old part:

New part:


2. Defrost vent actuator on passenger side behind the center console (upper) (Motorcraft part no. YH 1870).
Tools required:
Small 1/4" drive ratchet with 8mm hex socket.
Small but powerful flash light.
Fortunately the procedure for replacing this actuator is much easier than the aforementioned and can be completed in less than an hour.
Procedure:
1. Move the passenger seat as far back as it'll go.
2. Open the glove compartment, empty the contents, push the sides inwards until the rubber stops clear the recess, and allow the glove box to drop all the way down.
3. If you look up behind the center console on the passenger side of the transmission tunnel, you'll see two actuators. The upper actuator operates the defroster vents while the lower actuator operates the temperature blend door.

4. The procedure for removing either of the two actuators is essentially the same. The only difference is that the upper actuator has a swing arm (same part no. as floor/dash vent actuator) with a pin that needs to be engaged in the defroster vent swing arm slot during reinstallation, while the lower actuator just has a small gear that needs to slot into place (Motorcraft part no. YH 1865). You'll need to be lying on your back looking underneath the dash to perform this procedure.
5. Disconnect the wiring harness by pushing in the small tab on the side and gently pulling it out. Move it out of the way.
6. Using your left hand, loosen the two 8mm bolts and remove the actuator from its recess. Note the position of the swing arm as you remove it.
7. Insert the new actuator into its recess ensuring that its swing arm pin is engaged in the defroster vent swing arm slot before manipulating it into its final position.
8. Insert and tighten the two 8mm bolts, and plug in the electrical connector.
9. Restore the glove compartment to its original closed position.
To ensure correct operation of the new actuator, the HVAC system needs to be reset. This step is VERY important so don't skip it.
10. Remove the kick panel in the passenger side footwell to gain access to the smart junction box (SJB). It's only clipped in place so pull carefully and ease it out of the way. You'll need to unclip the front part of the door sill plate first to make it easier.
11. This will be the view of the SJB from the passenger side footwell.

12. The fuse/relay box is at the bottom. After you carefully remove the cover, this will be the view.

13. Use a pair of needle nose pliers to remove the two 5A fuses as indicated by the arrows (fuses no.10 & 12 in diagram). These control the HVAC system and the fuses need to be left out for at least one minute to reset it properly.

14. Reinsert the fuses into their original positions, clip the SJB cover back into place, and reinstall the kick panel.
3. Temperature blend door actuator on passenger side behind the center console (lower) (Motorcraft part no. YH 1865).
The procedure for replacing this actuator is the same as for the defroster vent actuator, but it's much easier to reach without lying on your back facing up in the passenger side footwell.
4. Recirculate vent actuator under glove compartment next to blower motor (Motorcraft part no. YH 1869).
This one is the easiest of all to replace as it's under the dash to the right of the blower motor behind the glove compartment, and access is very good if you lay on your back looking under the dash.

PS: I opened up both of the actuators that I'd removed to perform a post-mortem. Both had a broken plastic gear but since it was a different gear that broke in each actuator, I combined the good bits from both of them to create one good spare.
Last edited:


