DiMora's widened WeldCraft Wheels (Operation Steamroller)

DiMora

More Is Better
Joined
Aug 22, 2010
Posts
971
Reaction score
41
Location
Fayetteville, GA
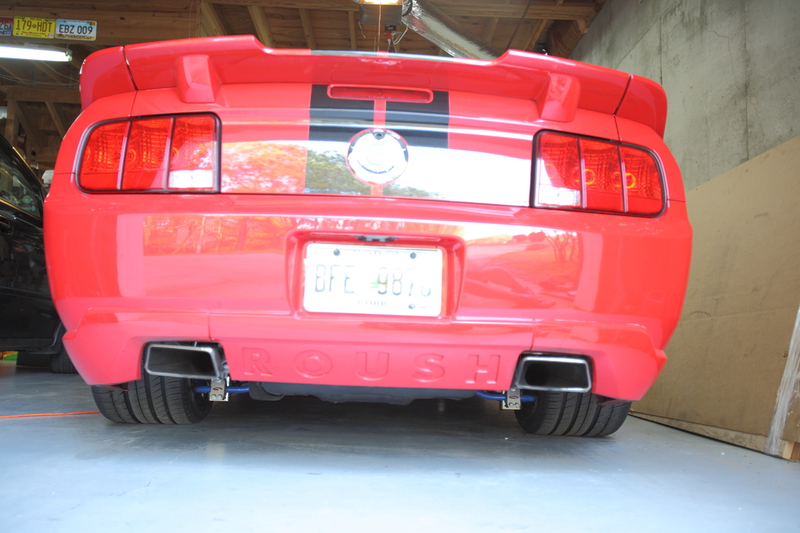
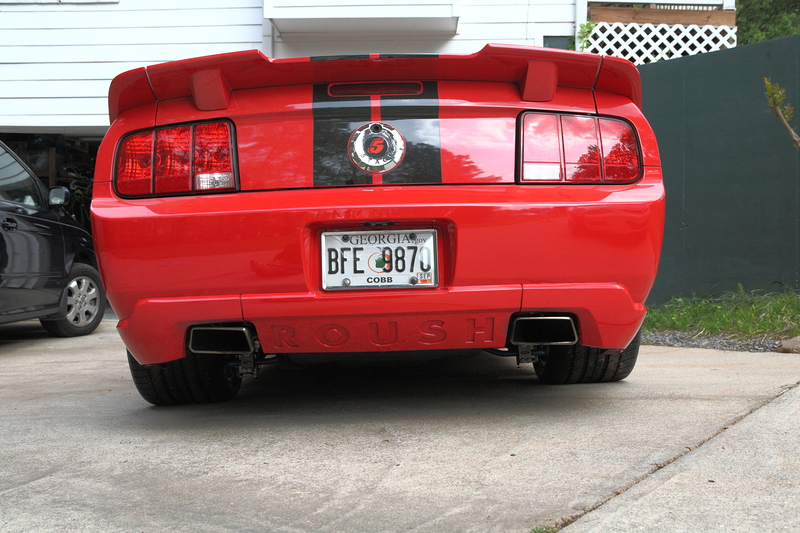
Last year I raced a nasty ZO6 'Vette at a charity drag race at a local 1/8 mile track....I took him off the line, but then my tires broke loose, I pedaled, got back in it and hooked, then I broke loose again going into second.

I decided my next phase of mods on my whip was to try to get more traction. This is a multi-faceted approach; I decided to do three things: Re-locate my battery to the trunk (done; see battery relocation thread), add some wider rubber on the back (this thread) and add a BMR K-member and A Arms (future mod). That plan should lighten the front, add weight to the rear, and improve the overall balance of the car.

The specs on the factory Roush rims for my 2006 were as follows:

18" diameter
10" wide (254 MM)
6.77" backspace (172MM)

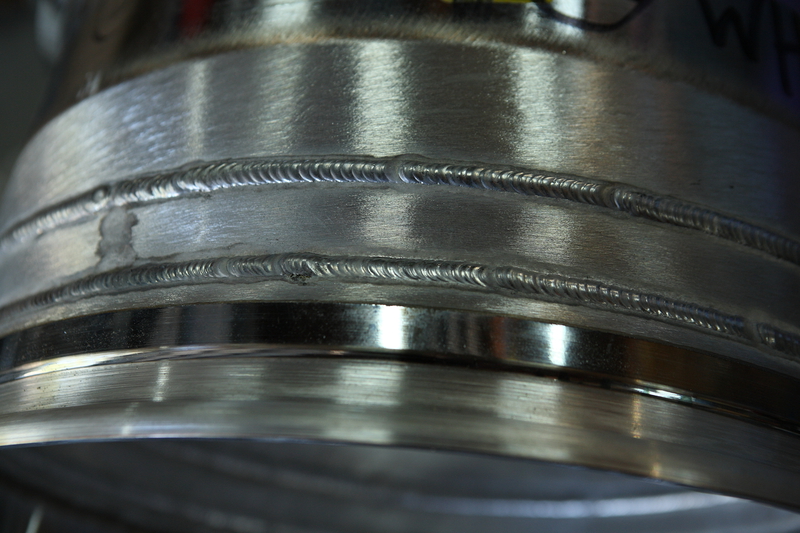
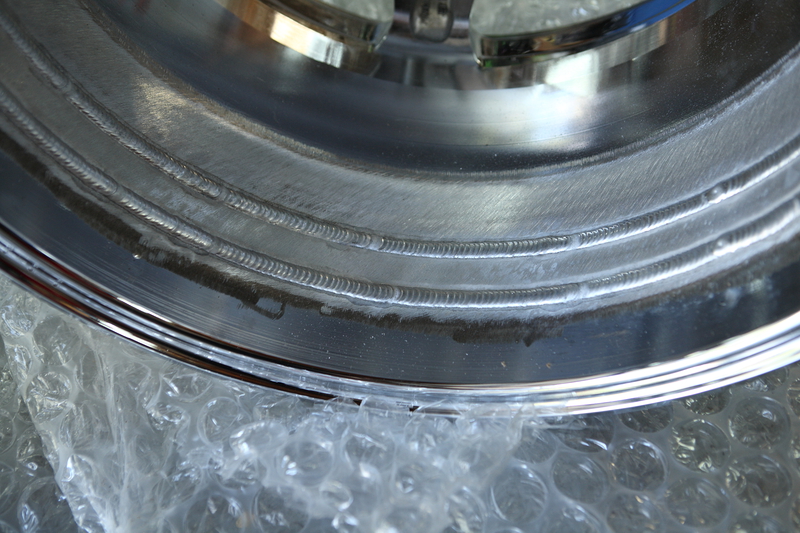
I sent them to James at WeldCraft Wheels in Michigan. They then cut your wheel, add width to your specification, TIG weld it all back together both inside and out, then true it up and balance it to better than OEM specification.

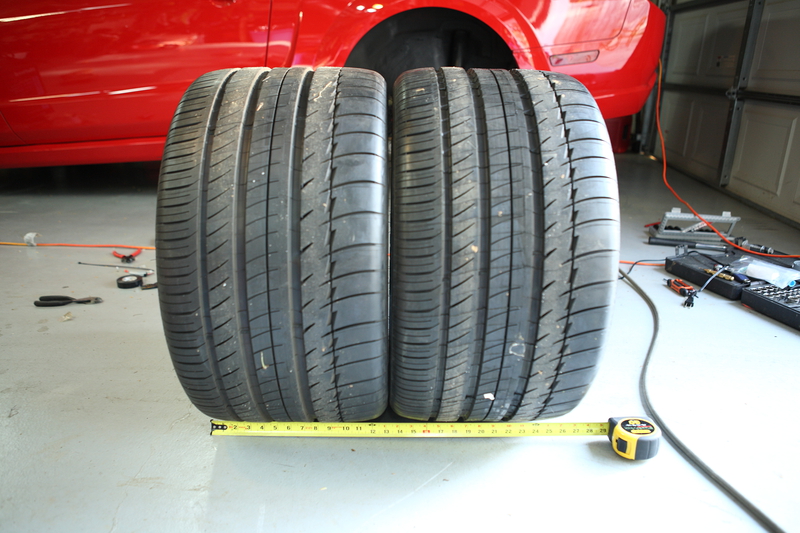
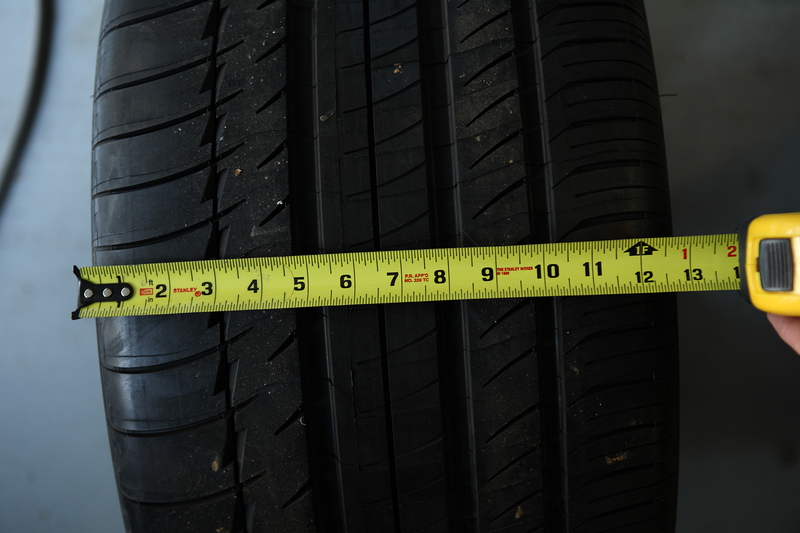
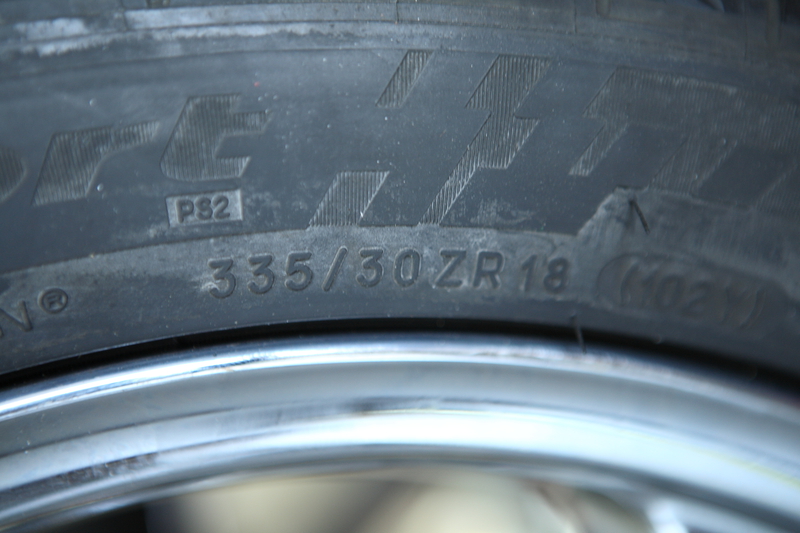
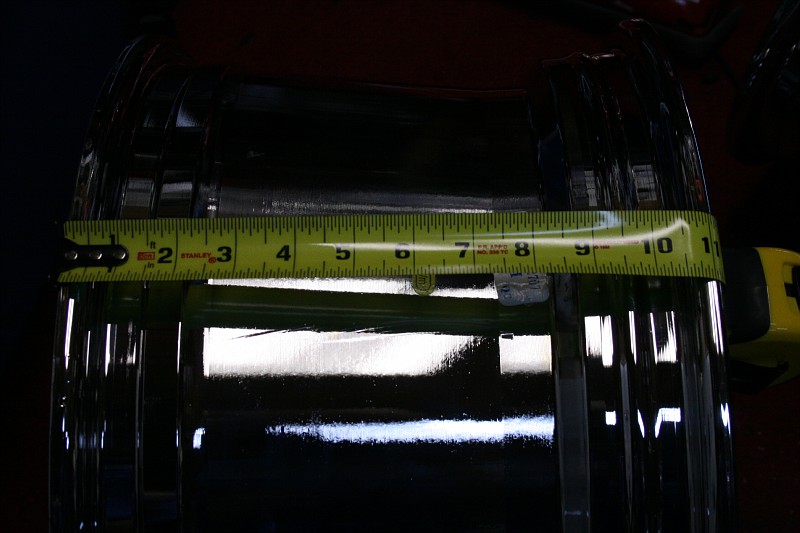
I decided I wanted to go from 10" to 11.5", which would allow the addition of 335 wide rubber on the back of my car.

You lose 1/16" due to the cutting, so my actual tire-mounting width would be 11 7/16", or 290.5MM.

Post-widening, my specs are as follows:
18" diameter, unchanged
62.25 MM offset
11 7/16" wide (290.5MM)
8.2" backspace (208.5 MM)

All my widening was done to the INSIDE of the rim, and I am using NO SPACERS. I will have to drive the car to insure there is no rubbing, but so far it looks good.

I want to add special thanks to two individuals: Justin Starkey at VMP tuning who did this mod on his GT500 and wrote about it; his tips and pictures were very helpful. I also want to thank Zombeast from the Modular Ford forums who made and sold me some bump-stop re-location brackets.

Enough talk, let's get on with it. Stand clear! Steamrolllleeeerrrr coming through!

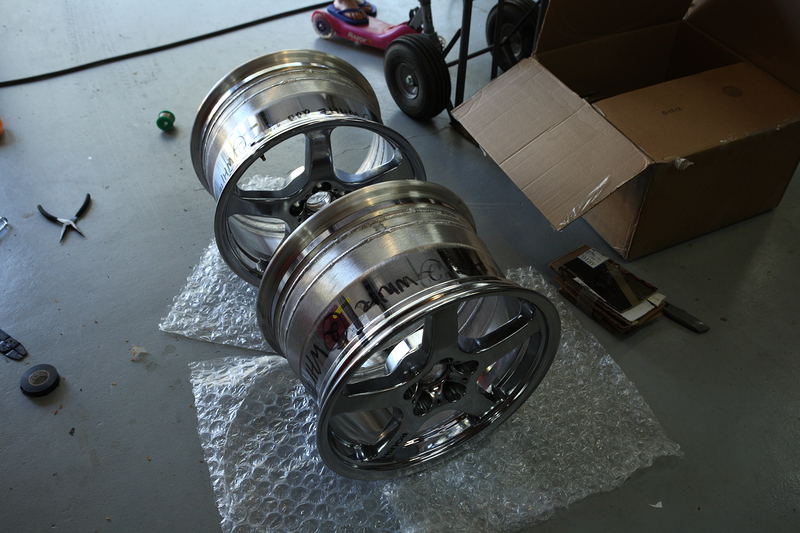
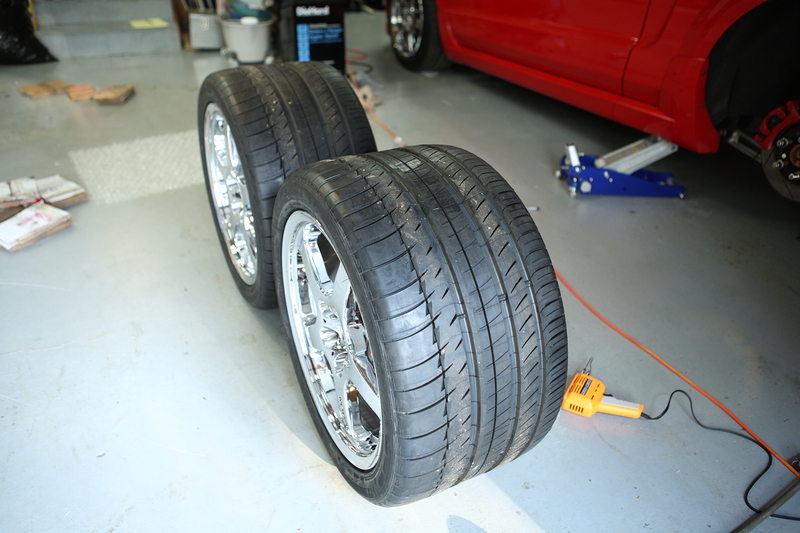
I pulled the wheels off the car and had Discount Tire dismount the rubber, then I cleaned them up:

IMG_6676-vi.jpg


IMG_6670-vi.jpg


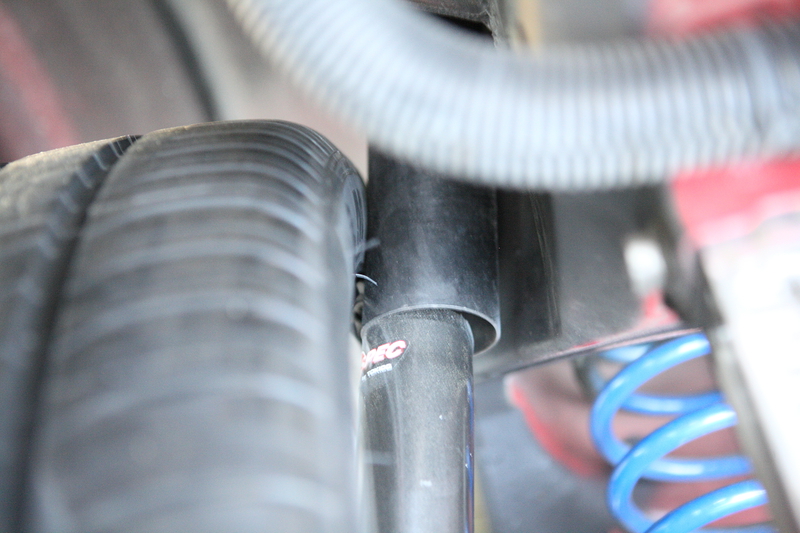
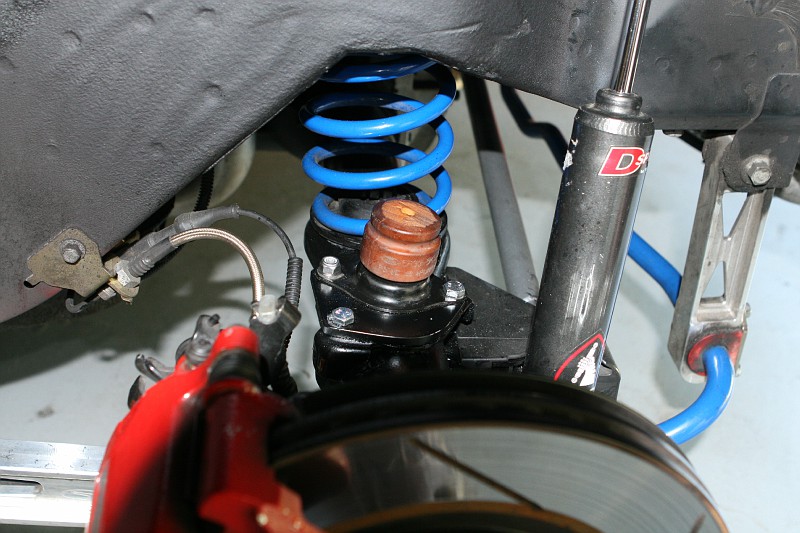
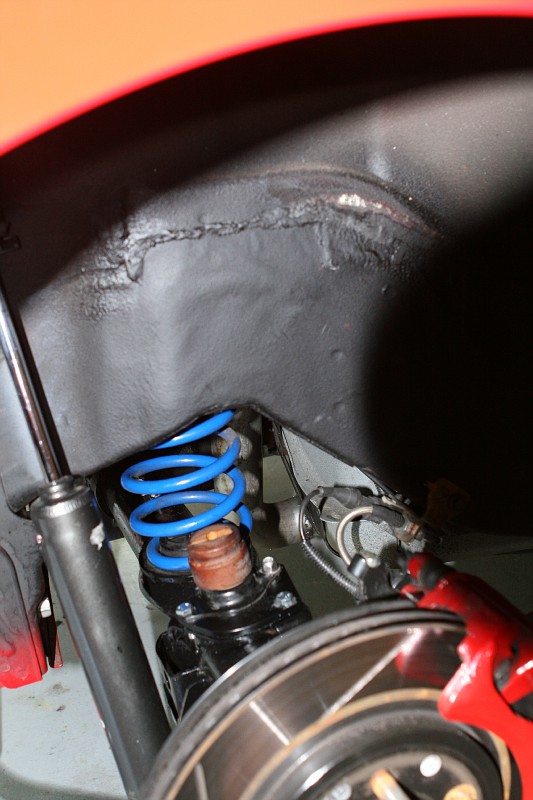
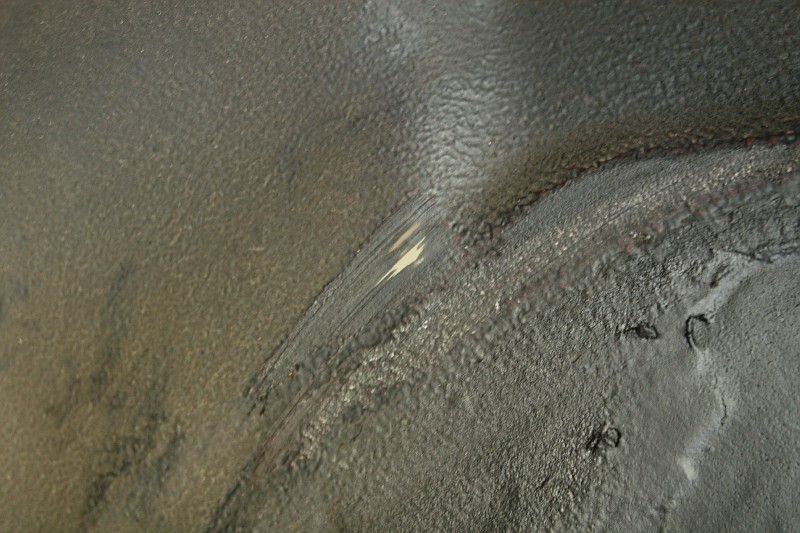
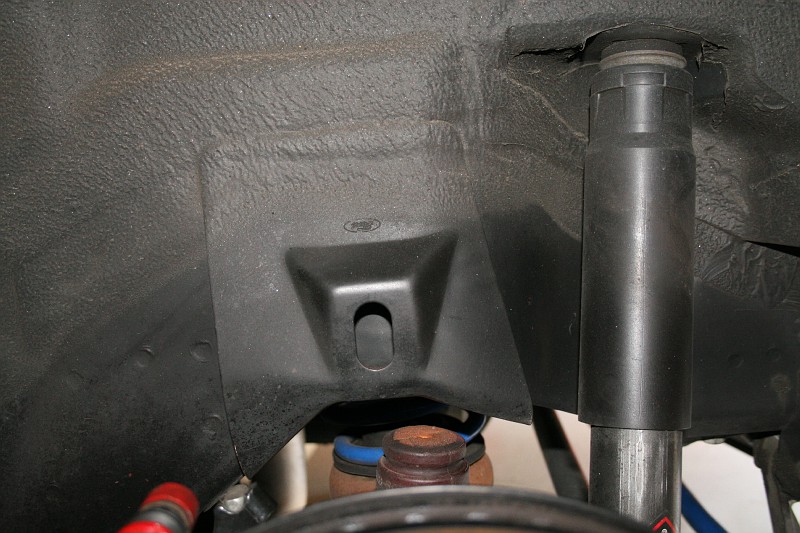
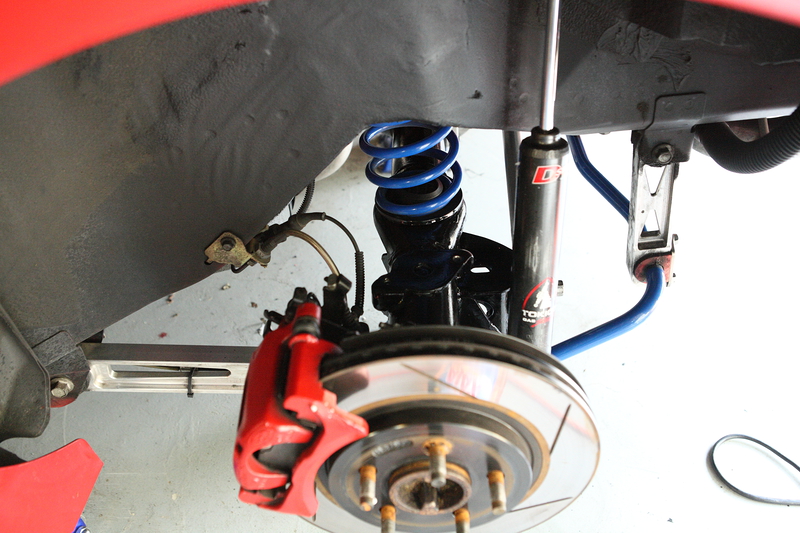
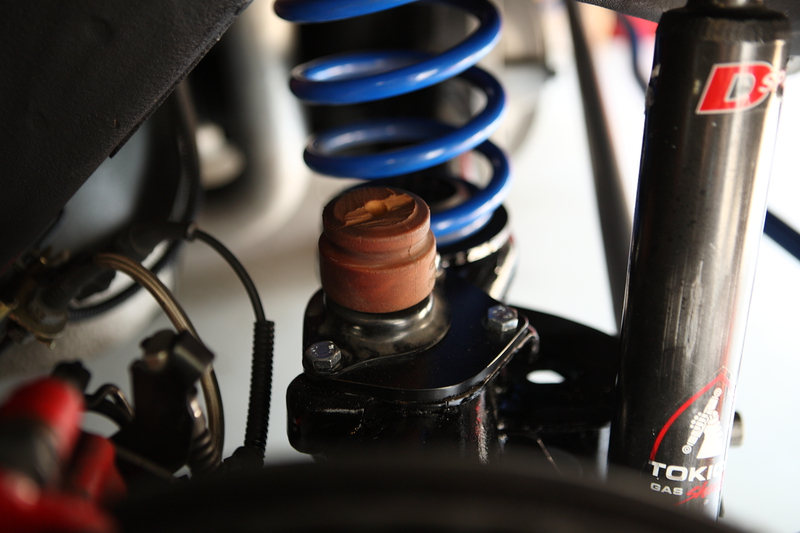
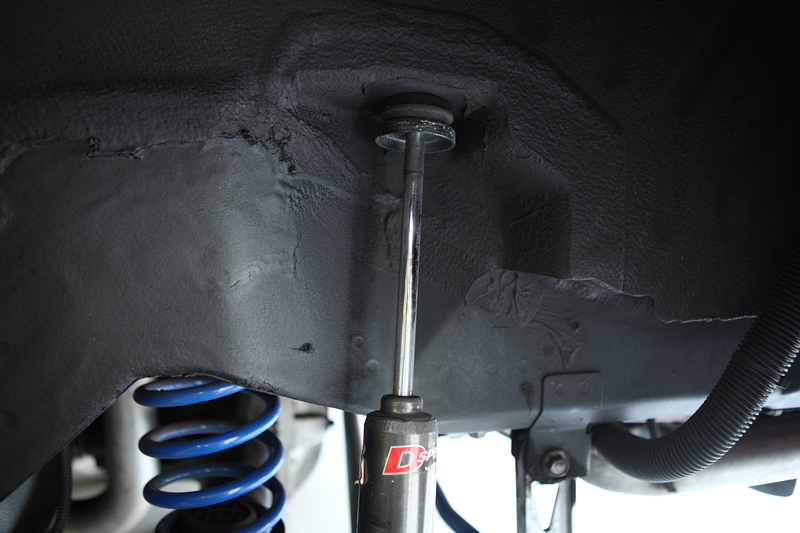
Here is the wheel well as it sits with no steamroller mods. Those are Tokico D-Spec shocks:

IMG_6680-vi.jpg


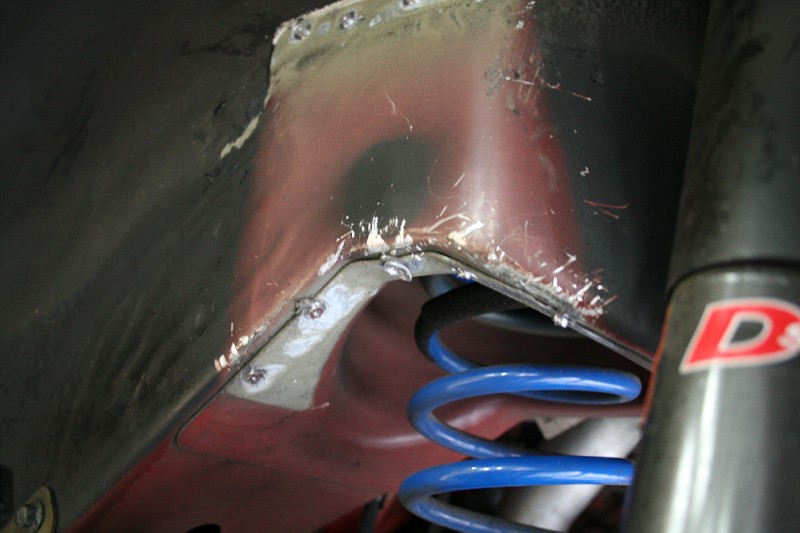
First I scraped away the undercoating that covers the spot-welds on the bump-stop bracket, and then I used two Harbor Freight spot-weld cutting bits to drill out the welds. This process is a bit tricky, as you don't want to go too deep and drill a hole completely through the wheel well, you only want to go deep enough to get through layer one and pry off the bump-stop bracket.

The bump-stop bracket has to be removed and the bump-stops re-located, as they stick out into the wheel well and would hit my new steamrollers.

IMG_6689-vi.jpg


There are some on the underside of the bracket as well. I own a 90 degree angle drill; this task would be impossible without it:

IMG_6694-vi.jpg


TIP if you do this mod: Some guys, I learned in retrospect, simply cut the bottom of the bump-stop bracket flush with the wheel well opening, leaving he bottom spot-welds and very bottom of the bracket intact. This would be much easier. My guidance was based on Justin Starkey's method, and he removed the whole thing, so that is what I did before learning of the other option on another forum.

IMG_6694-vi.jpg


9 welds later (on each side of the car) and these bump-stop brackets were discarded (For those guys who are full of Mustang lore, yes, these are also used to hold the car on the assembly line during production at Ford, but they aren't needed once it is built and off the line other than to hold your bump-stops).

IMG_6695-vi.jpg


With the bracket gone, I MIG welded the circles where the cutter had removed excess metal, then ground them smooth with my air grinder (totally un-necessary, but I'm detail-oriented):

IMG_6700-vi.jpg


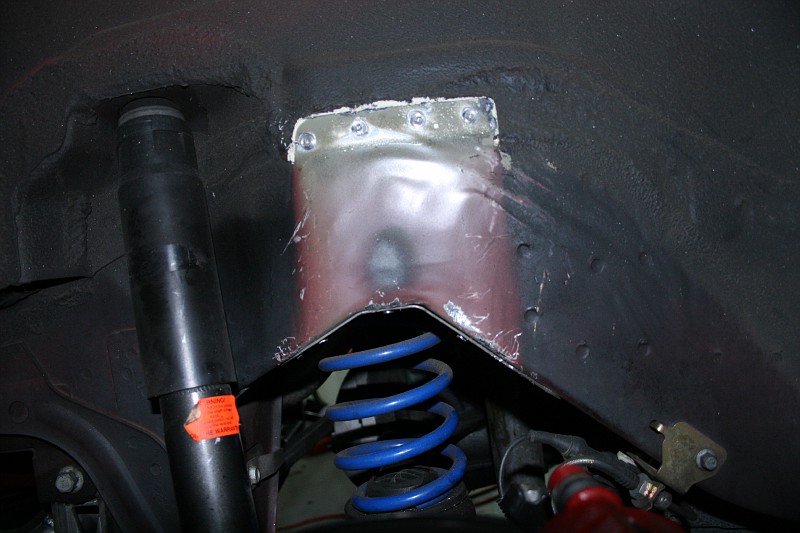
Then I sprayed all the bare metal with Rust-Oleum primer and 3M heavy duty undercoating:

couts_Wheels_GT500FuelPumps103-vi.jpg


Time for shock mods:

Stock:

Scouts_Wheels_GT500FuelPumps75-vi.jpg


Cut off the inboard spacer (I used an air-saw) and move it to the outside, and add a washer to take up the space from the missing metal you cut away. I put the washer on the outside, but inside would add a couple MM more clearance as well. This mod moves the shock inboard just enough to buy you a quarter inch clearance once the steamrollers are installed.

After (Driver's side):

couts_Wheels_GT500FuelPumps104-vi.jpg


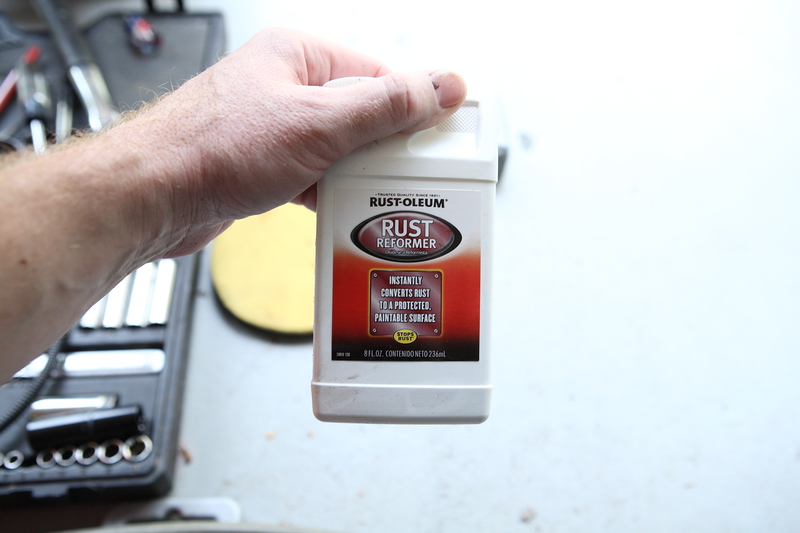
Next, I painted my axle and my new bump-stop brackets. I prepped with Rut-Oleum "Reformer" then painted with Rust-Oleum gloss enamel with a foam brush. Gloss wasn;t my number one choice, I would prefer matte, but it was all Home Depot had and I don't care, you can't see it anyway, I just wanted the rust gone:

Scouts_Wheels_GT500FuelPumps97-vi.jpg


couts_Wheels_GT500FuelPumps100-vi.jpg


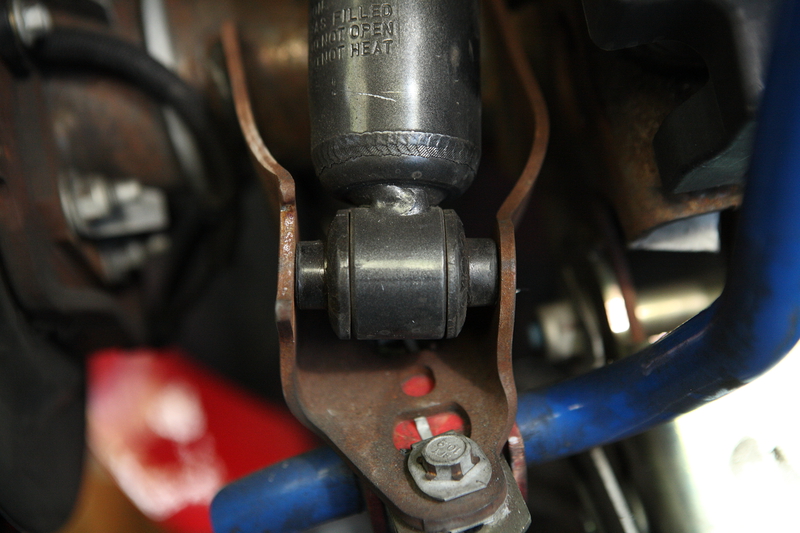
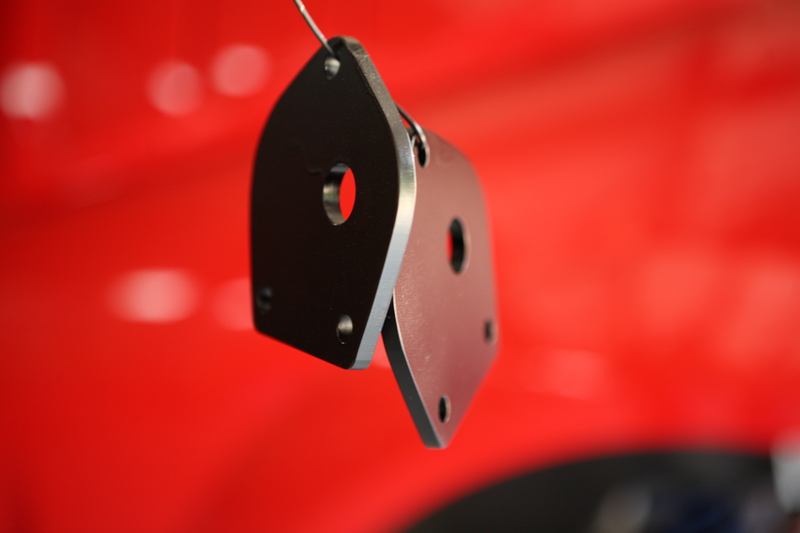
New Zombeast bump-stop relo brackets, primed and painted (they come plain):

couts_Wheels_GT500FuelPumps105-vi.jpg


Mount bump-stops to brackets with one bolt...

couts_Wheels_GT500FuelPumps106-vi.jpg


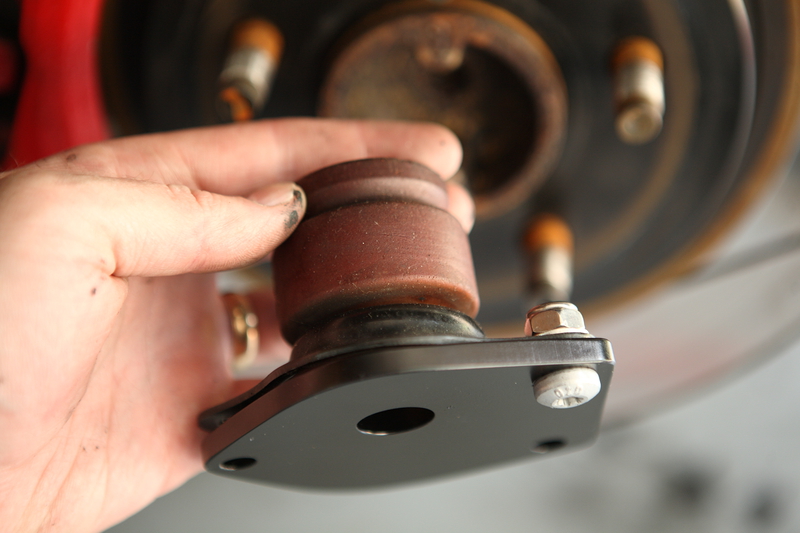
Then mount to car. I replaced the factory self-tapping Torx bolts with some Metric M8x1.25x25MM bolts, as the factory ones were too short:

couts_Wheels_GT500FuelPumps107-vi.jpg


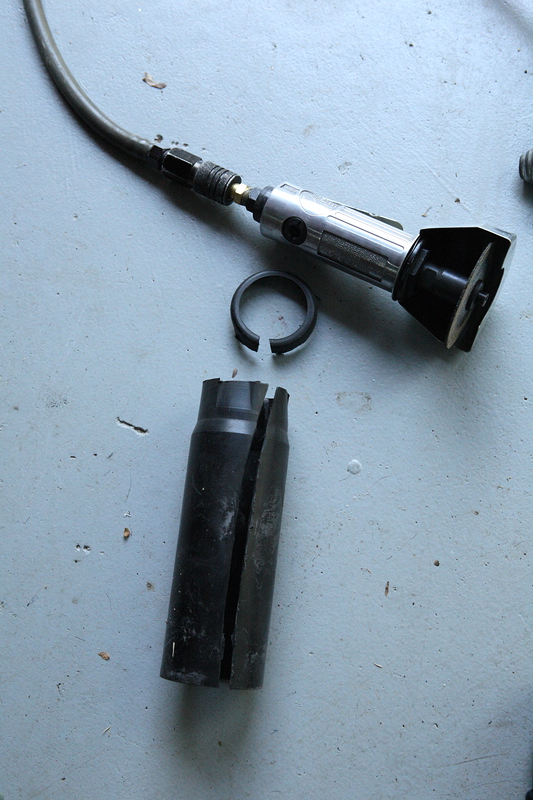
LASTLY, THE DUST-BOOTS ON THE SHOCKS NEED REMOVED. Oops, caps lock. An air-saw worked great; I cut around the top periphery, then did a long vertical cut, and cut off the last little top ring with an X-acto knife:

Scouts_Wheels_GT500FuelPumps95-vi.jpg


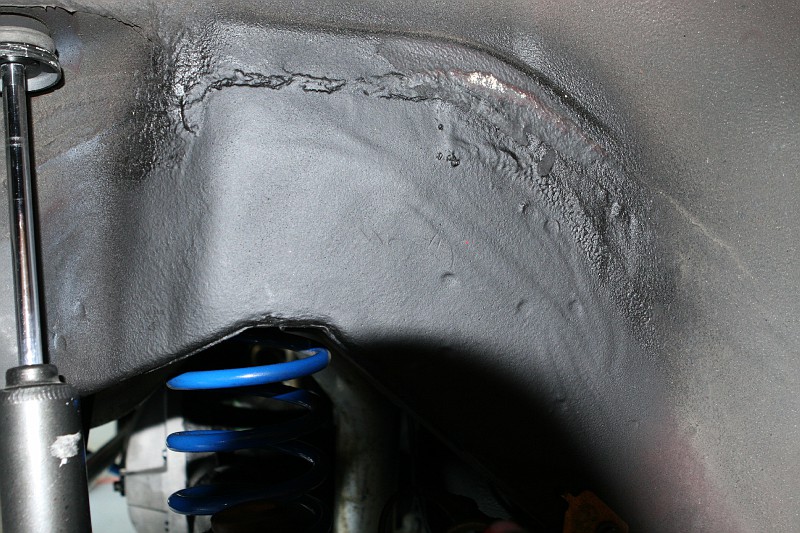
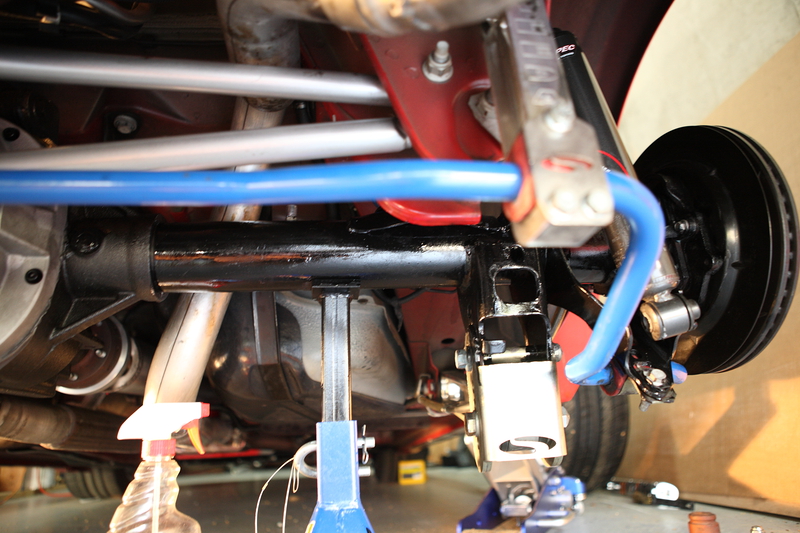
Wheel well mods done and ready for some 'rollers:

Scouts_Wheels_GT500FuelPumps96-vi.jpg


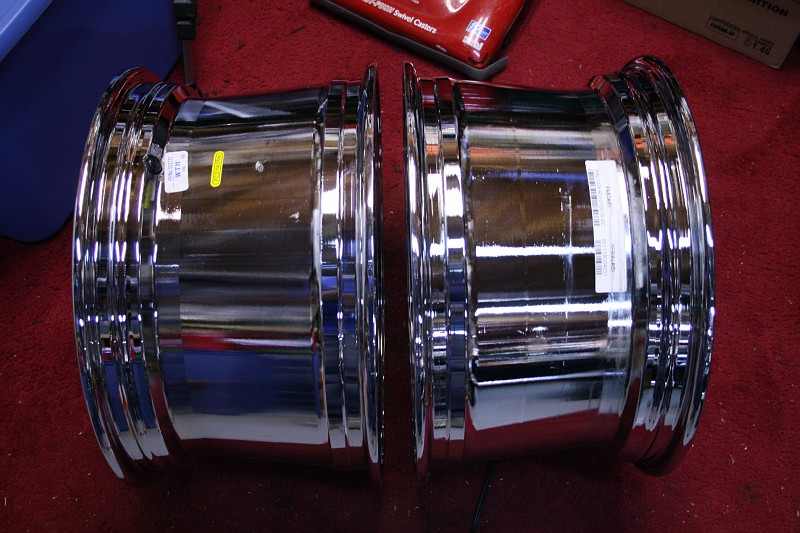
Wait...what is this that the big brown truck has brought me? Could it be?

Scouts_Wheels_GT500FuelPumps76-vi.jpg


Let's see what's inside:

Scouts_Wheels_GT500FuelPumps78-vi.jpg


DiMora

More Is Better
Joined
Aug 22, 2010
Posts
971
Reaction score
41
Location
Fayetteville, GA

Scouts_Wheels_GT500FuelPumps77-vi.jpg


Scouts_Wheels_GT500FuelPumps79-vi.jpg


Scouts_Wheels_GT500FuelPumps80-vi.jpg


For extra money, WeldCraft can grind smooth the welds (and you can re-chrome) but I don't care so I elected to fore go the extra at this point.


Off to discount tire, and back home with some Steamrollers:


Scouts_Wheels_GT500FuelPumps84-vi.jpg


Scouts_Wheels_GT500FuelPumps91-vi.jpg


Scouts_Wheels_GT500FuelPumps87-vi.jpg


BTW, Rubber is Michelin Pilot Sport PS2 335/30 ZR18. Expensive, but I got 24,000 on the last set, and they handle great, and aren't bad at the strip:


Scouts_Wheels_GT500FuelPumps88-vi.jpg


FYI, this is why you have to remove the shock dust-covers:


Scouts_Wheels_GT500FuelPumps94-vi.jpg


After spending some time with the adjustable pan-hard bar (That or a Watts link are an absolute must) I got them centered perfect. Clearance, as you would expect, is absolutely minimal - maybe .25" where the tire is near the wheel well, and the rim has minimal clearance between the inboard lip and the top of the shock, but it all works out.


I'll be monitoring the rim insides and tire insides for rubbing, and if necessary, will add a thin spacer to move the wheels out if necessary, but so far it looks good.


couts_Wheels_GT500FuelPumps129-vi.jpg


couts_Wheels_GT500FuelPumps126-vi.jpg


couts_Wheels_GT500FuelPumps120-vi.jpg


Yeah, I know my exhaust tips are crooked...I need new ends made to mate with my Extremes.


couts_Wheels_GT500FuelPumps117-vi.jpg


I want to make one last point...all these photos have a "skinnying" effect. The tires, in real life, look much wider than I can replicate with my camera. I tried three lenses, I just can't capture the width effect. Go to your car, take out your tape measure, and lay it behind your rear tire and see what just shy of 13" of width looks like, or the next time you see a Corvette ZO6, squat down and look at their rubber, as they roll on 335's as well.


Traction-wise, they still spin, as to be expected with almost 500 RWHP on tap, but not as bad as before. I look forward to more drag racing, and I now have the option of adding 345 M/T ET Streets if I want to get silly!


Shane
 

TexasKyle

D.I.L.L.I.G.A.F
S197 Team Member
Joined
Jun 19, 2007
Posts
3,039
Reaction score
38
Location
Katy, Tx
It looks great. Not that I don't think it's cool and all, but I don't really get it. Not for traction anyway. Cool as hell to be able to drive around with 335s? You bet. Helps with traction? Not economically it doesn't. Why didnt you just put some DRs on the 18x10s and be done with it? I see your relocation brackets and LCAs. That and some DRs should have hooked great at the track.

Just saying that is a lot of time and money invested for traction, when there are far easier ways to get some grip.
 

S197gt07

forum member
Joined
Jul 7, 2010
Posts
4,064
Reaction score
1
Location
Newburyport, MA
First off, great write up man, love the steamroller effect!

But, this whole thing leaves one question in my mind. Why not just get a D/R? I bet a 275-295 DR is going to have a bunch more traction than a 335 street tire. Now, the 345 M/T you mentioned would be another story...

Again, not to take anything away, the car is sick and you should be happy with what you did man, its good work. I just would of thought switching to a DR would of been the 1st choice, then go crazy with some wide meats.

EDIT: It seems I was treed in my opinion. I should get some DR's for next time!
 

TexasKyle

D.I.L.L.I.G.A.F
S197 Team Member
Joined
Jun 19, 2007
Posts
3,039
Reaction score
38
Location
Katy, Tx
First off, great write up man, love the steamroller effect!

But, this whole thing leaves one question in my mind. Why not just get a D/R? I bet a 275-295 DR is going to have a bunch more traction than a 335 street tire. Now, the 345 M/T you mentioned would be another story...

Again, not to take anything away, the car is sick and you should be happy with what you did man, its good work. I just would of thought switching to a DR would of been the 1st choice, then go crazy with some wide meats.

EDIT: It seems I was treed in my opinion. I should get some DR's for next time!


LoL

Yea, we are both saying the same thing. It looks great, and it was a nice write up. I am just very curious how this was needed instead of just going with a DR. Regardless, I love some meat on the back of our cars, and that looks pretty damn hawt.
 

JEWC_Motorsports

S197 Junkie
S197 Team Member
Joined
Aug 22, 2010
Posts
20,475
Reaction score
1,597
Location
Texas
Im curious as to the weight difference between the tires before and after. It may feel like there is more traction but that could be because of the additional rotational mass actually making your car slower. Hopefully that makes sense.
 

Racingtheburg

forum member
Joined
Aug 30, 2008
Posts
2,827
Reaction score
1
Im curious as to the weight difference between the tires before and after. It may feel like there is more traction but that could be because of the additional rotational mass actually making your car slower. Hopefully that makes sense.
Good point.

Alot of people ask me 275 or 295 or bigger. I always like a 275 tire, if the 275x class can get cars with over 1000hp down the track on a 275 there is no point for me to go bigger unless for looks. A 15 inch drag radial wheel and tire combo would be MUCH cheaper and lighter for sure. But not sure of the whole point of the OP's venture.

Here is the thing. . . If you dont have a big sidewall tire you will need a wide tire to get traction. So maybe the OP wanted a small sidewall and keep with the bigger wheel and get more traction with the wider tire.
 

DiMora

More Is Better
Joined
Aug 22, 2010
Posts
971
Reaction score
41
Location
Fayetteville, GA
It looks great. Not that I don't think it's cool and all, but I don't really get it. Not for traction anyway. Cool as hell to be able to drive around with 335s? You bet. Helps with traction? Not economically it doesn't. Why didnt you just put some DRs on the 18x10s and be done with it? I see your relocation brackets and LCAs. That and some DRs should have hooked great at the track.

Just saying that is a lot of time and money invested for traction, when there are far easier ways to get some grip.

Drag radials don't corner. I want my car to be a King of The Street type build...good cornering, braking, acceleration, etc. This mod is not just about grip. It is also about looks while gaining traction.

We can discuss all day about footprint, and believe me, I have read tons of info on it...the theory is that a wider tire actually costs you traction, since you have widened the contact patch (which shortens the contact patch front-to-rear), and also distributed the weight of the car acting on a given tire over a different surface area...and if you CAN increase contact patch, you have less PSI per inch of rubber due to the bigger area.

For a brain teaser, think about a dragster. What if it ran on bicycle tires? What if the tires were ten feet tall and skinny? What if they were ten feet wide, but only 20" total in diameter? As you know, on a dragster, you want a tall sidewall that can twist a bit so as to have a recoil effect, they need to be big to manage heat, and you want a large surface area to allow as much tire rubber to prepped surface contact area as possible, thus the width, and you want a tall tire to elongate the tire contact patch as much as possible.

Keep in mind, I now have room to run a M/T E/T Street 345 drag radial if I so desire.

The car had Michelin 275's on it before...and my initial impression is that I do indeed have more grip, with the same brand / design of tires installed (Michelin Pilot Sport PS/2)

I got 24,000 miles out of my last set of Michelins. A set of drag radials probably won'tt make it to 12,000.

First off, great write up man, love the steamroller effect!

But, this whole thing leaves one question in my mind. Why not just get a D/R? I bet a 275-295 DR is going to have a bunch more traction than a 335 street tire. Now, the 345 M/T you mentioned would be another story...

Again, not to take anything away, the car is sick and you should be happy with what you did man, its good work. I just would of thought switching to a DR would of been the 1st choice, then go crazy with some wide meats.

EDIT: It seems I was treed in my opinion. I should get some DR's for next time!

LOL...treed. Response is really the same as above.

1) Car is a street car first
2) I want 20,000 miles plus out of a set of tires.
3) Chicks dig wide tires.

Your homework assignment: Post up what size and brand of tires a Corvette ZR-1 rolls on.

Good point.

Alot of people ask me 275 or 295 or bigger. I always like a 275 tire, if the 275x class can get cars with over 1000hp down the track on a 275 there is no point for me to go bigger unless for looks. A 15 inch drag radial wheel and tire combo would be MUCH cheaper and lighter for sure. But not sure of the whole point of the OP's venture.

Here is the thing. . . If you dont have a big sidewall tire you will need a wide tire to get traction. So maybe the OP wanted a small sidewall and keep with the bigger wheel and get more traction with the wider tire.

That would be a cornering fail

You guys are all 100% correct in your assessment if the car's primary purpose was to get down the 1320 as fast as possible.

My intro sentence in my OP certainly would lead you to believe this car is all about drag racing, but it is not...it is a street car, but if I can dispatch a Government Motors 'Vette every now and then, both of us on street tires, then all is well.

Thanks for the compliments!
 
Last edited:

Racingtheburg

forum member
Joined
Aug 30, 2008
Posts
2,827
Reaction score
1
Nice write up and install!!!! Forgot to mention! lol

Can you show more pictures with camera further back? What about fronts whats the plan?

Also how much did it cost to widen the wheels?
 

DiMora

More Is Better
Joined
Aug 22, 2010
Posts
971
Reaction score
41
Location
Fayetteville, GA
Im curious as to the weight difference between the tires before and after. It may feel like there is more traction but that could be because of the additional rotational mass actually making your car slower. Hopefully that makes sense.

Great point, makes lots of sense.

I know what you mean, and I also understand unsprung weight. I own a superbike with forged wheels and Ohlins suspension.

I will get you a weight later next week. Fronts are un-modified and still running 275's, so I can weigh them vs. one of these steam-rollers.

Eventually, I'll go down the quarter mile again and report back to you the results, but for now the butt-dyno is happy, as is the visual moto-porn-o-meter.

Nice write up and install!!!! Forgot to mention! lol

Can you show more pictures with camera further back? What about fronts whats the plan?

Also how much did it cost to widen the wheels?

Will take more pics later on.

Front rims / tires stay as-is: Roush 10" rims with 275/40 rubber as it came from the Roush factory. Only additional front mods besides the battery relocation to trunk will be a full BMR K-member and A-arm setup - maybe this fall.

Roushes are designed to handle / corner very aggressively, thus the 275's all around.

Cost: $50 shipping to WeldCraft, $40 return, wheels $225 each, so $540 total, plus tires, of course. 5 week turn time.
 
Last edited by a moderator:

stkjock

---- Madmin ----
Staff member
Administrator
Super Moderator
S197 Team Member
Joined
Jul 10, 2007
Posts
40,243
Reaction score
3,159
Location
Long Island NY
11.5" it's in the first post


Nice write up! I bet the wheels and tires weigh close to 75# each

Only a 26" tall tire huh?
 
Last edited:

TexasKyle

D.I.L.L.I.G.A.F
S197 Team Member
Joined
Jun 19, 2007
Posts
3,039
Reaction score
38
Location
Katy, Tx
Ah, see you never said anything about corning. Your entire first post was all about drag racing a vette and loosing traction. Hence, why some of use were going down the DR path.

I see where you're coming from now, with your further explanation.

Like I said, it looks great regardless of the reasons you did it, and the write up is very detailed.
 

Racingtheburg

forum member
Joined
Aug 30, 2008
Posts
2,827
Reaction score
1
11.5" it's in the first post


Nice write up! I bet the wheels and tires weigh close to 75# each

Only a 26" tall tire huh?
Correct but I didnt know if it changed due to when he measured the wheel was bigger than 10 inches in his picture.
 

DiMora

More Is Better
Joined
Aug 22, 2010
Posts
971
Reaction score
41
Location
Fayetteville, GA
Correct but I didnt know if it changed due to when he measured the wheel was bigger than 10 inches in his picture.

10" was the original rim mount width for the tire bead, I am now at 11.5" rim bead mount width minus a smidge for material cut away (1/16").

That width will allow a wide variety of tires - Nitto, BFG, the Michelins I have now, M/T, and more.

I may eventually go with a taller rear tire. A 335/35 or 335/40 would be sweet, but I don't know if anyone makes them. I need to do more homework.

M/T makes an E/T Street II in P345/35R18 but again, I don't want to sacrifice cornering or have ridiculously short wear mileage.

Ah, see you never said anything about corning. Your entire first post was all about drag racing a vette and loosing traction. Hence, why some of use were going down the DR path.

I see where you're coming from now, with your further explanation.

Like I said, it looks great regardless of the reasons you did it, and the write up is very detailed.

Yeah, my intro was mis-leading.

I'll get you guys a weight soon.

Shane
 
Last edited by a moderator:

TexasKyle

D.I.L.L.I.G.A.F
S197 Team Member
Joined
Jun 19, 2007
Posts
3,039
Reaction score
38
Location
Katy, Tx
I found some 345/35/18, but they weren't street tires. Choices seem to be pretty thin beyond 335/35 in an 18" street tire.
 

908ssp

forum member
Joined
May 22, 2010
Posts
1,123
Reaction score
0
Location
Michigan
You can't be too rich...You can't be too thin and you can't have too wide rear tire.

Love your tires width. I'd like to find a 335/35-20 for my car then I'd go through the work too.
 

DiMora

More Is Better
Joined
Aug 22, 2010
Posts
971
Reaction score
41
Location
Fayetteville, GA
You can't be too rich...You can't be too thin and you can't have too wide rear tire.

Love your tires width. I'd like to find a 335/35-20 for my car then I'd go through the work too.

I like the way you think!

Update on two areas:

1) On my relocation brackets, I was informed by Zombeast that if I put the "flat side" of his brackets toward the front of the car, I will get even better bump-stop location in relation to the arch under the car. I just finished re-orienting them. Zombeast now includes installation instructions with his brackets; mine were an early set without instructions and I eye-balled them and got it wrong. They now look as follows:

Driver's side:

IMG_6891-vi.jpg


Passenger side:

IMG_6894-vi.jpg


2) Just to make sure all-is-well, I planned on pulling both wheels after only a few miles to look for any signs of rubbing, so re-orienting the Zombeast bracketrs was a great excuse to check everything out anyway. I have what appears to be very low-speed rubbing - most likely as the rear axle articulates coming out of my very steep driveway (that I have to take at a severe angle to avoid scraping). The evidence of this is apparent on the raised lettering on the inside of the tires, and also on the undercoating on the top-forward section of the wheel well.

The fix should be simple - I am going to add very thin wheel spacers to both sides. Right now I am trying to decide on whether to go 1/8" or 1/4". Hmmmm. UPR makes them, as well as some on Ebay (both billet designs) They are ~ $30.00-$40.00 and are hub-centric. My concern with 1/4" is whether or not I'll need to add some longer studs. I probably should add some upgraded studs anyway, so I'll be sure to add studs that have the extra length to compensate for the thin spacers. My neighbor has both 1/8" and 1/4" Mustang spacers so he is going to bring some over for a test-fit in a couple hours so I can get it all sorted.

Here is the rubbing area:

Driver's side:

IMG_6888-vi.jpg


IMG_6889-vi.jpg


Passenger side:

IMG_6896-vi.jpg


You can see it is minor - the tires are basically just taking out the undercoating in those areas, but long-term I don't want any inner tire wear or heat damage rings, so thin spacers will be added. I'll report back with an update once I get it 100% sorted to my satisfaction.
 

JEWC_Motorsports

S197 Junkie
S197 Team Member
Joined
Aug 22, 2010
Posts
20,475
Reaction score
1,597
Location
Texas
Instead of spacers couldnt you use a BFH and massage the area for the extra clearance needed? then just recoat it when finished.
 

Latest posts

Support us!

Support Us - Become A Supporting Member Today!

Click Here For Details

Sponsor Links

Banner image
Back
Top