Faulty wiring harness?

Jivesh

Junior Member
Joined
Dec 17, 2021
Posts
10
Reaction score
1
Hi everyone,

I'm having some really weird lighting issues with the car. The car is a Ford Mustang V8 2005.

Heres the issue:
- Initially, both headlamps were not working properly (they'll light up but were extremely dim).
- Whenever I try to use the highbeams, the fuse instantly blows.
- Fog lights work perfectly fine.

Things I've tried
- Replacing fuse, relay = no changes, highbeam fuse instantly blows when I turn on highbeams.
- Replace bulbs = no changes
- Replace bulb holder/socket = left light now works fine, right light now lights up for half a second and instantly goes off.
- Cleaning the ground near the radiator cover = no changes

One weird thing I noticed was that when I remove the ground the radiator cover, both lights immediately works BUT there is a high pitch whine from the light switch inside the cabin.

I'm guessing there is something wrong with the ground? Would I need to change the entire wiring harness? I've been trying to find the part number for it but I'm based in Germany and spare parts are really limited here for the S197 models.

Hopefully someone would be able to shed some light on this! (pun intended)

Happy New Year!

Regards,
Jiv
 

Jivesh

Junior Member
Joined
Dec 17, 2021
Posts
10
Reaction score
1
Hi 86GT351,

Thanks for the quick reply! Is there anyway to verify if its the Smart Junction Box or the harness? I just realized that whenever I move the cables, the Daytime Running Lights would flicker. Also, would the SJB be the issue if both lights work well when the ground near the radiator is disconnected from the car?

Stupid question, but the SJB refers to only the fuse box inside the car (passenger side) and not the fuse box in the engine compartment right?


Edit: The wires are quite frayed and I believe the previous owner had to install some custom/diy Daytime running lights.
 

86GT351

forum member
Joined
Nov 14, 2010
Posts
6,035
Reaction score
904
Location
Sunny South Florida
Hi 86GT351,

Thanks for the quick reply! Is there anyway to verify if its the Smart Junction Box or the harness? I just realized that whenever I move the cables, the Daytime Running Lights would flicker. Also, would the SJB be the issue if both lights work well when the ground near the radiator is disconnected from the car?

Stupid question, but the SJB refers to only the fuse box inside the car (passenger side) and not the fuse box in the engine compartment right?


Edit: The wires are quite frayed and I believe the previous owner had to install some custom/diy Daytime running lights.
The Smart Junction Box is the one inside behind the passenger kick panel. If you are finding frayed wiring, I would address that and see what happens. It needs to be fixed anyhow. All Lighting goes through the SJB. As you can see they all have there own wiring connections.
 

Jivesh

Junior Member
Joined
Dec 17, 2021
Posts
10
Reaction score
1
thank you! I'll remove the SJB and check it out this week.

Do you know which connector on the SJB handles the front headlamps + highbeams?

Also, is the ground located on the left of the radiator cover the only ground? (Planning on cleaning all grounds to see if it helps).

Regards,
 

stkjock

---- Madmin ----
Staff member
Administrator
Super Moderator
S197 Team Member
Joined
Jul 10, 2007
Posts
40,242
Reaction score
3,157
Location
Long Island NY
check for wetness in that area as well, notorious issue in the S197 model, clogged drains cause water in the SJB area and passenger footwell.
 

DieHarder

Senior Member
Joined
Nov 9, 2019
Posts
1,467
Reaction score
758
Hi 86GT351,

Thanks for the quick reply! Is there anyway to verify if its the Smart Junction Box or the harness? I just realized that whenever I move the cables, the Daytime Running Lights would flicker. Also, would the SJB be the issue if both lights work well when the ground near the radiator is disconnected from the car?

Stupid question, but the SJB refers to only the fuse box inside the car (passenger side) and not the fuse box in the engine compartment right?

Edit: The wires are quite frayed and I believe the previous owner had to install some custom/diy Daytime running lights.


Ground issues are notorious in these cars. Disconnect and clean the main grounds and all ground connections associated with the lighting circuits. Your goal is to determine if power/grounds are good or not for the lighting circuits.... If your symptoms change when you move wiring I would start there. You'll want to verify that the wiring that is frayed isn't shorting out power. Determine what it's supposed to be for and connects to; then do point to point (end to end) continuity checks (pwr off; VOM on ohms) and between wires (to determine if any shorts exist). If you have a test light it's fairly simple to follow power (lights on) in the lighting circuits. Refer to the wiring diagrams and half step (i.e. check for pwr/gnd at the half way point in the circuit). When you can't follow it, trace it back to where power/ground originates and determine why. To check grounds simply do continuity checks on each of the ground lines associated with lighting. You want to see less than an ohm for a straight ground. Good luck.

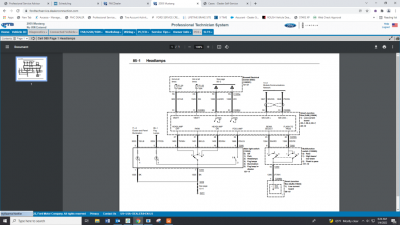
Here's some online electrical diagrams for your model year.
Headlamps: https://iihs.net/fsm/?d=40&f=Headlamps. Autolamps.pdf
Grounds: https://iihs.net/fsm/?d=40&f=Grounds.pdf
 

Jivesh

Junior Member
Joined
Dec 17, 2021
Posts
10
Reaction score
1
check for wetness in that area as well, notorious issue in the S197 model, clogged drains cause water in the SJB area and passenger footwell.

Thank you! Will do! As far as I know, that part has never been wet (no wetness in the passenger area etc). But would you know which connector on the SJB goes to the headlamp? I'll remove the SJB this weekend and inspect it for corrosion etc.

@DieHarder, thanks so much!
I've zero experience with electrical wiring and am learning as I go.

1) https://www.amazon.de/Kabelfinder-K...7&hvtargid=pla-1411484910916&psc=1&th=1&psc=1

Would this be sufficient for continuity checks?

The diagram is... are there any spots on the car that are used for grounds for the headlamps (other than the one beside the radiator cover?)
I've been trying to find the exact spots for grounds on the car.
 

DieHarder

Senior Member
Joined
Nov 9, 2019
Posts
1,467
Reaction score
758
Thank you! Will do! As far as I know, that part has never been wet (no wetness in the passenger area etc). But would you know which connector on the SJB goes to the headlamp? I'll remove the SJB this weekend and inspect it for corrosion etc.

@DieHarder, thanks so much!
I've zero experience with electrical wiring and am learning as I go.

1) https://www.amazon.de/Kabelfinder-K...7&hvtargid=pla-1411484910916&psc=1&th=1&psc=1

Would this be sufficient for continuity checks?

The diagram is... are there any spots on the car that are used for grounds for the headlamps (other than the one beside the radiator cover?)
I've been trying to find the exact spots for grounds on the car.

That's a cable checker - we used to call them mice and were used w/telephone handsets to chase/ID phone cabling. That's Not what you're after. You need a Volt/Ohm meter. Might as well get one with current capability. Several on feebay.

Here's a search example: https://www.ebay.com/sch/i.html?_fr...m570.l1311&_nkw=volt-+ohm+multimeter&_sacat=0

"C" stands for connector. i.e. C205 is the connector on the back of the main light switch. https://iihs.net/fsm/?d=40&f=Headlamps. Autolamps.pdf&p=2
"G" stands for ground. G100 and G201 are the primary grounds but understand that other grounds can have an affect on other circuits since it's a shared ground system. That's why is so important to ensure the big/primary grounds (i.e. Battery/engine/frame/starter grounds) are clean and in good condition.
"S" stands for splice. The grounds are often spliced (soldered) together at various points or within the wiring harness. When a ground is not at "ground potential"/0 ohms when doing continuity checks you need to determine why. i.e. Open, corrosion/resistance/etc.. Whatever it is. Fix it.

To read electrical diagrams start by reading the online manual: https://iihs.net/fsm/?d=1 Unfortunately, the information is not presented in the same order as the paper (wiring diagrams) manual. I've seen other examples on the forum. Perhaps someone will post up those links. Here's one I found: https://www.manualslib.com/manual/809931/Ford-Mustang-2005.html?page=2#manual

IMO your best bet would be to find a paper version (wiring diagrams manual) and buy it but they're hard to find these days. Just happened to see this one if you're interested: https://www.ebay.com/itm/1527824643...piO6mcYogrZTY%3D|clp:2334524|tkp:BFBMqL2PpsVf

Component location views: https://iihs.net/fsm/?d=40&f=Component Location Views.pdf
Ground location index: https://iihs.net/fsm/?d=40&f=Ground Location Index.pdf

Also several examples on YouTube that may help with troubleshooting. This one explains the basics:

You can troubleshoot yourself but you're going to have to have a VOM and/or test light. The easiest approach I've found is to think about your electrical system like plumbing. i.e. Voltage = water pressure; Current = water flow; Resistance = size of pipe (only inverse - 0 ohms is a huge pipe = dead short; while 10,000 - 100,000 ohms is a straw/then needle in comparison). The wires themselves are simply pipes that carry water (current) that supply individual circuits. The bigger the wire/cable; the more current it can carry. The rest of the items (relays, switches, diodes, etc.. are just like valves that direct where the current/water can flow when it's active/turned on. Learning the basics can be a challenge but again YouTube is your friend.

Troubleshooting basics:
Automotive electrical fundamentals:
Basics: https://www.youtube.com/results?search_query=electrical+troubleshooting+basics+part+1

If you're truly stuck might be worth taking it into a dealer unless you can find someone local who is good at troubleshooting electrical systems. The dealer of course has some super expensive test equipment that should allow them to narrow the issue down within 15-30 minutes so might be worth the expense.

Again, good luck.
 

TomL

Junior Member
Joined
Feb 11, 2020
Posts
10
Reaction score
3
Thought I might add my 2 cents worth.
If your blowing a fuse you have a short in that circuit.
Frayed wiring needs to be fixed.
Moving wiring harness and lights flickers is probably bad ground(s) which will also end up causing
other issues.
Northerners have more problems from corrosion if they drive on salted roads which can cause all kinds of problems

Tips: Get a Ford Wiring Service Manual and learn how to use it, it can be a little confusing
Get an incandescent test light
Get a small round telescoping mirror, for checking under and around wiring harness
Look for locations where the wires or harness might be rubbing against metal
Google Scanner Danner and watch his videos, you will learn how to troubleshoot electrical
and PCM problems/codes the right way, and NOT be a parts changer
Also, us Ford owners are lucky we can use Forscan which is free. You just need a quality OBD2
adapter(Forscan recommended) and laptop. No need for an expensive scan tool

For some issues, you will need an oscilloscope to connect to a laptop. Refer to Scanner Danner videos as mentioned above
It can be an inexpensive 2 channel scope, I recommend a $130+/- 2 channel Picoscope because of their software
and you don't need their automotive scopes. A 2 channel scope will do most things we need. You will also need some cables which will add to the cost. This will pay for itself if you get one and learn how to use it.

A couple of other good youtube channels are: South Main Auto and Pine Hollow Auto Diagnostics

I bought my 05 Mustang 2 years ago and wanted to learn how to fix PCM problems myself because I have always been a diy person. Too many technicians these days are just parts changers, even at the dealers. I have learned a ton of info. from these 3 youtube channels I mentioned and I thought I would pass that along to those that really want to learn how to fix their car themselves.

Happy New Year to all!!!
Tom
 

Jivesh

Junior Member
Joined
Dec 17, 2021
Posts
10
Reaction score
1
Thank you so much DieHarder and Tom!

Really appreciate it! Was worried I'll screw things up and make it worse! I've changed clutches, brake calipers etc, but never dared to play with the wiring except for installing a head unit.

This is going to be really fun! I'll watch the videos and do more research before trying anything this weekend!

Incidentally, I was quoted about 630euros for the SJB, about $710 usd. That seems a bit steep, I was expecting around 400 usd tops.

Regarding bringing the car to a dealer, its kinda a no-go. I spoke to two local dealers in Frankfurt and they cant do it. I'll have to go to a dealer quite a bit further away and my car isnt roadworthy at the moment.

Thanks again! I'll give it a shot this weekend.
 

Lime1Gt

Member
Joined
Oct 10, 2008
Posts
64
Reaction score
15
Does the fuse still blow when HI beams turned On? What number and amp rating is the fuse and is it in the "BEC (bussed electrical center) Engine compartment fuse box". SJB (smart junction box it located in rt. lower kick panel.
Where are the frayed wires, in the engine compartment? If the wiring strands have been cut they need to be repaired to carry current load.
For your information, the ground, G100, on the right front radiator cradle has a splice, S112, in the harness going back about a foot toward the BEC.
The SJB provides the ground for the HI Beam Relay pull-in coil when the Hi-Beam switch is activated but the power to the Hi-Beam comes directly from Fuse F1.50 15amp to pin 30 of relay out pin 87 of relay. 87 feeds pin F7 and F6 of Connector C1035c of the BEC then heads toward the headlight sockets.
There are a couple of grounds on a brace behind the glove box. One of them is for the headlight switch. There are a few grounds close to the SJB. In the engine compartment the grounds should be visible. Just follow the main harnesses until takeout wires are found and follow them to see if they're grounded anywhere on the body.
 

Jivesh

Junior Member
Joined
Dec 17, 2021
Posts
10
Reaction score
1
Does the fuse still blow when HI beams turned On? What number and amp rating is the fuse and is it in the "BEC (bussed electrical center) Engine compartment fuse box". SJB (smart junction box it located in rt. lower kick panel.
Where are the frayed wires, in the engine compartment? If the wiring strands have been cut they need to be repaired to carry current load.
For your information, the ground, G100, on the right front radiator cradle has a splice, S112, in the harness going back about a foot toward the BEC.
The SJB provides the ground for the HI Beam Relay pull-in coil when the Hi-Beam switch is activated but the power to the Hi-Beam comes directly from Fuse F1.50 15amp to pin 30 of relay out pin 87 of relay. 87 feeds pin F7 and F6 of Connector C1035c of the BEC then heads toward the headlight sockets.
There are a couple of grounds on a brace behind the glove box. One of them is for the headlight switch. There are a few grounds close to the SJB. In the engine compartment the grounds should be visible. Just follow the main harnesses until takeout wires are found and follow them to see if they're grounded anywhere on the body.


Hi! Apologies for the late response! This is extremely extremely helpful! I just realized something!

My lights stopped working when I was working behind the glovebox! It was a 3-4 day job and I wasnt paying much attention, but I moved some wiring behind the glove box for the Radio (GPS, Wifi cables)!

Is there any picture or something for me to check where exactly the ground is behind the glovebox?

The highbeams still instantly blows the second I turn them on. The fuses are 15amps (blue).
Also, is there a chance the relays being installed upside down is a problem? I'll try to take a picture of the Fuse box tomorrow.
 

Juice

forum member
Joined
Aug 24, 2017
Posts
4,622
Reaction score
1,904
Blowing fuse, dead short.
What I do to find a short:
Attach a 12v lightbulb to a blown fuse. I use a blown fuse to make this "test device" just for convenience.
I use a turn signal bulb for this, I want to draw some current.
Put this "fuse" I made into the slot where the fuse blows.
Power up the circuit, now my "fuse" is on full bright, as there is a short. You would turn on your high beams here.
Start wiggling the harness, unplugging connectors of the circuit (if any).
When my "fuse" turns off or even changes brightness, I have located the trouble spot.
 

Jivesh

Junior Member
Joined
Dec 17, 2021
Posts
10
Reaction score
1
Hi Juice,

Thank you. Do you know where the grounds are for the headlights located in the glovebox? I really think Lime1Gt hit the nail on the head with that. I was messing around with some wires behind the glovebox when I installed the radio.

If anyone could tell me where the grounds are behind the glovebox, I'll get it checked out.
 

DieHarder

Senior Member
Joined
Nov 9, 2019
Posts
1,467
Reaction score
758
Hi Juice,

Thank you. Do you know where the grounds are for the headlights located in the glovebox? I really think Lime1Gt hit the nail on the head with that. I was messing around with some wires behind the glovebox when I installed the radio.

If anyone could tell me where the grounds are behind the glovebox, I'll get it checked out.

Jivesh, it's not your grounds that are at fault here. It's one of the power lines is shorting to ground in the wrong place. A dead short means there is current flowing along an unintended path with no resistance or impedance.... (i.e. wire insulation is likely damaged somewhere and live wires are touching another wire or a body ground. The fuse blows to protect the circuit and keep the wires/circuit from being further damaged). So, it's likely that when you were messing with the wiring for the stereo you may have accidentally cut one or more wires for the high beam on a sharp piece of metal (it's easy, I've cut myself working behind the dash before) which is likely shorting 12v to a metal ground or another wire. Either way, something in the high beam circuit is finding a direct path to ground.

Since the fuse blows for the high beam every time you energize/turn the circuit on you already know exactly which line/s are involved (high beam). Now you need to isolate the circuit to determine what that problem is and where it's located. Since you suspect that you may have damaged some of the wiring behind the glove box I suggest a visual inspection first checking for anything obvious. Also I would suggest if you tie-wrapped any wiring to any of the metal behind the dash for the stereo remove it, separate the wiring; inspect for damage (and recheck the circuit). If you find cut/nicked/frayed tape/wiring note the colors of the lines involved and compare to them to the wiring diagram. (If you see cuts in the tape but unsure of damage you may need to strip some of the tape off to better inspect the wiring). If you find damaged lines and they're the same color code as the high beam wiring you've likely found your culprit; fix/repair (re-insulate the wiring w/electrical tape or similar); reinstall a fuse and retest the circuit.

If you don't find obvious damage anywhere near where you were working you can try troubleshooting.

Electrical troubleshooting - Tools needed: 12v Test light; VOM; lights; small mirror.

1) Review the wiring diagrams for the circuit (Wiring Diagrams Manual 85-1/2. https://iihs.net/fsm/?d=40&f=Headlamps. Autolamps.pdf&p=1 and https://iihs.net/fsm/?d=40&f=Headlamps. Autolamps.pdf&p=2

2) There are also Diagnosis and Testing procedures in the Workshop Manual; Section 417-01- pg1 thru pg 12 with Pinpoint tests that you can follow to troubleshoot the circuit. Start at https://iihs.net/fsm/?d=389&f=Headlamps.pdf&p=18 (Unfortunately, the online manuals here are not in order so you'll have to hunt around to follow the circuit pinpoint tests).

3) Follow the Pinpoint testing if you don't find obvious damage behind the dash; that should help you narrow down the area at fault.

Good luck.
 

Jivesh

Junior Member
Joined
Dec 17, 2021
Posts
10
Reaction score
1
@Everyone,

Thanks SO much for all the help. This is going to sound REALLY dumb, but it started working when I cut off some wires.

Removed the radio, center console, glove box, radiator cover etc to trace the short, nothing.

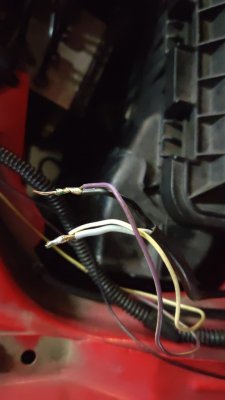
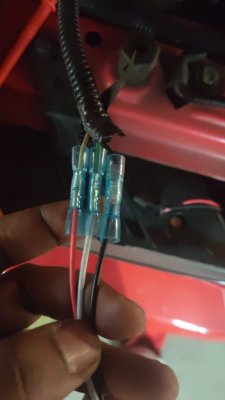
A friend pointed out that it doesnt make sense for the Driver's light socket to have to wires going into one socket. (Picture 1)

Cut out the wire and now everything seems fine! Fuse no longer blows when I turn on the highbeam!

Finally! Thanks again everyone, was quoted 1500 euros to diagnose the problem and change the SJB. I'll have to trace the wire tomorrow and see where it leads to. Since its connected to the headlamps, I'm guessing the previous owner had some underbody leds or something.

Incidentally, while testing the wiring and bulbs, I left the bulb running for 30 seconds - 1 minute (to make sure it doesnt short out again) with the bulb on top of the housing. 1 minute later, the plastic on the housing started smoking and melting. Is it normal for Halogen bulbs to run this hot?


Thanks everyone for all the guidance!

Picture 1.jpeg PIcture 2.jpeg
 

Lime1Gt

Member
Joined
Oct 10, 2008
Posts
64
Reaction score
15
Good for you. It's amazing what people do to their vehicles when wiring. If those wires were left open in the salt belt who knows how long it would take for corrosion to creep through the casings. Yes, Halogens get very hot. Sorry I missed your reply earlier. Can post ground picture for dash if you need it.
 

DieHarder

Senior Member
Joined
Nov 9, 2019
Posts
1,467
Reaction score
758
@Everyone,

Thanks SO much for all the help. This is going to sound REALLY dumb, but it started working when I cut off some wires.

Removed the radio, center console, glove box, radiator cover etc to trace the short, nothing.

A friend pointed out that it doesnt make sense for the Driver's light socket to have to wires going into one socket. (Picture 1)

Cut out the wire and now everything seems fine! Fuse no longer blows when I turn on the highbeam!

Finally! Thanks again everyone, was quoted 1500 euros to diagnose the problem and change the SJB. I'll have to trace the wire tomorrow and see where it leads to. Since its connected to the headlamps, I'm guessing the previous owner had some underbody leds or something.

Incidentally, while testing the wiring and bulbs, I left the bulb running for 30 seconds - 1 minute (to make sure it doesnt short out again) with the bulb on top of the housing. 1 minute later, the plastic on the housing started smoking and melting. Is it normal for Halogen bulbs to run this hot?


Thanks everyone for all the guidance!

View attachment 81229 View attachment 81231

The plastic housing can melt. Reinstall the bulb back into the light housing. The reflector that the bulb installs into is made of powdered metal and I think chromed by a PVD process and since it's metal it acts as a heat sink of sorts and should be fine. Not sure what the issue is with dealers quoting thousands of dollars for simple troubleshooting these days. Must have something to do with where you're located and availability (or lack thereof) of parts. Need to trace where those wires you cut off are going to and determine what they are for. Obviously, they have something to do with the lighting circuits. Until you do it's a good idea to tape them up so they don't short out. Glad it worked out.
 

Jivesh

Junior Member
Joined
Dec 17, 2021
Posts
10
Reaction score
1
Thanks again everyone.

@Lime1Gt, No worries! I found the grounds! Removed the glove box and center console.

@DieHarder, yup, I'm based in Frankfurt, Germany and parts here are insanely overpriced.

Just real quick, I'm trying to confirm I've not messed up the lowbeam and highbeam wires.

Passenger Side
Low Beam - White/Yellow
High Beam - Green?

Driver's Side
Low Beam - White/Yellow
High Beam - Purple?

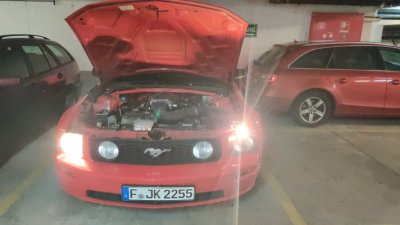
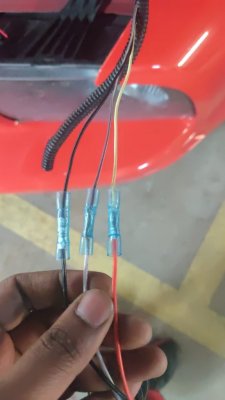
I think I might have messed up the Driver's side?Lights - Drivers Side.jpeg Lights - Passenger Side.jpegConnector.jpg

On the connector's side, I believe White = Highbeam and Red = Lowbeam
 
Last edited:

Support us!

Support Us - Become A Supporting Member Today!

Click Here For Details

Sponsor Links

Banner image
Back
Top