2011 shifter from mgw close to completion...some specs and info>>

NCStangs

Junior Member
Joined
Dec 28, 2011
Posts
21
Reaction score
0
Location
Fairview, NC
While installing the boot, it seems to be extremely cramped in the back and it barely creates a seal in front because it seems like it just can't reach. Anyone else have that problem?

inb4inuendos :naughty1:

Yes, I feel mine is same as you describe. A firm tug will not dislodge it, so I am pretty sure it is on correctly, but barely seals up front. I took it off/put it back on several times, same deal.
 

MGW

Member
Official Vendor
Joined
Apr 13, 2010
Posts
169
Reaction score
0
Mine was installed today, shifting is night and day difference. The noise however is quite louder then stock, you can hear everything going on in the tranny. Annoying more then anything, but I'm sure I will get over it.

you DEF dont have the boot installed right if its annoying . i have installed over 20 of these so far in my shop and all are just about same as stock.

here are some VERY useful tips all you guys should try...

when you put the boot on you MUST lower the rear bushing bracket almost completely down and make sure the boot flares out perfectly underneath. if it is bunched up you will need to lower the back and just keep pushing from the top until you get it to "pop" into place all around.

there should be NO sealing issues .i have done this hundreds of times and yes it can be a pain but it works if done right.

...........................................

also take some of that foil type dynamat that we include and put it in the following places...

1. between the rear bushing bracket and the underside of the floorpan

2. a small strip on the support arm and the linakge arm of your tranny.

3. a rectangular pad on the bottom of the lower base or on the heat shield face if you have it installed.

i'm telling you guys it will not be loud if you follow these tips.

george
 

cgibs89

Stickers add HP brah
Joined
Nov 1, 2011
Posts
403
Reaction score
0
Exactly what I was about to do tonight, unbolt the bracket to lower it. It's definitely bunching up leaving it bolted in place.
 

KonaGT

forum member
Joined
Nov 28, 2010
Posts
214
Reaction score
0
Sorry if this has been answered before, either MGW or other users can maybe answer it for me.

If I order the shifter do I get billed right away or when it ships?
 

blackgt87

forum member
Joined
Oct 11, 2011
Posts
469
Reaction score
1
Sorry if this has been answered before, either MGW or other users can maybe answer it for me.

If I order the shifter do I get billed right away or when it ships?

I ordered mine today they said when it ships. I probably won't get one until mid April :(

Least its snowing lol
 

Phuck Phace

forum member
Joined
Mar 2, 2012
Posts
1,531
Reaction score
0
Location
Dallas
I ordered mine today too, didn't get a delivery time frame but I don't care, it will be worth the wait.
 

NealAtTheWheel

forum member
Joined
Sep 7, 2011
Posts
125
Reaction score
0
This shifter is by FAR the nicest shifter I have ever had the pleasure of owning! I was fortunate enough to be local, and George installed it himself. What a class act, the shop, staff, and product! I am grinning ear-to-ear when shifting, it's just so much more mechanical and "real" feeling than the stock one. I feel like I'm connected to the car now. GREAT product, and GREAT service!
 

J.Kidd

forum member
Joined
Jun 24, 2010
Posts
327
Reaction score
15
Location
Suffield, CT
Bit the bullet and just ordered one. Only been researching this shifter for the past year(+). ;)

I knew that if/when I did get a shifter, this one was far above any others in consideration based on the engineering and complete construction...very well thought out and put together. The stock shifter, for the most part, was decent (compared to the wet noodle that came stock with my '92 Mustang) but there have been a couple instances where I felt I was pushing or leaning on the plastic pieces a bit too much (too much flex) trying to find a gear. It seems as though with this shifter, I'll either be going in to gear or I will not be - no more vagueness. We'll see. Looking forward to installing this!
 

hireman

forum member
Joined
Dec 7, 2010
Posts
61
Reaction score
0
Hey guys....got one, brand new in the box I am listing under classifieds in just a few minutes....fwiw.

well I thought I was...for some reason it will not let me post in classifieds???? PM me for link on SVT's site
save some cash and get it now.
 
Last edited:

BlackDragon

Large Member
Joined
Apr 6, 2011
Posts
384
Reaction score
0
Location
Bronx, NY
you DEF dont have the boot installed right if its annoying . i have installed over 20 of these so far in my shop and all are just about same as stock.

here are some VERY useful tips all you guys should try...

when you put the boot on you MUST lower the rear bushing bracket almost completely down and make sure the boot flares out perfectly underneath. if it is bunched up you will need to lower the back and just keep pushing from the top until you get it to "pop" into place all around.

there should be NO sealing issues .i have done this hundreds of times and yes it can be a pain but it works if done right.

...........................................

also take some of that foil type dynamat that we include and put it in the following places...

1. between the rear bushing bracket and the underside of the floorpan

2. a small strip on the support arm and the linakge arm of your tranny.

3. a rectangular pad on the bottom of the lower base or on the heat shield face if you have it installed.

i'm telling you guys it will not be loud if you follow these tips.

george

George, any way you can post up pictures of this? Or are these points in the install videos? At least points 2 and 3 as 1 is easy to understand...
 

Black 5.0

forum member
Joined
Jul 21, 2011
Posts
243
Reaction score
0
Wow! Did the install of my MGW yesterday and what a job it turned out to be. As a former and now, retired mechanic, I noted things I could have done differently to speed up the install. First of all, I probably took longer than most to install this thing because I did it on jack stands that could have been adusted higher for more clearance if the jack stands were a little larger. As it is, I adjusted them as high as I dare which only allowed about a foot of room above to work with. That, coupled with the fact that I ain't no tiny person, made things a little tight. Even at that, had I pulled the drive shaft, the space above would have not been a factor. But, then, your talking about removing that damn truck like drive shaft with the carrier bearing.

Obviously, I didn't do that which made things a little more difficult. First of all, the space above the drive shaft is limited and tight. Once you get the lower assembly loose, it needs to be pulled out of the shifter 'hole' from above. Then the fun begins. Let me note that you will spend as much time under the car as in the cab because of the lower assembly. It gets installed from under the car and with the drive shaft in the way and the way the MGW lower is designed with the now extended studs, putting the assembly together around the selecter arm which now have the MGW bushings installed on it and then installing the cover was, to say the least a chore all because of the drive shaft. Wtih the studs installed on the main body of the lower assembly, little room to maneuver and trying to keep the selecter rod in place, it was fairly difficult but, can be done with patience. Once the cover was on, I screwed on a couple of nuts to hold it together and went to work on attaching it to the mounting bar. This was kind of a pain again because of space and the added obstalcle of poor visiblity. Now that the lower box is installed, it was time to install the rest of the screws. With driveshaft in place, you really need a 1/2 inch ratcheting wrench or at least, a 1/4 inch ratchet and 1/2 inch 1/4 shallow socket to tighten the screws above the drive shaft. Once you have ALL the screws tightened on the lower assembly, your pretty much done working on the underneath side of the car. Installing the shifter itself is pretty straight forward and follows the instructions fairly well.

I also installed the optional heat shield and it went fairly smoothly with little problem.

The bottom line to all this is, while they have instructions for install included and on-line, you will not be using some of their methods, especially, putting the lower assembly together outside the vehicle. The front mounting bolt for the lower box bracket is pretty much barried and would require you to lower the rear tranny mount to get to it. Not recommended.

Anyhoo, the shifter has a definite difference and is way more precise than the stock one. I gaurantee you won't be disappointed with this shifter. Good luck
 

devildog1679

forum member
Joined
Sep 19, 2011
Posts
378
Reaction score
0
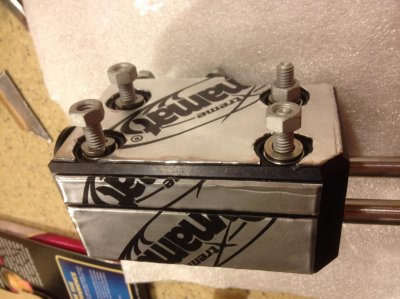
Dynomat

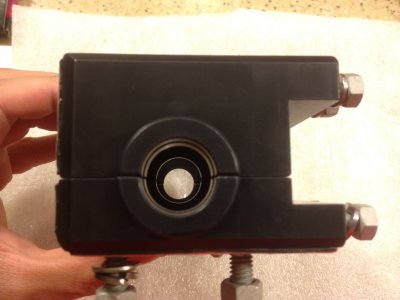
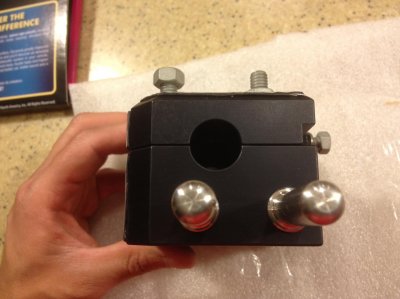
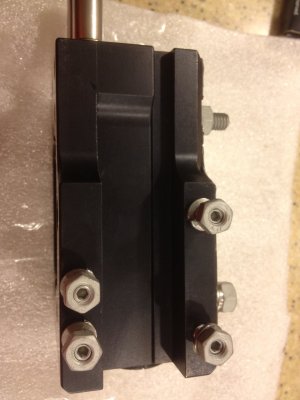
Installing mine tomorrow, so today I prepped it to get it ready. I added some dynomat to the clamshell (pic 1) in order to aid reduction in NVH. I'm wondering if I can add any to the areas in pics 2,3,4? I'm also adding some to the top and underside of the tranny tunnel.
MGW 1.jpg

MGW 2.JPG

MGW 3.jpg

MGW 4.JPG
 

Black 5.0

forum member
Joined
Jul 21, 2011
Posts
243
Reaction score
0
I used the dyna mat like was done in the video. However, I had no noise from that area before the install. It seems that the actual shifts are a bit noiser now with the MGW installed but, not in a bad way IMO. So, adding the dyna mat to the clamshell may be helpful in noise reduction. You will not be disappointed in the operation of this shifter as it is so precise. I am so happy that a company like MGW went 'the extra mile' to put out a product like this. Truly impresive!
 

devildog1679

forum member
Joined
Sep 19, 2011
Posts
378
Reaction score
0
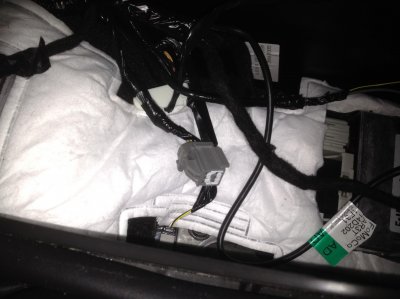
Just finished the install, took 3 hours but the boot actually only took 5 minutes. I was shocked, guess I was just lucky. I however have one question, I have one grey plug that I can't seem to find a connector for it. I don't remember disconnecting it. I have a GT premium. Any ideas? Its not the ambient lighting, could it be an extra one?

Feels great with a slight increase in tranny noise. Best performance mod so far with seats a close second.

MGW Plug.jpg
 

yellowrubiu

Junior Member
Joined
Sep 7, 2010
Posts
34
Reaction score
0
I have the same thing in mine, also a premium. It was not connected to anything when I took the center console appart.
 

cgibs89

Stickers add HP brah
Joined
Nov 1, 2011
Posts
403
Reaction score
0
I believe it's the harness for the "hill assist" button on the autos. Obviously it isn't needed for us. I had it too.
 

Wingspan

forum member
Joined
Aug 21, 2011
Posts
219
Reaction score
0
The bottom line to all this is, while they have instructions for install included and on-line, you will not be using some of their methods, especially, putting the lower assembly together outside the vehicle. The front mounting bolt for the lower box bracket is pretty much barried and would require you to lower the rear tranny mount to get to it. Not recommended.

I think you misunderstood part of the video/instructions. MGW's vids showed the lower box assembly outside the car only because it was easier to show the assembly process (this is stated in the video). You were supposed to assemble the box under/inside the car, and that is how the written instructions read. :)
 

Black 5.0

forum member
Joined
Jul 21, 2011
Posts
243
Reaction score
0
No, no misunderstanding at all. I was just pointing out that it would be futal to do the lower box outside of the car because of how difficult it would be to remove the whole assembly from the car. Also, I understand they were just showing it outside to make it easier to see what they were doing. At anyrate, glad you had no problems with the install.
 

Latest posts

Support us!

Support Us - Become A Supporting Member Today!

Click Here For Details

Sponsor Links

Banner image
Back
Top