Powered by Ford DOB Build Thread 2013

Powered by Ford

forum member
Joined
Jan 27, 2011
Posts
1,143
Reaction score
1
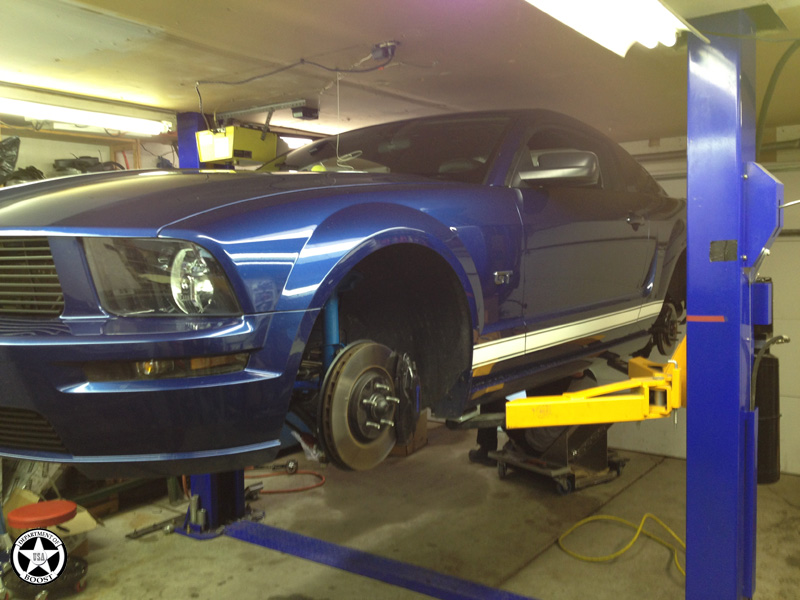
I finally saved up enough to start to transform my 07 GT into a street / HDPE machine. It has the typical bolt on's LT's, axle back, CAI, whiteline anti-dive kit, drake bumpsteer kit, Cortex Watts Link, etc.

Here is a quick list of planned modifications:

Supercharger
  • DOB Manifold
  • GT500 Takeoff H122 w/ DOB 8-rib 2.875" Pulley
  • 2010 GT500 CAI
  • GT500 OEM Throttle Body
  • Custom DOB Heat Exchanger w/ fan
  • DOB Supercharger Reservoir with Meziere 55 gpm pump
  • -12 AN hoses and fittings for cooling circuit

Engine
  • Meziere Engine Electric Water Pump (no idler) 55 gpm
  • Davies Craig Pump Controller
  • 8-Rib Pulley conversion (including IW 8-rib damper)
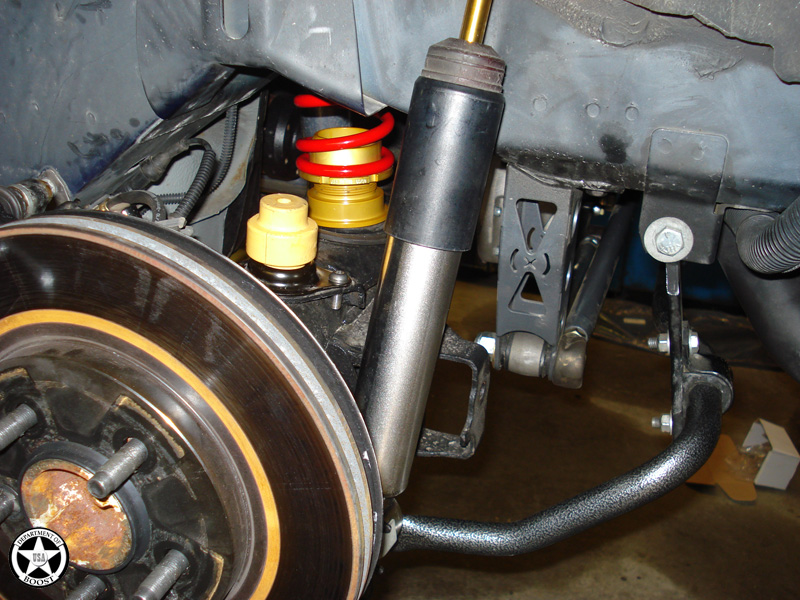
Suspension
  • KW Clubsports (rebuilt and "hot rodded")
  • Metco UCA & UCA Mount
  • Steeda Spherical Differential Bearing
  • J&M Extreme LCA's
  • Ford Motorsport LCA Drop Brackets

Brakes
  • GT500 Shelby Brake Ducts
  • Shelby Extreme 6 Piston w/ 2 Piston Rotors Front Upgrade

Fuel System
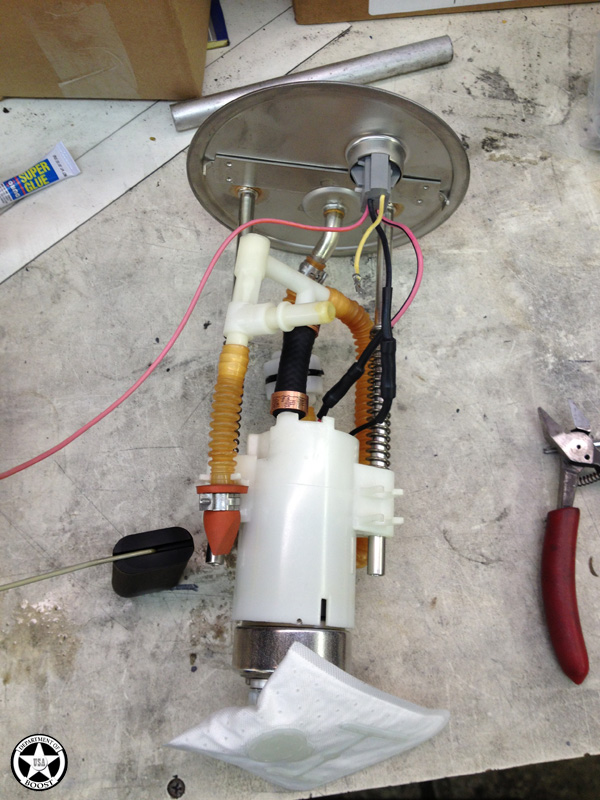
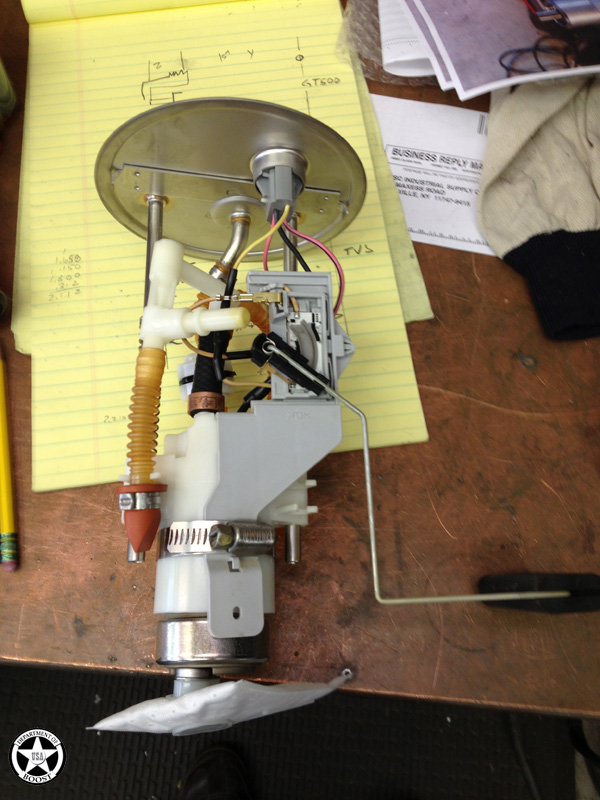
  • GT500 Take Off Fuel Rails
  • TI Automotive F90000267 Fuel Pump (aka Walbro 465 lph)
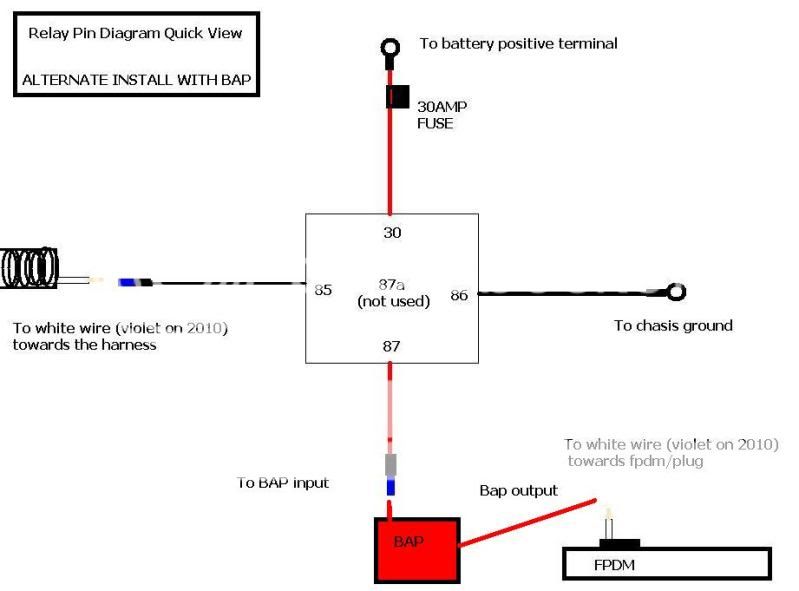
  • Pump and FPDM wiring upgrade

Electrical
  • DOB 200A Alternator Upgrade
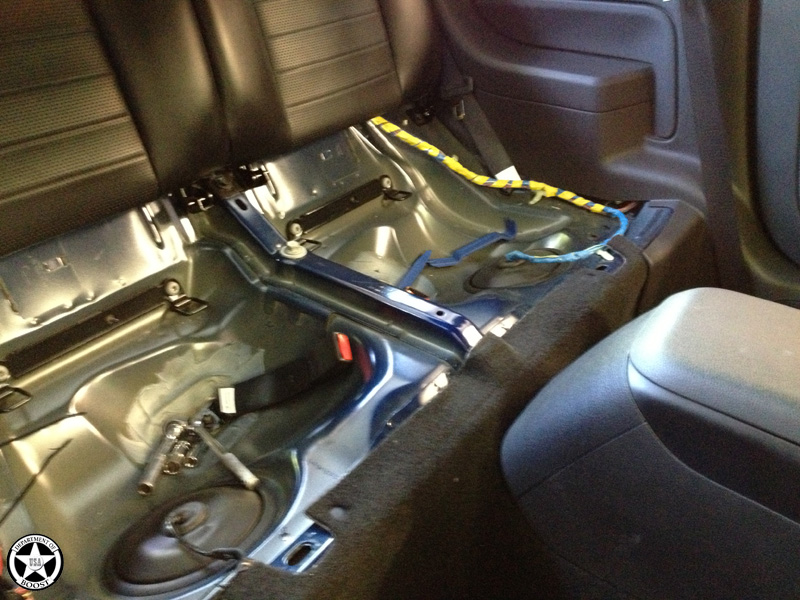
  • Battery Relocation

Exhaust
  • Pypes Off-Road X-Pipe
  • Pypes Super System Catback

Misc
  • GT500 Front Fascia Conversion
  • Dyna-Mat Trunk
 

Powered by Ford

forum member
Joined
Jan 27, 2011
Posts
1,143
Reaction score
1
First 908ssp and I tackled the fuel pump upgrade and the rear mounted battery relocation.

I originally had purchased a dual FORE setup, but found it to be overkill when you can simply modify the stock fuel pump hat. At this point my power goals are not extreme and the 465 LPH can handle quite well on its own.

The biggest difference in the stock pump and the Walbro 465 lph besides flowrate and design, but is its size. You will notice that the 465 pump on the right has a larger diameter especially at the bottom.


0001 Fuel Pump Comparison by matthewatitus, on Flickr

Stock Fuel Pump Assembly

0002 Factory Fuel Hat by matthewatitus, on Flickr

Removing the OEM fuel pump from the hat

0003 Disassembled Stock Fuel Hat by matthewatitus, on Flickr

The cup was not used and the Walbro 465 lph is a 1/2" taller than the stock pump so we cut a half inch off the housing.


0004 Partially Assembled Fuel Hat by matthewatitus, on Flickr

Submersible hose, wiring, prefilter, and float installed. We also put a band clamp around the pump and float since the lower "cup" could not be used.


0006 Fully Assembled Fuel Hat by matthewatitus, on Flickr

Next up, the more time consuming part of a fuel pump upgrade, wiring!

Not only did a I complete Jeremy @ S&H's FPDM upgrade found here.

WIREBAPRELAY.jpg


But also upon 908ssp's recommendation to upgrade the positive and ground from the FPDM to the pump. The OEM wire is 14 AWD and I upgraded it to 10 AWG.


0007 Upgraded Fuel Pump Harness by matthewatitus, on Flickr


0008 Upgraded Fuel Pump Harness and FPDM Wiring by matthewatitus, on Flickr


0009 Wiring harness upgrade and battery relocation by matthewatitus, on Flickr

While I was working on the fuel pump upgrade and wiring 908ssp worked on the battery relocation mount. If you know 908ssp you know he has serious fabrication skills. He pointed out the method of the two stud installation the Moser box came with and we decide to install it with a more user friendly battery box removal and installation.

908ssp - made a aluminum pad that the box would bolt to and then the pad was larger enough to bolt to existing threaded inserts in the trunk. Basically, this allows for easier removal and installation if the battery needs to come out since it is in a trunk.


0010 Rear Mounted Battery by matthewatitus, on Flickr

We routed the battery cable through the interior.

0011 Routing of battery cable by matthewatitus, on Flickr

After all of that work we completed for the day and I was able to drive my Mustang home without any lights or errors.
 

Powered by Ford

forum member
Joined
Jan 27, 2011
Posts
1,143
Reaction score
1
As I am sure some of you saw, gmitch. 908ssp, and myself rebuilt some KW Clubsports.

gmtich (Jason) used to do motorcycle suspension for years and taught me how to rebuild dampers using the KW's.

To see the rebuild thread, click here.

Put my stang on 908ssp's lift.

0000 Starting by matthewatitus, on Flickr

First order of business was to start with the rear suspension. We disassembled all that we needed.

The first item we installed was the Steeda differential bearing. Wow, we are not sure the at home mechanic/installer could do this. To remove the press fit in sleeve 908ssp came up with a puller using a small section of exhaust tubing, threaded rod, 2 nuts, and spacers.


0012 Tools Diff Bearing by matthewatitus, on Flickr

Steeda diff bearing installed

0013 Diff Bearing Installed by matthewatitus, on Flickr

Put together the KW Clubsport coilovers rear suspension including the metco UCA and UCA mount (hard to see in pictures).


0036 Rear Coilovers Installed by matthewatitus, on Flickr


0037 Rear Coilovers Installed by matthewatitus, on Flickr

Moved on to the front suspension.

0040 Front Coilovers Installed by matthewatitus, on Flickr

Now gmitch had a custom heat exchanger he was no longer using and put it towards good use for me! :highfive:

0014 HE Install by matthewatitus, on Flickr

You will notice that it is boxed in and fits perfectly to the GT500 fascia lower grille. Also notice that I cannot run the factory bumper support due to its size. However, we will be modifying the bumper to fit without scarifying the strength. I am not worried about crash, but more so keeping the frame rails connected to each other (boxed).

Converted to the GT500 fascia for the HE to fit perfectly and it just looks so much "meaner".

0016 GT500 Fascia by matthewatitus, on Flickr


0017 GT500 Fascia by matthewatitus, on Flickr

New stance

0018 GT500 Fascia and Coilovers by matthewatitus, on Flickr


0019 GT500 Fascia and Coilovers by matthewatitus, on Flickr
Look at the Shebly duct bezels! 908ssp's work on those should go on Shelby's website he made them fit perfectly.

More to come!
 

UltraKla$$ic

PERENNIAL WAXXER
Joined
Dec 28, 2008
Posts
17,151
Reaction score
35
Location
Louisiana
You are SOOOOOOooooooooo lucky to have 908ssp and Gmitch helping you! If I had talent like that available to me, I'd break the bank modding!!!!!

Nice write up and the car looks phenomenal!!!
 

Sharad

Site Sponsor
Official Vendor
Joined
Jan 3, 2011
Posts
2,403
Reaction score
0
Location
Fort Myers, Florida
Thanks for taking pics of everything. This is sure to be a great thread. Especially with Jason and Alex involved!
 

weather man

Persistance Is A Bitch
S197 Team Member
Joined
Mar 3, 2012
Posts
13,335
Reaction score
152
Location
MN
Good luck, you've been waiting awhile to do this.
 

DRock

Senior Member
Joined
Jun 22, 2009
Posts
2,098
Reaction score
2
Looks great so far! Looking forward to that Alternator install!
 

Support us!

Support Us - Become A Supporting Member Today!

Click Here For Details

Sponsor Links

Banner image
Back
Top