Vorshlag 2011 Mustang 5.0 GT - track/autocross/street Project

Status
Not open for further replies.

lost won

Junior Member
Joined
Jan 28, 2012
Posts
40
Reaction score
0
Location
Sandy Eggo
Re: SCCA Solo classing rules - F Stock

WOW, Your posts are really a Tour de Force, Terry. Keep 'em coming!

Just a couple of notes for the newbies that are maybe considering autoxing a late model S197 (Mustang GT)in SCCA:

In the present F Stock (2013), you can run Hoosier A6s in size 295/30-19 on the stock (Brembo or TrackPak) 19x9 rims. Looks like you can still do this in 2014 in what SCCA is calling "Street-R" under the 2013 rules for F Stock. (June 2013 SCCA Fastrack News p.22)

With these tires, and use of the camber bolts, you can run competitively at the Regional level in F Stock. The car, while a handful, does pretty well for a pure stock chassis with Hoosiers. Camber bolts (which are definitely not the best way to go negative), are legal, and will give you about 1.5 degrees negative. While not enough, this will keep your Hoosiers from cording with a little TLC like flipping the tires on the rims after about 20 runs, and rotating positions every event or so. Hoosiers, like Terry said, start to fall off at about 20 runs, and are DEAD at about 40/50 runs. Mine never corded, but they DID get too hard (heat cycled out). While expensive, Hoosiers are my only expense.

Now, to give the devil (Nice picture, Terry!) his due. 99% of what Terry said is absolutely true about running FS. And "F Street-R" as we (think we)know it; is gone effective 1/1/15. Plan accordingly.

In the meantime, some of us are soldiering on to the bitter end, kinda like Terry did in STX/STU. I don't think that SCCA will ever be able to react to current conditions fast enough to keep the rules in touch with the members needs. I truly empathize with fellow SCCA members struggling with outdated rules. Everyone should appreciate all that Terry has done to try and fix things.

In any case, I'm running FS for now and doing well. It's the best solution for me, as I use the car as a daily driver; I can't afford expensive mods, and I need to keep it under warranty, etc.

Definitely NOT "hating life", even in FS.... ("Wallowing", yes!)

John
2012 Mustang GT, SCCA San Diego Region F Stock #7
 
Last edited:

brdollmeyer

Junior Member
Joined
Jun 19, 2013
Posts
12
Reaction score
0
It's amazing how much work you and the crew have put into that car in the past year. Nice fabrication crew & Great looking car too.
A couple of things.
It looks like in one of the shots you have a panel that will cover the headlights and upper grill and it will be angled to "un" invert the front upper grill area and obviously you've increased the splitter area. So, lower the drag & increase the downforce.
Did you weigh in the pluses and minuses of going the other way? Blocking off the lower portion of the grill and using the upper for the intake. Most of the high pressure that the splitter produces is from air being deflected from the angled lower portion of the bumper down to the top of the splitter. Seems like the intake down there would bleed some high pressure off & if the lower grill was blocked off, it would keep more high pressure air (working with some fences on the ends of the splitter). Are the tracks in Texas mostly high speed?
Not meaning anything one way or the other here, just wondering how you arrived at your decision.

Edit...oh yeah, I said a couple of things.
In regards to the life of the A6 Hoosiers...We've had some better luck with them. Been running a couple of old sets of Hoosiers for the last few months & all 8 tires now have over 100 runs. Surprisingly they were still competitive at 90 runs(locally). They're done now, but still not corded. Far more economical than the Goodyears were last year which always corded between 40 to 50 runs.
 
Last edited:

Vorshlag-Fair

Official Site Vendor
Official Vendor
Joined
Nov 12, 2010
Posts
1,592
Reaction score
107
Location
Dallas, TX
Project Update for August 28, 2013: Been a busy couple of weeks since the last project thread update, with the majority of the new aero work completed on our TT3 Mustang after working long hours every day and night. It was a major thrash to get all of this done in a 2 week period. During that time we also ran an autocross event with Amy driving our 2013 GT (STU) and me in Matt's BRZ (STX), and then track tested the new front aero parts on our TT3 Mustang. We're now in the final week thrash to do all of the "clean up work" to the car before we load up and head 22 hours across country to the NASA Nationals Sept 4-8th, so let's get caught up.

S197 Mustang Coilover Tester Needed in Dallas/Ft. Worth Area

Before we dig into the STU Mustang autocross test results, let's get to the reason why we went to this event out of the way - to test some MCS coilovers on one of our shop employee's cars, a 2013 Subaru BRZ. And this has a bearing on the S197, too. How is the suspension on a BRZ important to a Mustang? Well, they have several things in common: both chassis have McStrut front/shock rear suspensions, both have a factory coilover spring on the struts, and both chassis Vorshlag makes camber plates for. They also both are RWD, and they share almost the same track width (about the only dimension they have in common). So our suspension testing on the BRZ does sort of apply to S197 Mustangs.


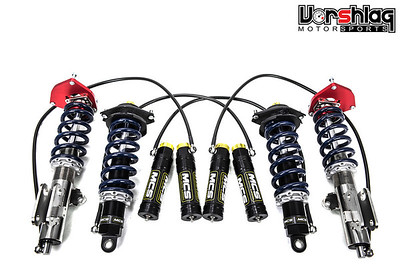
We also sell MCS coilovers for the S197 Mustang, and in fact we have the first TT1 set in stock that we had built to our specs. All we lack is a tester to buy this set, then let us photograph, install and measure all of the parameters we like to check on a brand new suspension option like this. We've done installs on MCS RR2 doubles with remotes and TT1 singles on other cars, just have get a Mustang buyer to let us install a set for the S197 chassis.


Fitting the custom built set of MCS TT1 shocks to a tester's BRZ, sans springs, for bump/rebound measurements

We need someone local with an S197 that street drives + tracks or autocrosses their Mustang to sign up as a Vorshlag Tester for this first MCS TT1 set we had built. This would include a discounted install at our shop, a free corner-balance, and hands-on set-up help at a local autocross or track event(s). Go to the recently updated Vorshlag Tester Page, read the Tester Expectations, and if it sounds like a fit, sign up to be a tester via the method shown on that page. Don't call, or shoot me a PM, or send a fax, or wire us a telegram, but instead follow the instructions on that page to sign up. :) If your criteria line up with ours, we can get the MCS TT1 installation pictures for the S197 chassis. This would be another great monotube offering we can provide for this chassis (to go along with the offerings we have from Bilstein, Moton and AST). The MCS units are a bit unique in that they only have a 2 to 3 week lead time, are modular and can be upgraded to doubles or with remotes, and the have very beefy internals, shafts and housings.

SCCA Autox at Crandall, August 18, 2013 - STX vs STU?

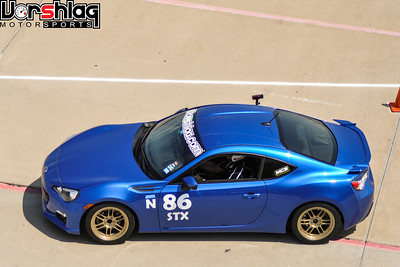
So we decided to enter this autocross after we installed the MCS TT1 coilovers on Matt's 2013 Subaru BRZ. This car has been waiting on proper coilovers for almost a year, and after a few fits and starts we finally got a high end, adjustable monotube coilover on the car that was made to the specs we wanted. Working with MCS has been easy and we've installed and sold a good number of their singles (TT1), internal doubles (TT2) and doubles with remotes (RR2) onto our various customer cars.

20130818_E6_Dallasraceway-M.jpg


You can read more about the BRZ project here, but the plan quickly became to drive this car in its Street Touring class (STX) at the same event as two S197s we brought and ran in STU. Amy drove our 2013 GT (which is still for sale - hello, is this thing on??) and Mark C drove again his 2012 GT in STU class, so we could compare times against each other and against the other STU and STX cars in attendance. There were a number of strong regular competitors in STX cars at this event who ran in other classes for various reasons (mostly time of day choices). Still, it was worth comparing to the top ST cars there, so we will, at the bottom of this post section.

Vorshlag Photo & Video Gallery: http://vorshlag.smugmug.com/Racing-Events/SCCA-Crandall-081813/

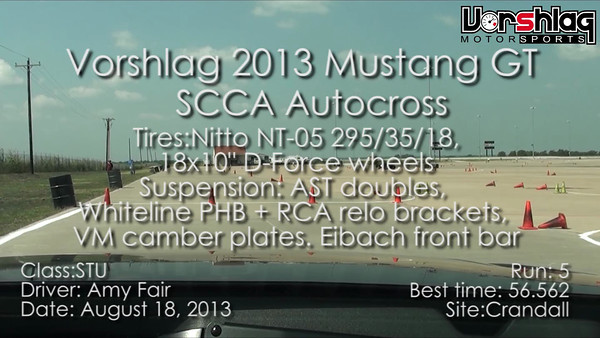
So Amy Fair, my wife, is a 3 time National Champion autocrosser (STU-L twice and ESP-L last year) was running our 2013 Mustang GT in STU. This car is far from under-prepped, and in fact had a couple of "illegal for STU" mods, but this was a good venue to test those things because they were both items we've been asking the STAC/SEB to include for solid axle STU cars. The main suspension items were a $5000 set of AST remote reservoir double adjustable shocks with 400F/200R coilover spring rates.


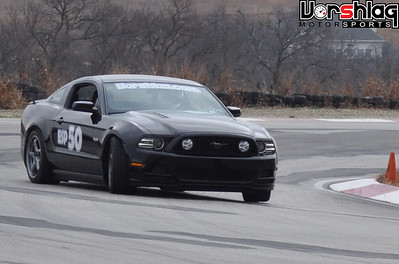
The 2013 also has a big adjustable Eibach front swaybar, plenty of front camber (VM plates), upgraded and ducted 14" Brembo brakes, and 295/35/18 (10mm wider than allowed in STU - for now) Nitto NT-05s (200 treadwear) on our Vorshlag/D-Force 18x10" wheels. It also has Whiteline rear control arm Relocation brackets (also not yet allowed) plus a Whiteline Adjustable Panhard bar, to center the axle since it is lowered approx. 2 inches. This car had zero power mods, as it already made 377 whp with the bone stock 5.0L Coyote motor - which is too much for 295mm street tires to deal with on TRACK (see above), much less use in thae "knife fight in a phone booth" which is autocross.


Have I mentioned that this car is for sale? Oh, there, I did it again. Somebody is going to come by and drive this car, realize what an amazing deal this is, and buy it. And then rub it in other peoples' faces. :D


Mark C is a bit newer to autocross (couple of years) but has a solidly prepped car as well, and was running on fresh RS-3 Hankooks in 285/35/18. These felt like they had a good bit more stick than the year-old 295 Nittos on our car, so the extra 10mm was probably a wash, if that. Mark's Mustang was on AST 4150 coilovers, 550F/250R springs, BMR adjustable panhard bar, the same 18x10" wheels with the aforementioned "200" treadwear RS-3s (they used to be 140 treadwear but Hankook asked the Pope to sprinkle holy water on them and viola! they are now 200). It also has a Torsen T-2R aftermarket diff, 14" Brembos, and some other goodies, but also stock power.


SCCA Event Results: http://texasscca.org/2013_solo_results/tr13_6_final.htm#STU

I guess the BRZ was fairly well prepped for STX, too. I figured beforehand that we might give the two STU Mustangs a run for the money, and was hoping just to keep within a second of the fast STX guys that I watch in our region, like Brad Maxcy's BMW 328is and Mark Sipe's RX8.

Mark C (STU 150) and Amy (STU 197) ran their 5.0 Mustangs in the first heat of four for the day - which was both good and bad. It was good because the surface temperatures on this concrete lot were lower, as were ambient temps in the morning runs. This meant the tires wouldn't get overheated as quickly - but we still had to spray tires on both cars after runs 2-4. At least the didn't have co-drivers to add to the tire heat. But it was bad because the course surface for first heat wasn't as clean as it gets later. Texas Region SCCA does a phenomenal job in prepping the course, with multiple backpack air blowers and brooms, but nothing replaces car tires scrubbing the surface clean. And the course was a bit tricky. It was long, with a LOT of slaloms and near-offsets, perfect for narrow cars - more of what I call a "Miata-centric" course, which we see a lot since the course designer drives a Miata (love ya JJ!). It also had three increasingly tight 180° turn-arounds that joined long-ish acceleration zones. This was AWD heaven.

Walking it I could see the two STU Mustangs probably having trouble with corner exit traction compared to the AWD cars in their class, as the exits from each major "slow down element" (the three turn-arounds) were pinched off (aka: decreasing) and not what these cars need to "excel". The tightness of the 180s were also going to be tough to navigate in these big cars, as were the slaloms. But the BRZ on 17x9" wheels and brand new 255/40/18 BFG Rivals was almost as wide, at a measured 71" outer track width. So it might struggle through the slaloms, too.


It turned out to NOT be the case for the BRZ. This car was eating up the slaloms! In the video linked above (which has horrible audio, thanks to a previous gen GoPro HD camera) is my best run in the BRZ. It was a GRIP BUGGY, and at 2700 pounds with 255 Rivals, excellent shocks and great camber, I guess it should be. My first run in the BRZ absolutely obliterated both STU Mustangs. Now I did run in heat 4, so the course surface was cleaner. But it was also 90°F, so it was hotter when a ran, too. And I was co-driving in a 2-driver car with Matt, and we had to do fast driver changes - we barely had time to spray the tires, switch numbers and reset the seat/wheel between runs, and we had help (thanks, Olof and Mark).


So it looked like Matt's BRZ was pretty quick for having zero testing, at its first ever autocross. We basically threw a bunch of parts at this car, took some guesses at set-up, and went out there and drove it. Of course the parts didn't suck... custom spec'd MCS TT1 coilovers, 450#/in springs, Vorshlag plates, Whiteline bars, Enkei 17x9" RPF-1 wheels (15.8 pounds) and brand new 255/40/17 BFG Rivals. It needs a test day to get the bars, spring rates and other adjustments sorted, but we tweaked shock settings and tire pressures during the event and it felt pretty damned good.

This car was hooked UP on this course. At 2700 pounds the BRZ has a huge weight advantage on the 3600 pound S197s in STU, but with 166 whp it lacks a bit in the "go" department. I beat on that car like a rented mule, launching from the Start at 5500 rpms and taking it to redline several times on course; even using 3rd gear on most of my runs. These cars have relatively low power levels, but it just didn't matter. This is autocross, where WEIGHT WINS. In the end the BRZ was 3.6 seconds faster than Mark or Amy in STU and 1.5 sec faster than the winner in STU. That was shocking, and more than a little depressing. I mean, sure, I knew the BRZ could be faster but not THAT much faster than two well prepped STU S197 5.0 cars.

Matt, the car's owner and a 5 year veteran here at Vorshlag, is still a novice autocrosser yet beat the 30 car Novice class handily in the same BRZ. So I guess we had the car set-up well enough from the start. Co-driving the car with him in the last heat of the day made it tight on driver switchover timing, and the car slowed down on my last 2 runs - we think from both tire and brake pad heat (he had on the OEM pads and I was turning them to goo with my hectic Left Foot Braking). We just could not get the tires cooled down on our last 2 runs.


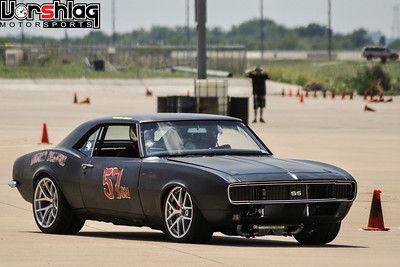
Left: Twin turbo LSx powered 68 Camaro on street tires! Right: 2 liters of naturally aspirated fury pumping out 166 whp. Its no Coyote 5.0.

PAX Results: http://texasscca.org/2013_solo_results/tr13_6_pax.htm

I will be the first to admit that I'm no "momentum" car driver, yet the times still PAX'd 13th out of 121, and won STX class by a 2.5 sec margin. My best run in the BRZ was run #3, still with with a passenger on board (took passengers on runs 1-3, then took runs 4-5 solo), so I know the car had more left in it. I feel that the tires were just a tick too hot, and word is the Rivals do not take extreme heat well - but what does well in Texas summer heat with 2-drivers running back to back? Not a whole lot. Normally you don't want to have a 2-driver car in any class in this kind of heat.


Amy driving the 2013 (at left) in the same 180° corner as Mark in his 2012 (at right).

Looking at the results, the two STU Mustangs were bringing up the tail end of their class. It seems that the Mustangs were very close to each other, and in the end Mark beat Amy by .009 sec, which is no small feat. Sure, Amy was coning runs left and right (3 of 5 runs) but her fastest run was clean and on her 5th and final attempt. Maybe her car's tires were past their due date (NT-05s were never that grippy), but she was hustling around that course and stepping on cone bases, cutting good lines. She's been racing since 1993 and often matches or beats my times, but she's a bit rusty in Solo this year. And in case you are wondering, I might guess that.... I might have put a second on her that day in that car, maybe. I almost never beat her by more than that, and we are often in the same tenth (or she beats me) when we co-drive together.


The image above (click or any other it for larger version, as always) is a "composite results" listing I put together of all of the STX & STU cars. I even dragged in some StreetMod and X class entries, that were really STX or ESP cars (but not the entire X or SM classes). Sometimes the online results disappear over time, so I like to make my own copy. This grouping shows all of the cars that matter to the STU Mustang. As you can see there was a good variety of cars in the STU class, including a 2.5L WRX, an EVO X, an E46 M3 (Gaith's car, which we have worked on several times), and the two Mustangs bringing up the rear. STU should be faster than STX, of course, but it doesn't always work out this way.

continued below
 

Vorshlag-Fair

Official Site Vendor
Official Vendor
Joined
Nov 12, 2010
Posts
1,592
Reaction score
107
Location
Dallas, TX
continued from above

It looks like my STX winning time was also good enough to top STU and all of the STX cars at the event but one, as Mark Sipe cleaned up some cone trouble with a hero 5th run (running in Street Mod during heat 3) that put almost 9 tenths on the BRZ. He's a damn fast driver and has been racing that RX8 since about 2006, and it is set up well. Maxcy was fast in his well prepped BMW 328is (running in X class) but also had cone trouble and sat on his 1st run. Since he was in X class and they automatically DSQ the 4th and 5th runs (that class only), and he was a bit closer on his 5th run. Madarash's ESP car was smoking fast, and even with the harder SMod factor he just out-placed me in PAX results. After watching all of my runs on video, there was clearly more time in the BRZ than we saw in this first event, with better driving and a developed set-up. As usual I complained more about power than anything, and there are some proven power mods on these cars out now, too.


In the end I think this event was a better test point for the "S197 in STU" idea than the last autocross where Mark and I drove his 2012 GT in two different heats on differing courses (mid-event course change, ugh). The times we see in these results show another piece of data supporting the request allowing more tire on the Mustangs in STU. Even with 295s and $100 worth of "cheater" rear suspension upgrades, it was still lacking. Both Mustangs would have gotten killed in the old STX class, especially running on the skinnier 265mm tires, so I think STU is still the right move for these cars. Of course everyone can always drive better and Mark will only get faster as he gets more seat time and mods on the car, but Amy isn't new to this sport and neither of them brought an un-prepped STU car.

Since there is still no resolution in sight on the ESP Watts Link rules debacle (delayed until 2015, for no good reason), see I will continue to not build a car of my own around an SCCA class in 2014. This is unusual for me, as I have almost always had a car built around some SCCA Solo class rules since I started autocrossing in the late 80s. Instead I will try to continue to co-drive cars like Matt's STX BRZ or maybe Mark's STU Mustang, at local events through this year and maybe even into next season. Might do the "local" National level events but I won't travel for them. We have been doing 25-30 race weekends a year for the past 7 or 8 years in a row, and it is taking its toll. Amy and I will continue to concentrate our personal cars and efforts on campaigning our 2011 Mustang in NASA TT (as well as another car we are building) next year, which as a club has been a good bit easier to deal with.

We are also on the list for a 2015 Mustang, as soon as they are released, whatever it looks like or weighs. Who knows how the SCCA will class this car, or if it will be heavier than the outgoing chassis? I think that all of the rumors out now of it being lighter than the S197 are wildly optimistic, but I am hopeful that with IRS it might have better corner exit traction. Time will tell. However it turns out we will try to make it better, and track + autocross it to test parts we develop for this new chassis. :)

More Aero Prep on TT3 Mustang

Now for the stuff most of you have been waiting for - if you even bothered to read the autocross bits above, I thank you. Many of you have been watching the progress of our front aero work from the past two weeks on the Vorshlag Facebook page. But for the rest of you, let's catch up from where we left off in the last update, where we were just starting to get the new aero development underway. Don't forget that almost every picture I post can be clicked for a larger rez version.


One big slab of 6061-T6 x .190 sheet makes up the new splitter, and yes, we probably went too thick and this thing has a sizable amount of heft. Its hard to tell in the small picture above (left) how much bigger the new unit really is. The black one is the Leguna Seca ABS splitter sitting on top of our aluminum BMF splitter. The Leguna piece sticks out past the lower fascia by 5.5". The new unit sticks out front by 10.25", almost double the forward length. It also goes back a couple of feet and is wider by nearly 4" per side, and is mounted 1" lower as well. The extra width is there to better line up with the upcoming tire spats/flares that will cover the front of the 18x12" front wheels. Spinning tires sticking out in the air stream are a big contribution to drag, so we planned to cover the leading edges.


The spacer to lower the splitter was built out of is 1" square aluminum tubing, pie cut on the back side and bent to match the curved contour of the lower fascia. This was then TIG welded back together while held in the fixture shown above, ground smooth, drilled for the existing mounting holes, and bolted between the splitter and fascia it becomes a rigid spacer. Ed cut and shaped this thing one night using his portable band saw, then Ryan (who did 90% of all of the work in this aero mod project) welded and ground it smooth, and it came out looking much nicer than any race part should. If we have ground clearance issues we can remove this 1" spacer and adjust the rear mounting eyes upward to match.


The radiator I talked briefly about in my previous post is shown above. Yes, it is a Mishimoto unit, which is a fabricated, all-aluminum radiator that is much larger than the OEM piece. It bolts in place and has the integral mounts for the A/C condenser, which is still on this car. We were going to buy the Ford Racing Boss-S radiator (M-8005-MGT), but at $750 retail (still $650+ at the lowest shipped price) I just couldn't stomach that. We have had excellent results with Mishimoto radiators in the past on LS1 BMWs (I have one in my new E46 LSx build, one in the Alpha E36 making 490 whp, McCall had one in his Z3 LS1, Matt has one in his E36 LS1, etc). Then we realized... damn, we're a Mishimoto dealer, and they do make an S197 drop-in radiator. We sell this radiator now for $247, which is a steal. I will touch on how it worked in my coverage of the ECR track test, below (excellent).


Above left you can see the "waterfall" air deflector that we built for behind the radiator. There are brackets that hold it in place (not shown in these pics yet) and it has rubber edging and cut-outs near any radiator hose. This deflector seals to the bottom of the radiator but is open on the sides. It directs the airflow up towards the hood ducting, but isn't part of a 100% sealed duct system. We talked to other race engineers and they agreed - the small incremental improvements from making a 100% sealed radiator-to-hood duct system is not worth the added work compared to what we have done here. We could get 90-95% of the benefit for 1/3rd the work. The upper right pic shows the first iteration of the rear splitter mounts. These are custom made pin mounts that go into small spherical eyes that can be adjusted up/down for a better fit. We have 3 on there, and the outer 2 have latching pins.


Above left are the fabricated struts that hold the front of the splitter and bolt to the fabricated push bar behind the bumper cover. These are adjustable in length and made from aluminum tubing and steel threaded eye ends. They have been weight tested and also proven on track, don't worry. The above right picture is with the hood ducting cut and some corrugated cardboard stuffed in place, for mock-up. Then Brandon did his photoshop tricks and made the blue hood look red.


Building the hood ducting was done in the method shown above. We looked at other ways, and even attempted to weld on the aluminum sheet that the OEM hood is made of. welding was a major chore so we went with rivets. The aluminum side panels have small angle pieces riveted to them and to the hood, and he structure is actually stronger than before due to the boxed shape of the two ducts.


How big are the ducts, and why didn't we just "buy a Tiger Racing hood!", like so many people suggested? Well, as you can see, a human head will fit through the duct openings, so they are bigger than anything we've seen out there. The drop on the ducting is also very deep, unlike any off the shelf hood we have found for the S197. This drop was only possible by moving the coolant reservoir and factory routing of the cold-air inlet to the middle and going over the radiator support. THIS was why we did all of that work. The TR hood also has the ducts in less than ideal placement, in my humble opinion, moving from a low presure (forward) to high pressure zone back by near the windshield. It is also $1500+ for a composite hood that is prone to cracking, and a real bear to paint (according to a body shop I talked to that has done a half dozen), whereas this is a $300 used aluminum OEM hood with just "some fab hours" into it. ;) It is still light and yet strong enough to work for years without cracking. Mostly it allowed us to make the ducting as deep as we wanted in where we wanted, instead of being stuck with an aftermarket composite hood's shape and layout.


As you can see above, Ryan added some epoxy seam sealer to the edges of the hood openings where the sheets of aluminum met. Again, welding this OEM material proved problematic, so we went with rivets and panel bonding epoxy on everything. It is air tight and STRONG. The ducts are BIG, placed in the correct low pressure areas (in theory), and they drop WAY down and grab air from the now uncovered back of the radiator, with more flow pushed upwards from the waterfall deflector. This hood ducting combined with the massive splitter we fabricated should produce significantly more front downforce than the LS splitter we used before, even at low speeds. In theory. Neither Jason nor I are aero engineers, but our mechanical engineering backgrounds aren't from another planet, either. We also know some smart aero guys who gave us a lot of tips.

Continued below
 

Vorshlag-Fair

Official Site Vendor
Official Vendor
Joined
Nov 12, 2010
Posts
1,592
Reaction score
107
Location
Dallas, TX
continued from above


We never got a good picture with the bumper cover off of the new "Corvette style" air cleaner installed onto the end of our fabricated aluminum intake tube, and now that is all buried under the front end and I don't want to pull it all apart for a pic. Above are a couple of pictures with the clear cellophane still on the air cleaner, but mounted in place. Removing the big, bulky factory bumper beam and foam crash structure and replacing it with the fabricated 1.75" x .120" wall DOM tube allowed a lot of extra SPACE for the rather large air cleaner to sit and draw air from. It is up out of the air stream with just the carbon fiber "lid" visible from the grill opening. It might get a tiny bit of extra airflow from some "ram air" effect, but I doubt it will be noticeable (it wasn't on track). That wasn't the intent of the new intake tube routing and air cleaner location - it was all about making room behind the radiator for the new hood ducting's surface area.


In order to leave as much room behind the radiator for more surface area on the hood, to allow more flow through the ducting, we ditched the OEM electric fan and shroud. Why? The stock fan shroud was VERY THICK (4" or more), and it was also sealed to the entire back surface of the radiator. This is a good thing on a 100% street car with stock grill and stock radiator, as it allows the fan to suck air from the full back surface of the radiator and not just the round area that the fan blade covers. We aren't as concerned about stop and go traffic driving as much now, and once you are up to speed (45 mph or so) on track the "free flow" across the radiator makes the electric fan irrelevant - and in fact, the shroud can restrict free flow at speed. So we added a slim aftermarket 16" diameter electric fan without a shroud. This mounts to the Mishimoto's upper and lower flanges with custom aluminum brackets Olof fabbed up. We have it tied into the factory wiring harness and it functions just like the stock fan (computer controlled). When Ed and I ran the car Friday night to burp the new coolant system (filled with distilled water), the engine idled for about 20 minutes and the fan came on 2 times for about 30 seconds. Trust me, it moves some air. You can feel it sucking in on the front of the radiator and also blowing hard up from the waterfall deflector. We had to wait for the track test to see if the ducting work would pay off with adequate cooling, seeing that we blocked off over half of the grill opening area. We were warned by countless Mustang folks watching the pics on FB that it would overheat and melt the block like the core of the earth, too.


Another area we wanted to improve was the oil / air separator system. We have been using the JLT for over 2 years, and had upgraded their normal kit to have a real mounting bracket (we fabbed) and real metal fittings and lines (the JLT kit comes with plastic bits that eventually crack/leak). It was OK but the kit we had only drew crankcase pressure from one cylinder head - the passenger side. I picked up the can from a Moroso kit a while back and used it in a new system we built. This larger Moroso oil / air separator draws from both valve covers, into the separator, with a vacuum source on the other side of the can. We were pressed for time and simply used 5/8" heater hose for the lines with Norma clamps crimped at each end. We set-up the Moroso can using fittings with hose barb ends that we put together and mounted to the firewall with the included mounting bracket. I hoped the heater hose could take suction without collapsing (it doesn't!), but we had the track test to check that out at.


I'll cover the new flashy bits and we'll move on to the track test. First you will see coil covers are painted red now instead of blue, which I had spray bombed 2 years ago. A recent Vorshlag customer upgraded to some metal Ford Racing units and gave us his painted red ones, which actually match this car's body color so we swapped them out. Meh, it was a freebie, and the blue covers were a bit garish. The other bit of flash is the GOLD foil on the intake tube. This is not just for hard parkers, as it is used on real race cars all the time. This foil is DEI reflective gold foil, which we've used before on other builds, especially when the intake tube is around a source of radiant heat (like this one, which routes right over the top of the radiator and sticks out in the post-radiator air stream). And Brandon just took this shot (above right) of the air cleaner with the bumper on - note how it isn't really in the air stream, but tucked up behind the bumper cover. Un-ram air.


At left above we have the fabricated aluminum grill cover riveted to the factory grill surround. It isn't the final cover I had envisioned (wanted a smoother, more aerodynamic insert), but it was already made and we went with it for the track testing - and might not mess with it for a while. You can also see the tow hook we finally added to the front of the car. Yes, we went 3 years without a tow hook - and luckily never needed one. Whew! Above right I am doing the "200 pound splitter load test". The splitter doesn't bend, instead the front suspension just takes up the extra compression load, as it should.

We had a LOT of late nights over the previous 2 weeks to get the car track ready, and finished up Saturday night and loaded the car into the trailer at around 10 pm. As I was installing 4 temporary hood pins Ryan swapped on new front Centric rotors, new Carbotech XP20 pads, and flushed a little Motul 600 through the lines. The track prep went to just about the last minute. The plan was to test at ECR on Sunday morning at 9 am.

Note: we did not have the flares completed when we went to test, we do understand that some bad aero drag occurs when the tire is visible from the front like this, but they were partially done before the test - just not enough to mount them. Due to some business reasons, we are not showing the manufacturing techniques for our flares. Nothing revolutionary, but I've never seen flares done the way we have in mind - and it could completely flop, so I don't want to show my ass if it does, ya know? There are some teaser shots of the flares in progress, below, from after the track test.

Dyno Tuning at True Street

We have to back up a couple of days to cover the dyno tuning we had done before heading to ECR. On Friday before we went to the track to test we delivered the Mustang pieced together just enough to get it to True Street Motorsports, who does all of our Mustang engine tuning. The bumper cover and splitter weren't attached yet, but that didn't matter for the chassis dyno pulls. We've been using True Street for close to 3 years, and they have re-tuned our car after each major change. Our motor is bone and cooling systems have stayed all stock, never been opened up, and never given a single hiccup, thanks in no small part to their custom tuning. They've been the folks that kept our dyno numbers solid (430 whp back in 2011) yet keep the tune safe enough to beat on for 3 years and 17,000 miles.


Left: Driving to a corner gas station to fill up with 93 octane. Right: loading up to go to the tuner

Any time you make a change to your Mustang (with regards to power parts) it could need a new tune. I am not a believer in "mail order tunes", because without driving the car and/or putting it on a dyno and pulling air:fuel numbers and seeing the power curve and listening for knock, it is an impossible task to do this well. I am, however, a strong supporter of working with a local shop and getting proper dyno tunes done on your car, in person, with no e-mailing of files involved. Also, before you buy a stand-alone tuner (we use the SCT) talk to your local tuner shop and buy the tuner from them. You are always better off patronizing your local tuner with parts orders. Sure, you might spend $10 whole dollars more than the cheapest of the cheapest online parts wh0rehouses, but it will pay off in the long run with one-on-one help from YOUR shop that does YOUR tune, right on their own dyno. If you have a 5.0 Mustang in live in North Dallas, trust me, True Street is the place to get your go-fast goodies and engine tuning from. Come to Vorshlag for your suspension parts/work, for sure, but go to True Street for your power parts and tuning.


Anyway, Ryan and I stopped by and talked about an upcoming event (see below) then we asked Sean to give us a "safe" tune once again. By safe I mean tune it for 93 octane, fix any air:fuel changes induced with our custom intake tube/MAF, keep the timing curve from being on the ragged edge, and make sure the power curve looks smooth. They are very good at this and won't do "hero tunes" to squeeze out that last tenth of a hp while endangering your motor. We also asked for a few small updates, like going back to the OEM throttle map (removing our "street tire autocross" traction control mapping they made for us).


Since we were about to go race at Miller Motorsports Park in SLC, with an elevation of 4000 feet, we asked for a slightly milder spark curve than normal. That coupled with the intense heat that day (100+F in the dyno cell) made for a slightly softer number than before (I'm not sharing until after Nationals, sorry), but the air:fuel numbers were cleaned up and there were no unusual dips in the power or torque curves. We can also pull out a few pounds with this new number (we were at 424 whp and 3770 pounds on DOT tires in TT3). Of course we will stick the car on a dyno at Miller, to make sure everything is copacetic in case we get dyno'd after competition begins (it can happen, as can a scale check). If we need to add or remove ballast based on their dyno numbers, we can before racing starts. We can also tweak the timing, peak RPM and some other factors trackside if we need to adjust for the elevation, available fuel, observed knock, etc. I used to do a little EFI tuning many eons ago, so I understand the basics, and Sean only allowed us access to the most basic of alterations. Again - I'm not looking to add more power, just to be able to keep it safe. We lowered the rev limiter from 7800 to 7200, for sanity's sake (we only had it set that high to avoid 2-3 shifts in autocrosses; power falls off hard above 6500).

Test Day at ECR, August 26, 2013

Brandon and Ryan from Vorshlag and racing buddy Jason McCall met up with me and Amy at our house Sunday morning for the trek out to Eagles Canyon Raceway, which is located about 70 miles from our shop. This is our home track, and where I've got the most track miles since I did the first NASA event there in 2008. Lately we have been out at ECR at least once a month, sometimes 2 or even 3 times in a 4 week period. Long story short - this is where we could put in the most reliable laps without "driver course learning" coming into play.

Vorshlag Photo and Video Gallery for ECR Track Test: http://vorshlag.smugmug.com/Racing-Events/Test-Day-ECR-082613/


Now the 2.5 mile ECR circuit is far from a high speed test track, as most of the corners are fairly tight with long-ish straights in between (125 mph top speeds). It would not normally have been the ideal location for testing the new aero. And honestly, we didn't think we would put in a full day of data logging and aero testing - this was more of a place to take the new set-up and do basic shake down testing, to make sure nothing fell off or burned up. If we noticed any aero imbalance we figured the semi-fast corners in T1/T2, T4, T9, T10 and T11 might show us. It is also much closer to our shop than any other track, and the folks that run it are very cool and accommodating.


After we got there we had even more folks join us, including Olof from our shop, a Boss302 owner and fellow track junkie Jerry Cecco, and Dave B - who brought his GTS3 BMW our to test with us. We set-up the sunshade and put out chairs while the fluids were topped off and the car was checked out.

continued below
 

Vorshlag-Fair

Official Site Vendor
Official Vendor
Joined
Nov 12, 2010
Posts
1,592
Reaction score
107
Location
Dallas, TX
continued from above


Loading and unloading the car from the trailer requires the front splitter to come off, and we've designed the splitter so that it stays attached to the bumper cover and all comes off as a unit. We quickly found that lining the splitter's rear mounting pins up with the mating holes while sitting on the ground is much harder than when on our 4 post lift, even with 3 people shoving it this way and that. After nearly 45 minutes we got the pins lined up and pinned, the front retaining struts bolted on, and the ends of the bumper cover bolted in place. Whew.


Above you can see me standing on the "ankle cutter" again - which always freaks people out. Honestly when you're trying to work on the front of the car you kinda have to stand there. It has been tested to 300 pounds now, too. At right Ryan is strapping on a helmet to take a ride in the Mustang for the first time on a road course. He has driven the car countless times on the street, and even ridden in it at an autocross, just hasn't had a chance to grab a ride on track yet. At most track days he's usually too busy working on other customers' cars or taking temps and measuring data on our own.


We were testing on the newer set of 18x12 Forgestar F14s ($350/each) at all 4 corners mounted with a used set of 315mm Hoosier R6 tires. These wheels and tires were used at NASA @ Hallett on June 22-23 and all day with 2 drivers at the June 29th Five Star Ford ECR track day. So they had some miles, but more importantly they were the same tires we had run at ECR 6 weeks earlier in nearly the same conditions. Any improvements (or slow downs) could at least be nullified from the tires. In the shake down laps Ryan and I did and the car felt LOOSE, but I wasn't really pushing it hard yet, just running some 2:01 laps, checking the gauges (temps looked great all day), looking for any weird deflections in the hood and listening for the splitter rubbing or scraping.


Some external video of when the car was still feeling "a bit loose"

Brandon was shooting pics and video and the whole crew was standing at the pit wall, looking for anything weird, or laughing when I was drifting out of T11 (not on purpose). The splitter did touch on some curbing at the side on a few corners, but it showed no damage afterwards. This thing is TOUGH. One bump under braking into T6 was causing the splitter to barely touch on the front edge, but the old 5.5" Leguna Splitter touched in the same braking zone, so no surprise there. Ryan was very happy with how the car felt, especially the brakes ("WOW, this car really stops"). After a few gentle laps Ryan hopped out and we brought the car in for a thorough look at all systems.


After that look-see went well, we added some fuel then Olof (above) got in to ride shotgun for the next 2 sessions out. Each run was only 3-5 laps, but we were learning a lot as I pushed the car harder each lap. The car was LOOSE AS HELL, especially in the faster corners. So each time we came in we kept adding more angle of attack (AOA) on the rear wing. For sessions 4 and 5 I went out alone, to push the car at the TT3 race weight we would be running. With the final wing change we managed to get the car a bit more neutral and ran the lap below.


That video has some pretty bad driving from me, as usual, and it was still a bit loose. Even with some ridiculously late braking into T1, which turned into a big SLIDE, plus some bobbles in other corners, the car put down a 1:57.6 lap in 95 degree heat on well worn R6s. The best lap I ever have put in at ECR was a 1:56 back in November of last year, when it was 40 degrees cooler and we were on fresh 315 Kumhos, and didn't have these big driving errors. In June the best Amy or I could get out of the car was a 2:00 min lap, wringing it out all day, so we seemingly found 3 seconds on the same set of tires in the same heat. We could have stuck around for more laps and likely chopped off some more time, but it was getting towards 1:30 pm and everyone wanted to go eat and get out of there. Most of us had not taken a day off in weeks and we were all dead tired, too.

The car did make some funky noises all day, only under decel or idle, which we attributed to the vacuum pulling the hoses shut on the oil / air separator system. We are replacing these with proper suction-rated lines tomorrow.

TT3 Work Continues After Track Test

So the car was barely finished enough to take it to the track but we have a lot to wrap up before heading to NASA Nationals. The car is covered in grasshopper guts, half of it is unpainted, and the temporary hood pins we had installed need to be replaced with Aero latches. The flares aren't done, we have a lot of spares to put together, and the general pre-race prep needs to be redone.


Left: Actual look at the track test event. Right: Photoshop rendering in red

We always see a lot of bug hits on the cars raced in Texas when the grass is high, and this test day was no different. To reduce the impact of bug and rock hits on the radiator (actually the A/C condenser) we've got some Kevlar honeycomb grill protector material coming. This will go on the face of the heat exchanger and stay out of the higher pressure airflow at the grill opening. This stuff us used in circle track to take mud and rock hits and can be cleaned out quickly.


Lots of cleaning has to be done before the bumper cover goes to the painter. We have a lot of little paint work to tackle, too - like the raw steel bumper beam, the unpainted splitter needs some semi-flat black, and the grill cover will likely get some black, too.


You merely adopted the downforce, I was born in it.

Some guys on a fb car page made the Bane connection, above. Strangely that's the 4th Bane reference picture so far (and the funniest). I don't like to name cars, though, and we just call it "the Red Mustang" around here.


The flare mock-ups are shown above, with some photoshop work to cover up a few things. The final flares will look pretty similar to this, and they are open on the back for better air evacuation. Hopefully we have time to post up some pictures right before we load up on Monday Sept 2nd, with a painted car, new graphics applied, and at Nationals we will have another set of 18x12" wheels in a different color installed. A sticker set of Hoosier A6s are inbound, other bits and pieces will be here today, and the hood is already bodyworked and primed. I have to stop here and go finish some more flare work tonight.

Upcoming Events

NASA Nationals< Miller Motorsports Park, Sept 4-8th. Will post up about that probably a few days after we get back. But there are several other events we will be at right after Nats.

Five Star Ford track event at ECR, September 7th. - This is an event we would normally be attending in our Mustang, but most of us will be at the NASA Nationals. Matt is taking his BRZ out that day, and if I can find someone to drive it out there, our 2013 GT will be there for showing. These track events are fairly informal but well run, includes instructors for novice drivers, lunch is provided, and they have great SCCA corner workers present. $150 to sign up and you can see more details here.

NASA @ TWS, September 20-22nd. We will be competing at this event at Texas World Speedway, the 2nd time this event is run on the NASA schedule this year (different direction). They will have HPDE, Time Trials, Racing, and an Enduro. Here is a link to the event sign-up page.

Camaro VS Mustang: The Ultimate Battle - October 5th, Texas Motorplex in Ennis, TX. This is a multi-motorsports event being run by True Street Motorsports. This event is billed as a Camaro and Mustang event but is open to all GM and Ford powered vehicles. Events include drag racing and autocrossing; Vorshlag is joining forces with the Texas Region SCCA folks to set-up and run the autocross event. Vorshlag will have cash prizes for the fastest autocross times from both street tire (140+ treadwear) and race tire (DOT R-compounds or slicks) entries. The entry fee is very cheap ($45!) and the sign-up page is here.

There are more events, but that's all I am going to put out there right now. Gotta get to work...

Cheers,
 

Sky Render

Stig's Retarded Cousin
S197 Team Member
Joined
Feb 24, 2011
Posts
9,463
Reaction score
357
Location
NW of Baltimore, MD
Damn it, I'd let you use my car for that coilover test if I wasn't halfway across the country.

-Vince
 

Mountain

forum member
Joined
May 2, 2011
Posts
117
Reaction score
0
The results you guys had in STU are very similar to the results I am getting this summer in my region - the STI WRX is usually 1-1.5 seconds quicker. Comparing this season so far in STU and last season in F stock/RTR, I am having more fun, but not as competitive so far. I need more camber (currently -1.7), more front spring rate (currently 235/200 F/R) and maybe some minor weight reduction (I'd be happy with 100-150 lbs; this is a daily driver in the summer).
 
Last edited:

Vorshlag-Fair

Official Site Vendor
Official Vendor
Joined
Nov 12, 2010
Posts
1,592
Reaction score
107
Location
Dallas, TX
Pre-Nationals Update, Sept 2nd, 2013: It has been a very long week and we have been working hard on our Mustang every day since the test. A lot of things have been finished and cleaned up, and the crew is loading the car into the trailer now, at 10 pm the night before we drive to Miller. I will show a few pictures that are uploaded, but will do a better "catch up " post when we get back from the NASA Nationals...


The picture above shows the Kevlar honeycomb grill guard material and the air cleaner, in front of the radiator. If this honeycomb is damaged it can be quickly removed. It is a sacrificial material. A mesh grill out at the opening (high pressure area) would cause more airflow restriction than this stuff right at the radiator surface.


That's the front end all painted and ready for graphics. The guys at Heritage Collision Center in Sherman, TX did a fantastic job for such a short window, and over a 3-day holiday weekend at that. There is some clean-up work to do, as they ran out of color and couldn't get anyone to open their stores to make more, so don't over-analyze the paint just yet. We will bring the car back after Nationals, sans stripes, and they will re-shoot the hood. For the insane time frame we gave them, however it looks fantastic!

Ryan has been working damn near around the clock getting all of the little fab work done. Jason, Ryan and I worked with the flares and they came out "pretty good" for our first time vacuum forming ABS. We will show more pics of the flares when we get back. We learned a lot with this set, and will apply this knowledge and tweak our forming equipment to get a cleaner looking set of flares soon.


Amy and Jason did the stripes in about an hour, and they look excellent. They look like the old graphics but are indeed all new on the fenders and hood. The stripes dive down into the hood ducts and look slick. Big NASA decals adorn the car front and back.


That's the crew, with me on the left, Amy, then Jason and Ryan (with his eyes closed!). Brandon is on a ladder getting the shot. The rest of our guys are at home, asleep, on this Monday Labor Day holiday. Ed was here earlier helping with the build, as usual, but this time sporting a busted knee. We're loading the trailer and Amy and I leave for our 22 hour tow in about 6 hours. Sleep? Not part of the plan.

We hope to have fun at this, our first NASA Nationals. I want to thank everyone at Vorshlag that helped with this 3 week "new aero thrash" and flares prototype work. The final results are beyond my expectations and I hope it all works as good at Miller as they did at our ECR test. I also I can put in some good laps and don't embarrass everyone! Fingers crossed.

More soon,
 
Last edited:

stang389

forum member
Joined
Sep 1, 2010
Posts
3,617
Reaction score
18
Location
texas
hey terry i will be taking my mustang to motorsport ranch on the 21st and 22nd if you need a test car for some suspension parts, i can install and get the alignment/corner balance done to help save labor costs on your end.
 

neema

forum member
Joined
Aug 30, 2010
Posts
748
Reaction score
0
Location
Fresno, CA
the car looks good Terry. I have to ask--how is the does the car fit in the trailer with the wider front track? I've had my car in an enclosed trailer recently, and with 18x10.5 et 32 offset wheels up front, there's only a little real estate in the trailer between the fenders and front tires.

look forward to seeing your next post!
 
Last edited:

Dreadknought

HOON MONSTER
Joined
Jun 21, 2010
Posts
1,053
Reaction score
2
Location
Texas Hill Country
I hate to say this, but I am seriously sitting here freaking out at how awesome this all is. If this car gets too much cooler, I'm going to have an aneurysm. Seriously the first time any build has given me feels. Damn you.
 

Vorshlag-Fair

Official Site Vendor
Official Vendor
Joined
Nov 12, 2010
Posts
1,592
Reaction score
107
Location
Dallas, TX
Project Update for Sept 17, 2013: Lots to cover in this update - the final pre-Nationals aero prep, paint, new wheels, coverage of NASA Nationals, the trip up and back, and plans for 2014. So much to cover that I'm going to break it up over several days. Otherwise it will be a mega update, then the eyes on the Short Attention Span kids will just glaze over and they will skip ahead just to see the pretty pictures. And believe me, there will be a lot of pretty pictures. Brandon went with us to Miller and shot hundreds of pics of dozens of cars, and Ryan worked on the car and helped me find 6 seconds of improvement over the 4 days we were racing at Miller.

Don't forget that virtually every picture in my forum posts can be clicked for a larger resolution image. Some of these pics are from my camera phone (GS4), but the ones Brandon took with his high end SLR gear are obvious and worth the effort to see the higher rez versions.

Pre-Nationals Prep

After our ECR test session we had one more week to do work on the car, and that included painting the entire front of the car. As you can imagine it was a nearly round-the-clock thrash to get the car finished, pretty, and loaded into the trailer. Most of this thrash was done by Ryan, Jason, me and Olof, with some help from Ed (who blew out his knee, yet still stopped by to pitch in).

So over the past three years of owning, racing and developing this 2011 Mustang GT we have learned one thing that has held true on every wheel and tire iteration: BIGGER IS BETTER. This big, heavy car has a lot of power and a lot of mass, and each time we went to a wider tire the car got faster, without exception. We have not found any limit to this rule yet, and even 345/35/18 Hoosier A6 tires were still easy to spin at autocross speeds, as seen below.


And while it looks like those 345mm tires fit the Mustang under stock fenders, they DON'T. They rubbed everywhere inboard, like mad, and wouldn't even bolt on the car without major changes to the rear swaybar (Whiteline style), a Watts Link, and more. It would still take a large amount of chassis fab work to make these fit - cutting the fenders and adding big flares would do it. Unfortunately Amy never allowed this, and even in the final months of ownership (more on this below) she is sticking to this limitation. Without flares the widest we can fit under the stock S197 fenders at the front or back is 315mm - anything wider rubs inboard or sticks past the fenders (and rubs under cornering if you run the ride height low enough). 315mm tires are not very big when you are talking about a 3500+ pound car making close to 500 hp. I looked at a lot of ST1/ST2/SIX cars at the recent NASA Nationals and all too many were on 345mm rears.

Bill1-M.jpg


In my Sept 20th, 2012 thread update I mentioned that that we were working on solving this tire width limitation by making some bolt-on flares, inspired partly by the AIX Mustang shown above (the flares shown above are not for sale). We had planed on doing this to our 2013 GT, which I bought with the intent of cutting up and building a dedicated ESP classed autocross car. After the SCCA rules SNAFU we changed our plans, so we didn't get to do the chassis cutting needed to develop the S197 rear flares. There aren't any proper flares out there for this chassis (and yes, we know all about the RTR and Shelby versions, and all the rest); by proper I mean flares that can fit REALLY big tires, with a decent aero signature, and that don't cost $6000+. When we bought some extra front fenders, Amy gave us the green light to cut and flare the front. Which we did a week before Nationals...


What we had in mind was something a bit more modern and sleeker than the "cover the top of the tire" flares shown on the black AIX Mustang. Leaving the leading edge of a spinning tire in the airstream creates lots of drag; for lower drag and better evacuation from the fenderwell/undercar areas you want the back side of the flare OPEN, and even curve the trailing edge of the fender opening in if you can. We took some aero cues from several existing race cars and melded that with a little styling from the hard parking ("rough") crowd's flares and made these.


Now I will be the first to admit that these flares are far from perfect; these are very functional prototypes, with which we learned many lessons. I'd say they are a 6 out of 10 cosmetically, but we will make prettier versions. We have learned a lot and have more yet to learn with thermal formed plastic flares - making the bucks/molds, tweaking our heater, improving our vacuum table, and experimenting with more materials. We made all of our own vacuum forming equipment (which I'm not showing on purpose - sorry) and this is about version 1.2 of the flares. We still have several more iterations and technique improvements in store before we make something worth selling. And honestly, most people will want the "more looks/less aero" version with a little more styling (something more akin to this), which we plan to do. And we will make the rear flares, just not going to cut on this car's chassis due to Amy's restrictions on her car. Someone will bring us an S197 we can cut on a little, and we will make the rears around a 345mm wide tire at that time. The fronts clear 335mm wide tires.


The honking oil catch can system

The oil catch can and hoses were upgraded from the old JLT kit we had added (then heavily modified). I talked about this before the ECR test, but in short the new system has a larger catch can (from Moroso) and mounts to the firewall. We thought we routed it the same way as the Boss 302-S race cars, but not quite. Instead of the JLT system that was pulling from just one cylinder head, we pulled air from both, with the lines T-'d together on the right side of the catch can. On the left of the can is a line that pulls from a vacuum source in the intake manifold. So theoretically the engine vacuum from the intake manifold pulls through the catch can, and grabs oil/vapor/air from the top of the motor from both valve covers, and the oil separates out into droplets inside the metal mesh filter inside the can. Once it falls out of suspension it pools in the bottom of the catch can, which can be drained between race weekends. In theory only air goes back into the intake manifold, not "oily air". Burning oil can cause detonation, of course.


So we showed a version of this system before the ECR test and the heater hose we used there was collapsing badly under deceleration/high vacuum - so much so that it made this loud "honking" noise that sounded like a dying goose (see video linked above), even at idle. Pinching off the vacuum source made the noise go away. So we replaced the heater hoses used at the ECR test with suction rated hoses. And it still collapsed on one side. Bruce from Ford Racing looked at the routing and immediately saw the issue - we sill have the PCV valve in the passenger side valve cover. Duh. So that valve closes under load, which puts that hose under extreme vacuum on that side. The fix is to get a driver's side valve for both sides - which deletes the PCV valve, suitable for a race car. We will try this before the next event (NASA @ TWS) and see how it does.


The hood latches/pins were a bit of a bear to install. I bought some "flush under mount" Aerolatches (but I meant to get the top mount) and was hoping to install them before the ECR test. Well we ran out of time and instead temporarily installed some simpler Sparco style hood pins for that track test. That took a couple of hours, whereas the Aerolatches took another 4+ hours to do correctly before we went to Nationals. Total PITA, but well worth it in the long run.


As you can see, they are much more aerodynamic, with considerably less drag when installed than the old school hood pin "posts" that protrude above the hood and have a separate securing pin that hooks through the hole in the post. The latches come with templates to use for marking and cutting the tapered oval openings and drilled holes for securing bolts. A very fiddly installation, so take your time and don't rush this. Aerolatches are not something you want to do the night before a race, trust me. It might take you an entire day to do 4 of them, if it is your first time.


The up/down alignment of the posts is critical, as is the angle of the post through the hood/into the latch, as is the latch alignment to the post. But once you have them installed and adjusted correctly (don't be afraid to use a light touch with a sledge hammer to persuade them during alignment) they mount flush, and when open the latches are very visibly so. Some folks paint the top of the latch a bright and contrasting color, so they are even more visible when open. But the black plastic stands out well against the red hood, so we left them unpainted. We used 4 across the hood to hold them down - some folks use only 2, but on an S197 there are 4 rubber "hood bumpers" that make for great spots to mount the pins/latches.


The hood struts we added to this car are nice, but everything has limits. As some of you may remember, one of these struts popped loose last May in some 30+ mph wind gusts, and the hood went crashing into the windshield. This was when the car was parked in the grid, facing into the wind, during an SCCA National Tour event in Nebraska. We had to finish the weekend with a destroyed windshield, and the hood was damaged every so slightly at the rear corners. It broke one hood hinge, too, which we replaced. So we don't trust the hood struts completely, and have been using these + the OEM hood prop to hold the hood from opening completely whenever there is even the slightest breeze in grid or paddock.


But having these self-raising hood struts is convenient, and now that the 3" diameter intake tubing is passing right over the top of the radiator, the hood prop no longer fits with the hood down. With the new hood we had just been using a broom handle to hold the hood up in paddock and the shop after we added the hood ducting and intake tube - but after the stick was bumped, it fell off and the hood bonked into my noggin, I went ahead and grabbed the hood-side mounts off of the old hood and reinstalled the hood struts. Two holes to drill on the hood and everything transferred over. Well except the bottom end of one hood strut was smashed in the previous "paddock incident" (the plastic end cup is broken), so I spent half an hour looking through all of the OEM replacement hood struts at the local parts store, found one that kind of fit, and it worked enough for careful use at Nationals. With some zip ties holding it together. Just use some common sense when pointed into the wind, or you could face the same consequences we did (new windshield + new hood hinge + damaged hood). Called RedlineTuning and they are sending us the plastic replacement end for the strut, free of charge - thanks.

continued below
 

Vorshlag-Fair

Official Site Vendor
Official Vendor
Joined
Nov 12, 2010
Posts
1,592
Reaction score
107
Location
Dallas, TX
continued from above


On Saturday before we were to leave Ryan had the calipers off to make new brake ducting backing plates for our car. We've been making these for customers in small batches, and will add them to our website in the next week or so, as front brake ducting kits for the 14" Brembo cars. During the reinstall of the calipers one of the M12 bolts stripped out the threaded hole in the aluminum caliper - which figures, because Ryan asked for new calipers 2 months ago, and I had said "Nah, these are fine..." We figured these holes have been screwed and unscrewed close to 150 times, so it was time to replace them. We couldn't get a replacement caliper on the 3-day Labor Day weekend and were set to leave early Tuesday morning, so I picked up a heli-coil kit at a local NAPA and Ryan fixed that on Monday.


Our previous set of backing plates (our first set we made about 2 years ago) were as bad as most out there, having had the cooling hose pointed mostly at the rotor face. The new ducts our guys built have the inlet moved inboard, to blow air inside the rotor's friction ring and at the hub. This lets the vanes of the rotor pull the air through the inside of the rotor and out, and also cools the front hubs. Our plates have the correct tubing size to fit inside a 3" brake duct hose without having to remove the reinforcing metal ring winding in the brake duct hose, unlike all of the other brake cooling kits we have installed before (including the Ford Racing kit). It isn't that hard to do it right, but nobody else seems to. Our plates are made from new OEM backing plates, trimmed down with a piece left in place to shield the tie rod from rotor heat, yet leaving the rotor face open. We bead blast them to raw metal, cut to fit the round tubing, TIG weld it all together, then have them powder coated black. More on these as soon as we get a batch back from the powder coater and added to our website.

Since we didn't want to get any grief from NASA's "50/50" rule (the car has to look good from 50 feet at 50 mph), we had to pull the car apart for paint before heading to Nationals. We sent the fenders on Wednesday night, and we got them the hood and bumper cover by Friday on the Labor Day weekend. They had it all painted by Sunday, and it came out great. We rushed the heck out of them and the hood wasn't cut and buffed, but we were out of time and picked it up anyway.


Once the front body panels were picked up we started to quickly reassemble the front of the car. This happened on Monday - Labor Day - and we spent the entire day getting it all put together. The splitter and lower fascia had to go back onto the bumper cover, the fenders had to go on and be aligned, the hood had to go back on and be aligned, and the Aerolatches had to be reinstalled.


Once the fenders and front bumper cover were on we could finally install the flares, which we built while the fenders were being painted. The flares turned out pretty well for a first effort, but we will definitely make some improvements. We added a cut at the bumper cover to fender parting line, so we can pull the front bumper cover and splitter off to make it easier to roll the car into the trailer.


You can see the side mirror block off plates that Olof built, for both door mirrors. This was "the drag racer" Ed's idea, to reduce drag on the higher speed Miller track; I'll talk about how fun it is to drive the car with huge blind spots, down in my event write-up. Once the flares were trimmed and bolted on Amy and Jason started on graphics, while Ryan was corner weighing the car (came in the first time at a 49.8% cross - good enough!).


We went ahead and kept the quickly built aluminum grill block off plate, which I degreased, taped off and painted semi-flat black. Then the sticker crew added a white Vorshlag graphic, the NASA graphics, and fresh rear flank Vorshlag graphics.


The white wheels had some scrub A6 tires mounted, as the sticker set we had ordered a week before was delayed by UPS. I was freaking out, but luckily our friends from Maxcyspeed were able to swing by and grab the 4 new tires as well as two new front calipers after we had left, then trucked them 25 hours across country and brought them to us in Salt Lake City. Whew!


You can see the hood stripes in many pictures from the event, which are similar to the previous version. These go down into hood duct openings so they are a bit wider in some areas, and we capped the front with a big NASA decal we made. There are also new decals for Whiteline, Maxcyspeed, MagnaFlow, Hoosier and others that were on the front half of the car. We added more contingency decals at the NASA Miller event for GoPro, MCS, Royal Purple and the required NASA Nationals event decals.


These two pictures above, from the Miller event, show how the entire splitter, bumper cover and grill come off as a unit. This makes it easy to load and unload the car from the trailer. It takes about six minutes to remove and 15 minutes to install the front of the car, with various bolted fasteners and the splitter support struts.


Other than some new rear pads we installed after ECR (the same rear Carbotechs have been on there for many months of abuse - since before NOLA in May) that is the extent of the pre-Nationals prep on the Mustang. We finished up working on the car and loading it and all of our spares and tools and tires into the trailer at about 11:30 pm Labor Day, we were home by midnight and packing our gear for the trip, and we rolled out the next morning at about 7:30 am...

continued below
 
Status
Not open for further replies.

Support us!

Support Us - Become A Supporting Member Today!

Click Here For Details

Sponsor Links

Banner image
Back
Top