okay so WTF?

DusterRT

Defected to Deutsche
Joined
Dec 9, 2008
Posts
1,707
Reaction score
32
Location
Seattle, the Sunshine City
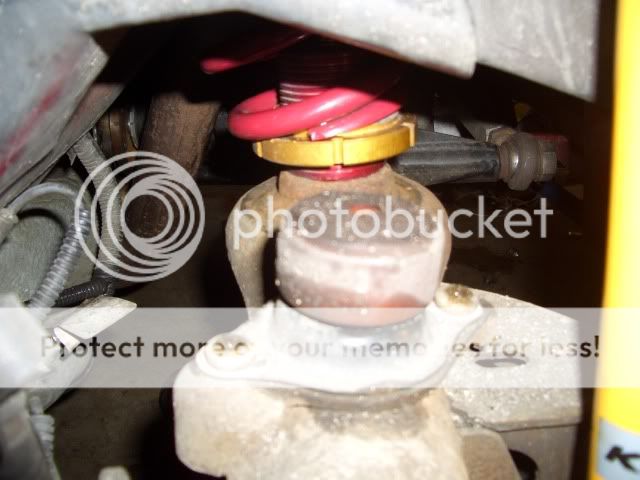
When comparing Duster and Kaldars car, I notice the spring seat/gold collar don't look the same between the two. Dusters has holes in it almost making me think it's made of two halves bolted together. Is it just a generation gap or possibly a wrong part?

Their adjustment collar is more of a threaded clamp than the traditional two collar jam nut style. The collar is split in one place and has a small bolt that you loosen that allows you to adjust it, then you cinch it back down to fix it in place. After unsuccessfully attempting to un-seize the collars on my friend's VW's coilovers, I really like this design!
 

SoundGuyDave

This Space For Rent
Joined
Apr 9, 2007
Posts
1,978
Reaction score
28
05: It's not really that hard on the measurements... Basically, shoot for zero net pinion angle and adjust from there... What you want is the two flanges (pinion and output flange) to be parallel, so if the trans is pointing down 10*, you want the pinion pointing up the same amount. 10* is just an example, obviously!

You're right, though, something is way out of whack with the OP's suspension setup, somewhere. My gut's telling me it's the brackets.
 

Kaldar142

Senior Member
Joined
Jun 26, 2008
Posts
2,308
Reaction score
4
Location
Silver Spring, MD
Looks like I have a busy weekend ahead of me, LOL


Hey dave, I'm using a digital angle finder and when I measured the trans flange it was 86.2 degrees, my pinion flange was 89.0 degrees. When I adjusted the pinion angle I went to 86.2 to make them match, which I also had to turn it quite a few times. Couple days later I brought it to about 85 to make it more negative.

That's the only way my gauge reads, what do you think? This was of course done with it loaded and on level surface.

Perhaps it's wrong and I should of went the other way, even though I thought this was correct
 

Kaldar142

Senior Member
Joined
Jun 26, 2008
Posts
2,308
Reaction score
4
Location
Silver Spring, MD
Also, before I start taking everything apart, are there any pictures you think would help figure out what's going on
 

Pony DNA

grease monkey
Joined
Sep 2, 2009
Posts
161
Reaction score
4
Location
SoCal
Okay, it looks like we're starting to close in on the issue and the solution... If I were you, here's what I would do:

1) Temporarily remove the relocation brackets, and see if that centers your axle out (at least visually). This costs nothing, and if it changes nothing, then we have other issues. If removing the brackets puts the axle in the right spot, then you know that you'll need adjustable lowers to run the CHE brackets, and that CHE's design on the bracket was less than well thought out. The holes in the bracket should describe an arc based on the front of the rear LCA. In theory, you should be able to pin any of the holes and not change the location of the rear end. Not everybody managed to get that right... Both Steeda and BMR got that right, but I can't attest to CHE. This could be interesting!
2) If, however removing the brackets does NOT reset the axle position, then I would pull one of the lower arms and compare length to the OE piece. You should be able to set them side-by-side, and run bolts through both of them without problem. If you can't, or the CHE arm is visually longer, then that's your problem.
3) If the brackets are right, and the control arms are right, then your UCA adjustment is way off for some reason. Assuming that everything worked correctly stock, the chassis mount points are in the correct location, and absent crash damage, that couldn't have changed, so...

I have no doubt that you did it right, but I'm going to restate the pinion angle measurement procedure just to get it out in the open for anybody that may be attempting it! With the car in the air, but loaded on the rear suspension (and with the chassis sitting level! Think ramps rather than jackstands.) remove the driveshaft, and use an angle-finder to measure the angle of the transmission output shaft flange relative to the ground. Let's say, for sake of argument, that it's 2*, and points slightly towards the ground. Call that "-2*." Now, measure the pinion shaft flange the same way, and compare the two. In this case, for example, the angle is 1*, and the flange points up slightly, so we'll call that "+1*." Add the two numbers together, and THAT is your net pinion angle, in this case a net -1*. For auto cars, you want around -1 to -2*, and for sticks, between -2 and -3*. If you run poly/rod control arms, reduce the angle by one degree, (-1 to -2 for sticks), and if all rod-end, just set it at -1 and be done. What you're doing with pinion angle is pre-loading the rear suspension so that under acceleration, you wind up with a net ZERO pinion angle, and the different bushing materials will have different rates of deflection.

With a little luck we can figure this out and get you all sorted! :beer:


SGDave,

Dude, you got up before me!

Kaldar, Dave is right on in his diagnosis tree. Just follow it step by step and you cannot go wrong short of there being a bent chassis that is.

The CHE brackets are not so good just as he mentions for exactly the reason posted not to mention the lack of enough adjustment holes. I hope you did not weld them in and can remove them as posted. I have BMR LCA relocation brackets because Steeda would not release theirs for a couple of years after BMR did. I begged then to release them sooner as they had them just sitting on the shelf! Anyway I had to drill extra holes in the BMR's to make them have the right adjustments and they are still not as good as the Steeda version LCA relocation brackets. But too late, I welded the suckers in years ago GRRR!

HTH!
 

SoundGuyDave

This Space For Rent
Joined
Apr 9, 2007
Posts
1,978
Reaction score
28
Looks like I have a busy weekend ahead of me, LOL


Hey dave, I'm using a digital angle finder and when I measured the trans flange it was 86.2 degrees, my pinion flange was 89.0 degrees. When I adjusted the pinion angle I went to 86.2 to make them match, which I also had to turn it quite a few times. Couple days later I brought it to about 85 to make it more negative.

That's the only way my gauge reads, what do you think? This was of course done with it loaded and on level surface.

Okay, that's still simple enough to give the info we need. From experience, I know that the trans tailshaft points down, so your 86.2* reading, subtracting 90* (veritcal) will yield a -3.8* net angle. The pinion flange will be tipped the other way, and the 89* reading equates to a 1* positive, so the net pinion angle is -2.8*, which is a touch more negative than we need. At your current setting of 85*, that's a net -1.2* angle, which is certainly in the basket of "correct." Let's call that one good, but it wouldn't hurt to re-measure to verify that nothing has changed. With the digital gauges, it's easy to see which way the flange is tipped. Still in contact with the flange, rock the gauge until it reads 90* (vertical), and if you had to pull the bottom away from the flange, your reading is negative; if you had to pull the top away from the flange, the reading is positive.

And yes, you DO have a busy week ahead of you!! If, as I suspect, it does turn out to be the brackets, then you have a few choices on how to proceed.
1) Skip the relocation bracket entirely. See how the car drives, and if you're not getting excessive squat on acceleration or dive under hard braking, you're fine. Too much anti-squat can actually hurt you as you accelerate off the corner and cause snap oversteer, so you MAY actually see an improvement. That will be your call.
2) Replace the brackets with either Steeda or BMR, since I know for a fact those are drilled correctly. Either way, you should weld them in, so don't let that be the deciding factor.
3) Replace the lower control arms with adjustables to compensate. Make sure, though, that you'll have enough range of adjustment, since yours looks pretty far off...

My personal vote would be for #1 or #2. THEN add in the adjustables, and you'll be done with the rear end for a LONG time to come. I'm using the Steeda competition upper control arm, and Maximum Motorsports lowers, all rod ends.

Good luck, and let us know how it all shakes out!
 

Kaldar142

Senior Member
Joined
Jun 26, 2008
Posts
2,308
Reaction score
4
Location
Silver Spring, MD
i love this forum!! you guys have all been extremely helpful


So the CHE relocation brackets are no good? damnit.... When i put them on, i felt a HUGE difference in traction so i would definitely want to stay with some type of relocation bracket.

Also, Dave... i was looking at the maximum motorsports lcas, do you think those have enough adjustment in them?


Good thing i have a garage, its been raining all week and will continue to rain... :(

I'm still kind of skeptical about my UCA though, when i was adjusting it i had turned it ALOT, i guess i can play around with it and see if it does anything, since its much easier to do that than to tear apart my suspension lol
 

Pony DNA

grease monkey
Joined
Sep 2, 2009
Posts
161
Reaction score
4
Location
SoCal
Mine are adjusted lower than dusters, it's the same part.

So basically I need to get adj. lcas and shorten them to bring it closer, then measure my pinion angle.

So you don't think that maybe I adjusted my UCA incorrectly? It couldn't be that far off by only adjusting the uca?

Also, random you bring a good point, my axle is shifted very far back that it puts thw wheels close to the rear bumper, but it's the same on both sides.


Hi Kaldar,

When you get your new adjustable LCA's in your hands this is what you might want to try. I would guess you have or can borrow four jack stands.

With the car siting on level ground measure the rear axle height from the center of the wheels to the top of the fender, use blue tape to mark your measurement points or you will get lost later on. For grunts and giggles measure both sides. Then put the car up on all four jack stands making sure to get it as level as possible. Leave your tires on for now but pull out both rear springs.

Using a floor jack under the pumpkin lift the rear axle up into position using your static axle to fender measurements and confirm that the axle is cattywompus per the photos. Is the wheel in the middle of the wheel arch? How much does it miss by? Pull out one of your old fixed length LCA's and measure it. Take that new adjustable LCA and make it shorter than the old LCA by about as much as the wheel is not centered in the arch. No need to get it all tight we're playing with this for now. Put the NEW adjustable LCA back in the car and just put the bolts in place to see where the axle lines up now. Is it better? If so keep adjusting it until it's in the right place when the axle is at ride height using the blue tape as a reference point to measure from.

Once you have it right pullt the new adjusted LCA out of the car and make the other one the same length. Put the first LCA back in the car loosely and pull the last OLD LCA out and replace it with the NEW and now adjusted LCA, shove the bolts in and have a look with the axle at the correct height in the wheel wells again using the blue tape as a reference point of measurement.

Now here is the tricky part. Loosen the UCA locking nuts or jam nuts. Did you use the lower pivot hole on the BMR UCA mount? If not remove the chassis side UCA bolt and reposition it in the lower hole now. Adjust your UCA to get the approximate pinion angle you need if possible. Drop and raise the rear axle as needed to achieve the target pinion angle making sure to set the axle height to the previous measured static axle height.

Once you have the UCA adjusted go back and confirm that the axle is centered in the wheel arches. If not adjust one LCA until it's right and then adjust the other LCA to the same length. Then go back and confirm your pinion angle is right again. This is a circular task and may require adjusting and checking all of the measurements and axle centering a few times to get it right. Once you have it 100% torque the LCA and UCA jamnuts and check it one more time before installing the springs back in their seats. While you are under the car you will probably need to check the axle's lateral centering just to make sure you don't have a new problem caused by all the adjustment going on.

Also know that with a mixed maker suspension you may or may not be able to get the UCA and LCA's adjusted perfectly, you may run out of adjustment on the UCA or LCA's. If this happens you will need to talk to your vendor or UCA/LCA maker about what you can do about it. If you did not weld your LCA bracket to your axle I would sell them off to a dedicated drag racer and then install some Steeda LCA brackets. Just realize that you probably won't be able to run your car through an automated wash rack any more.

HTH!
 

Pony DNA

grease monkey
Joined
Sep 2, 2009
Posts
161
Reaction score
4
Location
SoCal
Okay, that's still simple enough to give the info we need. From experience, I know that the trans tailshaft points down, so your 86.2* reading, subtracting 90* (veritcal) will yield a -3.8* net angle. The pinion flange will be tipped the other way, and the 89* reading equates to a 1* positive, so the net pinion angle is -2.8*, which is a touch more negative than we need. At your current setting of 85*, that's a net -1.2* angle, which is certainly in the basket of "correct." Let's call that one good, but it wouldn't hurt to re-measure to verify that nothing has changed. With the digital gauges, it's easy to see which way the flange is tipped. Still in contact with the flange, rock the gauge until it reads 90* (vertical), and if you had to pull the bottom away from the flange, your reading is negative; if you had to pull the top away from the flange, the reading is positive.

And yes, you DO have a busy week ahead of you!! If, as I suspect, it does turn out to be the brackets, then you have a few choices on how to proceed.
1) Skip the relocation bracket entirely. See how the car drives, and if you're not getting excessive squat on acceleration or dive under hard braking, you're fine. Too much anti-squat can actually hurt you as you accelerate off the corner and cause snap oversteer, so you MAY actually see an improvement. That will be your call.
2) Replace the brackets with either Steeda or BMR, since I know for a fact those are drilled correctly. Either way, you should weld them in, so don't let that be the deciding factor.
3) Replace the lower control arms with adjustables to compensate. Make sure, though, that you'll have enough range of adjustment, since yours looks pretty far off...

My personal vote would be for #1 or #2. THEN add in the adjustables, and you'll be done with the rear end for a LONG time to come. I'm using the Steeda competition upper control arm, and Maximum Motorsports lowers, all rod ends.

Good luck, and let us know how it all shakes out!

SGDave,

Kaldar has way too much power to not try to optimize his side view IC. He'll be going up in smoke all the time.

It's not the anti-squat that causes oversteer it's rear axle roll steering that is the problem. This is why you want to keep your LCA's as level as possible for street or road course use to minmize roll induced oversteer and promote high-speed stability with some rear axle roll understeer.

Cheers!
 
Last edited:

SoundGuyDave

This Space For Rent
Joined
Apr 9, 2007
Posts
1,978
Reaction score
28
Kaldar: Using the stock UCA mount shouldn't be creating any issues, or change any of the adjustment procedures. I'm running the stock mount myself (F*cking TT points!!).

Pony: I somehow missed the blower power in the sig. I agree, he's going to HAVE to set up the IC for more traction. And you're right, it is the roll-steer issue that causes the snap oversteer, in a way I mis-spoke. Since everybody on this chassis uses the LCA mount brackets to optimize IC, I kind of mentally translated that into "setting up for high AS% creates snap oversteer," since that's essentially what they are doing... Due to classing contstriants (F*cking TT points!!), I had to pull my relocation brackets, and it did hurt my straight-line traction somewhat, but had almost no impact on cornering under power, since I was running the the LCAs pretty flat before. When I initially set them up, I used the bottom hole (BMR) and while the launch was great, it was a serious handful going around corners! Good catch.
 

Pony DNA

grease monkey
Joined
Sep 2, 2009
Posts
161
Reaction score
4
Location
SoCal
Hey pony, i have the stock UCA mount... so would that change the way i do any of the things you just described?


Hi Kaldar,

No, just ignore the part about using the lower pivot hole on the mount. If you were here I'd come help you, where are you? The advice SGDave and others has given is pretty sound. But if you can wait for some new adjustable LCA's to come to your house before digging into the car that's what I would do. It seems likely that you might need them to get your axle in the right place even with the LCA brackets removed. Having the ability to adjust the length of both the upper and lower control arms will make your life easier in this situation. Keep us posted on your progress and get back to us with how those new dampers work.

HTH!
 

Pony DNA

grease monkey
Joined
Sep 2, 2009
Posts
161
Reaction score
4
Location
SoCal
Kaldar: Using the stock UCA mount shouldn't be creating any issues, or change any of the adjustment procedures. I'm running the stock mount myself (F*cking TT points!!).

Pony: I somehow missed the blower power in the sig. I agree, he's going to HAVE to set up the IC for more traction. And you're right, it is the roll-steer issue that causes the snap oversteer, in a way I mis-spoke. Since everybody on this chassis uses the LCA mount brackets to optimize IC, I kind of mentally translated that into "setting up for high AS% creates snap oversteer," since that's essentially what they are doing... Due to classing contstriants (F*cking TT points!!), I had to pull my relocation brackets, and it did hurt my straight-line traction somewhat, but had almost no impact on cornering under power, since I was running the the LCAs pretty flat before. When I initially set them up, I used the bottom hole (BMR) and while the launch was great, it was a serious handful going around corners! Good catch.

Hi SGDave,

You had the right idea you just did not go all windy like I always do.

I don't have to follow any rules as I don't compete in any officially santioned events. I just drilled new holes in my BMR LCA reloc brackets between the existing ones to get it just right. You can get on it a little bit sooner on corner exit with the LCA's in the perfect hole vs. pointing up hill to the axle. Small difference but still noticable under the right conditions.

Cheers!
 

Kaldar142

Senior Member
Joined
Jun 26, 2008
Posts
2,308
Reaction score
4
Location
Silver Spring, MD
i have a question regarding the LCA stance, do i want it to be pointed down or do i want it to be level for optimum handling and grip? or slightly angled down?
 

Pony DNA

grease monkey
Joined
Sep 2, 2009
Posts
161
Reaction score
4
Location
SoCal
i have a question regarding the LCA stance, do i want it to be pointed down or do i want it to be level for optimum handling and grip? or slightly angled down?

Hi Kaldar,

Well it depends. But ideally with a well balanced chassis you would prefer them to be level. That way as you load the rear axle in a turn the axle will tend to roll understeer and lend stability to the car instead of oversteer. This same effect is also working to your advantage when you are cornering and hit a bump in the road, the axle rolls in the direction of adding stability instead of instability which improves driver confidence in what the chassis is going to do. The faster you go or higher the load the more stable the car will try to become. If the LCA's are pointed down towards the axle the opposite condition occurs until the LCA passes through the longest point of its arc and starts to pull the axle back the other way.

This is exactly the same sort of thing that happens with a Panhard bar that has been optimized. As you go through a corner the Panhard bar wants to push or pull on the mounting point on the chassis depending on which way you are turning and where the Panahrd bar is in its arc. This is one of the reasons why a properly set up Watt's link feels smoother and transitions faster. A Watt's link when driven on the edge will not have any of the sort of spooky loading and unloading motions the Panhard bar puts in to the chassis as the suspension works up and down and the Panhard bar passes back and forth through the longest part of its arc.

But as I've posted before level is usually not the optimum setting for a drag strip launch. Normally on a hard drag type launch the LCA's will work more to your advantage if they point down hill toward the rear axle. The reason is by moving the LCA's to a lower position you are moving the instant center rearward increasing anti-squat. Anti-squat is simply using the suspension geometry to your advantage like an anti-roll bar, to transfer weight to the rear tires through mechanical advantage or leverage. This helps to make the tires bite when launching the car and in a drag race the first 60 feet are very important and basically make or brake a timed run.

The quickest '60 times for an S197 I've seen are in the low 1.3 second range running LCA relocation brackets. A good stock S197GT will be in the 2.0- 2.1 second range. That is 3/4 of a second difference just for changing the angle of the LCA's. LCA brackets are a LOT cheaper then the money it would take to make the extra 75bhp or so it would take to clip that much time off your ET.

Does this help answer your question?

Cheers!
 

Kaldar142

Senior Member
Joined
Jun 26, 2008
Posts
2,308
Reaction score
4
Location
Silver Spring, MD
So, for optimum handling i should keep them level?

Also, i have not started working on my car yet BUT, i noticed that the passenger side rear wheel is farther back then the driver side wheel, which they are BOTH more rearward then they should be.


WTF?!?! I'll pull the relocation brackets off tomorrow and see what it does.

What Adj. LCAs would you recommend? the maximum motorsports ones look nice
 

bigwilly43729

I do stupid shit, a lot
S197 Team Member
Joined
Jul 27, 2007
Posts
6,751
Reaction score
13
Location
Oklahoma: Not terrible
So, i put on my ground control coilovers and everything is great, except............

I didn't have the spacers and poly bushings to put in the rear konis, so i did that today when they arrived today.

Although, there is a slight problem... the springs don't sit flush on the perch, its almost like the axle is off center or something. the rubber thing won't allow the spring to sit flush.

check out this bullshit...

CIMG0198.jpg


CIMG0197.jpg


CIMG0196.jpg

This is EXACTLY what my springs looked like before I got adjustable LCA's. I had an adjustable UCA, but with the relocation brackets, I guess it didn't provide enough adjustment. I picked up some BMR adjustable LCA's and got this worked out. Not saying that's your problem, but when you mentioned the axle being off centered, that made me think back. It was the exact same thing I said.
 
Last edited:

Kaldar142

Senior Member
Joined
Jun 26, 2008
Posts
2,308
Reaction score
4
Location
Silver Spring, MD
Yeah, i think i need some adjustables.........ugh

Fucking money pit, one thing after another

oh well, good chance to upgrade to some rod ends :D :D :D
 

SoundGuyDave

This Space For Rent
Joined
Apr 9, 2007
Posts
1,978
Reaction score
28
Get the Maximum Motorsports arms, you won't be disappointed! I shattered the front bushings in my BMR poly/rod arms before I went to the MM pieces, and the handling difference was noticeable. There will be more NVH than with a poly-bushed arm, but it's livable, IMO. The fact that you have one side further back than the other says a couple of things... Either the CHE arms are off, or the CHE brackets are off, or both, but either way, you're going to have to make some changes. I would pull the brackets and see what you've got. If the rear axle comes in nicely, then just order the Steeda pieces and have them welded in when you get them, and you should be in good shape. If the axle doesn't come in, then you know for a fact that you'll need the adjustables to replace the screwed up arms, and at that point, either weld in the CHE brackets, or get the Steedas and do it right the first time around...

I've honestly got nothing against either BMR or CHE, but they are drag-oriented companies, and for us twisties folk, that's not really the engineering viewpoint we need to see. The drag guys probably never even think about the forces applied to the suspension bits when in a cornering situation, and after breaking a lot of "race" parts, I figured out that you need to go with vendors that have a presence in our niche of the market, like Steeda, Griggs, Agent47 and of course, Maximum Motorsports. My very last bits of BMR are coming off the car after the season ends, if that tells you anything.
 

Kaldar142

Senior Member
Joined
Jun 26, 2008
Posts
2,308
Reaction score
4
Location
Silver Spring, MD
Wait, so what do you think about the BMR K-member / a-arms? i was going to put thos on tomorrow but if you think otherwise, since BMR is drag race orientated.

I think i'm going to redo my suspension, LOL

funny how one change, makes for 10 other changes... hahaha

Heres my list of what i will change;

BMR LCAs upgraded to maximum motorsports adj. LCAs
CHE relocation bracket changed to Steeda relocation bracket

I should be good with that, right? i have a CHE ADJ. UCA also with stock mount.

I wonder why its so out of shape, can't wait to have a look at it tomorrow
 
Back
Top