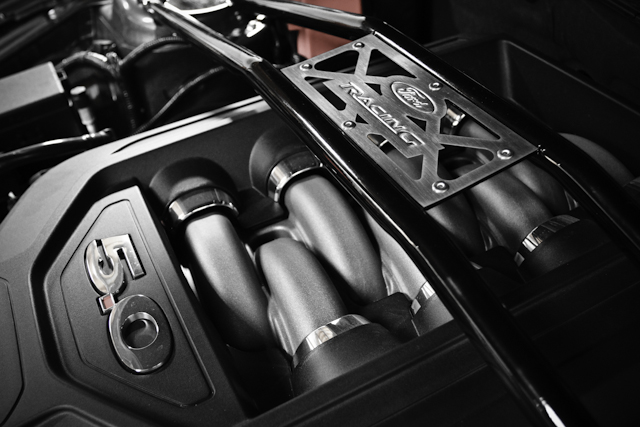
The 2012 Boss 302 Intake Manifold has been THE talk of the town since it was first spotted in the photos released by FoMoCo. Then we got another dose of it in the FRPP catalog wearing part # M-9424-M50BR. Then came all of the controversy on the interwebs all over the forums over availability. Well, all BS aside, we have them in the warehouse & we put one on a car. Scott's Race Red Brembo Package 2011 5.0L Mustang GT to be exact. Surprisingly, despite how it looks initially, it really went quite smoothly & quickly. Scott & I were recapping after the install & we both agreed that putting this intake on a 5.0L Coyote was vastly simpler than installing an intake on a venerable pushrod 5-oh. Enough of the appetizer, lets get to the meat & potatoes!
Oh, on a side note, you'll be getting several first looks at the all new Nitrous Outlet Plate Kit Nitrous System designed specifically for 2011-2012 5.0L Mustang. And yes, it does fit with the Boss Intake just fine. A full install write up will be coming up soon on this Nitrous System.
First, remove your intake cover. This is done by simply pulling up on the cover & unsnapping it.
Second, remove your inlet tube. This Mustang was already equipped with a Steeda CAI, so we simply loosened a couple of clamps, disconnected the sound tube & PCV tube, & pulled it free of the car. Just to get the PCV tube out of the way, we removed it from the valve cover as well.

We then removed the breather tube that runs from the RH valve cover to the intake manifold.

After that, we pulled the throttle body loose & let it hang out of the way. You can fully remove it from the car, but because of the nitrous system on this one, we just let it hang out because it looked comfortable.

Next, we pulled the purge valve off of the intake. This is the part that requires all the Boss specific stuff to properly locate. Well, at least that is what was being said. No says I. We'll cover the cheap fix here in a bit.


On each side of the intake you'll see 2 nuts holding down plastic brackets, & on the drivers side, the brake booster vacuum tube. Remove those & set the brackets to the side & pull the vacuum tube free.


Once those are out of the way, grab 2 sets of pliers & a friend to remove the booster vacuum hose from the intake manifold. The 2 clamps are connected with a metal strap, so they don't move independently.

Then you can remove the foam sound deadener from both sides of the fuel rails.

Now, remove the 4 fuel rail retaining bolts & set them to the side. Unplug all the fuel injector electrical connectors. Using a 3/8" fuel & a/c line disconnect tool, disconnect the fuel feed line. Wrap the fitting with a rag to prevent gas from going everywhere. (its still a safe bet to have your safety goggles on) Remove the fuel rails from the car by gently pulling up & releasing the injectors from the intake, & set them to the side.


You are now left with 6 bolts holding the intake to the heads, 3 on each side. They are located front corner, dead center, & rear corner. Fully loosen all 6 of these. They will not come out of the intake, so don't spend too much time trying. Once you're done with that, lift up on the manifold & slide it forward slightly. On the very back there are 4 wiring harness retainers that need to be pulled free from the intake.

Pull that stock intake out of the way to make room for better looks & more power!

Here is a better look at the 4 wiring harness retainers. Also, that is oil on Scott's finger & there was more in the intake. Probably a good excuse to add an oil separator.

Oh, on a side note, you'll be getting several first looks at the all new Nitrous Outlet Plate Kit Nitrous System designed specifically for 2011-2012 5.0L Mustang. And yes, it does fit with the Boss Intake just fine. A full install write up will be coming up soon on this Nitrous System.
First, remove your intake cover. This is done by simply pulling up on the cover & unsnapping it.
Second, remove your inlet tube. This Mustang was already equipped with a Steeda CAI, so we simply loosened a couple of clamps, disconnected the sound tube & PCV tube, & pulled it free of the car. Just to get the PCV tube out of the way, we removed it from the valve cover as well.
We then removed the breather tube that runs from the RH valve cover to the intake manifold.
After that, we pulled the throttle body loose & let it hang out of the way. You can fully remove it from the car, but because of the nitrous system on this one, we just let it hang out because it looked comfortable.
Next, we pulled the purge valve off of the intake. This is the part that requires all the Boss specific stuff to properly locate. Well, at least that is what was being said. No says I. We'll cover the cheap fix here in a bit.
On each side of the intake you'll see 2 nuts holding down plastic brackets, & on the drivers side, the brake booster vacuum tube. Remove those & set the brackets to the side & pull the vacuum tube free.
Once those are out of the way, grab 2 sets of pliers & a friend to remove the booster vacuum hose from the intake manifold. The 2 clamps are connected with a metal strap, so they don't move independently.
Then you can remove the foam sound deadener from both sides of the fuel rails.
Now, remove the 4 fuel rail retaining bolts & set them to the side. Unplug all the fuel injector electrical connectors. Using a 3/8" fuel & a/c line disconnect tool, disconnect the fuel feed line. Wrap the fitting with a rag to prevent gas from going everywhere. (its still a safe bet to have your safety goggles on) Remove the fuel rails from the car by gently pulling up & releasing the injectors from the intake, & set them to the side.
You are now left with 6 bolts holding the intake to the heads, 3 on each side. They are located front corner, dead center, & rear corner. Fully loosen all 6 of these. They will not come out of the intake, so don't spend too much time trying. Once you're done with that, lift up on the manifold & slide it forward slightly. On the very back there are 4 wiring harness retainers that need to be pulled free from the intake.
Pull that stock intake out of the way to make room for better looks & more power!
Here is a better look at the 4 wiring harness retainers. Also, that is oil on Scott's finger & there was more in the intake. Probably a good excuse to add an oil separator.
Last edited: