5.0 Twinscrew Installers - Grinding Front Cover

S197 GT

PINK Casting Director
Joined
Apr 5, 2007
Posts
5,431
Reaction score
31
Location
Nor Cal
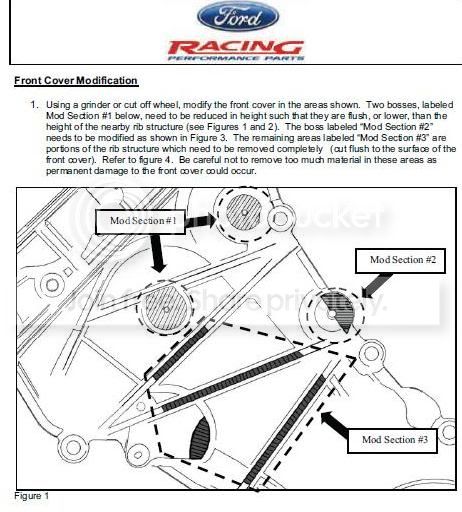
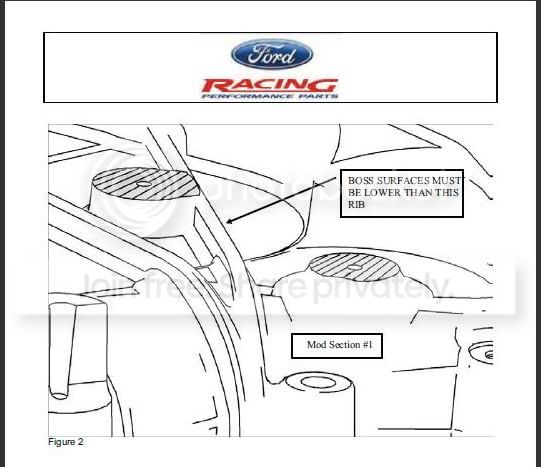
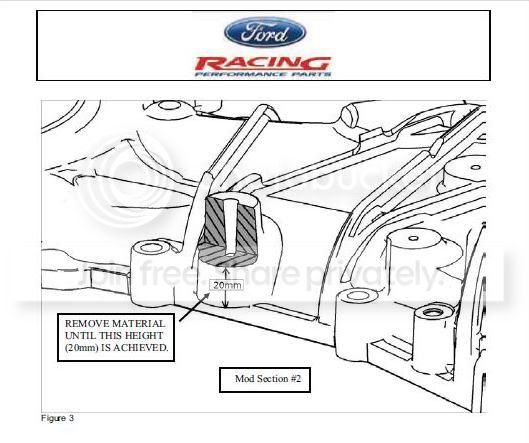
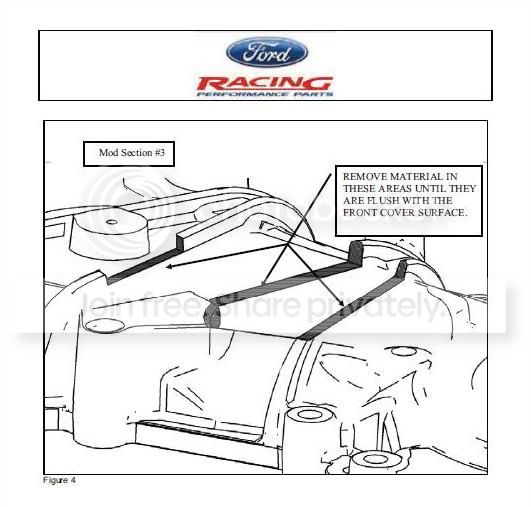
On the new 5.0, it appears that most of the twinscrews require that you grind down a few bosses and ribs on the timing cover.

Page1.jpg


Page2.jpg


Page3.jpg


Page4.jpg


To anyone that has installed a twinscrew on the new 5.0, do you have any tips for how you grinded down the front cover?

Did you guys use a dremel, or a sawzall, or what?

Did you pull the cover and grind it, or did you do it while on the car?

Thanks in advance!
 

Attachments

  • Front Cover Modification.pdf
    441.8 KB · Views: 27
Last edited:

94tbird

4R70W FTMFW
Joined
Apr 5, 2007
Posts
12,732
Reaction score
56
Location
NY/NJ
I have witnessed one being installed. They did it with the cover in the car, and a dremel to cut it down. Your not using a Sawzall here lol. I do believe JDM made a custom tool to grind it down perfectly. I saw it in an article in MMFF. Give them a call.
 

S197 GT

PINK Casting Director
Joined
Apr 5, 2007
Posts
5,431
Reaction score
31
Location
Nor Cal
I have witnessed one being installed. They did it with the cover in the car, and a dremel to cut it down. Your not using a Sawzall here lol. I do believe JDM made a custom tool to grind it down perfectly. I saw it in an article in MMFF. Give them a call.


Calling right now! Thanks bro!
 

S197 GT

PINK Casting Director
Joined
Apr 5, 2007
Posts
5,431
Reaction score
31
Location
Nor Cal
So I called JDM, and was directed to the following site:

http://www.mcmaster.com/#end-mills/=dch55u

They said that they used an end mill with a guide.

I can't seem to find one with a guide.

Anyone have machining experience? This is new to me, and I'm looking to arm myself with as much knowledge as possible before cutting into my timing cover.

I've got some experience with grinding on a timing cover, but that was just a tab on the 3V cover and etching my name into it. Hahahahaha! Sorry Ted!

The article Ron is referring to was in August issue of the Muscle Mustangs and Fast Fords. I'll have to dig that up when I get home.
 

Twinscrewgt

Bad Smurf
Joined
Mar 9, 2010
Posts
963
Reaction score
1
Location
Ogden, Utah
Be careful using an endmill in a die grinder... they have a ton of cuttin force. I'd recommend a burr bit in a die grinder... low rpm and take your time... should make short work of the aluminum. Not to mention a 1/4" endmill will be quite pricey.
 

TimMcc

______________
Joined
Oct 1, 2010
Posts
633
Reaction score
0
Location
Indian Land, SC
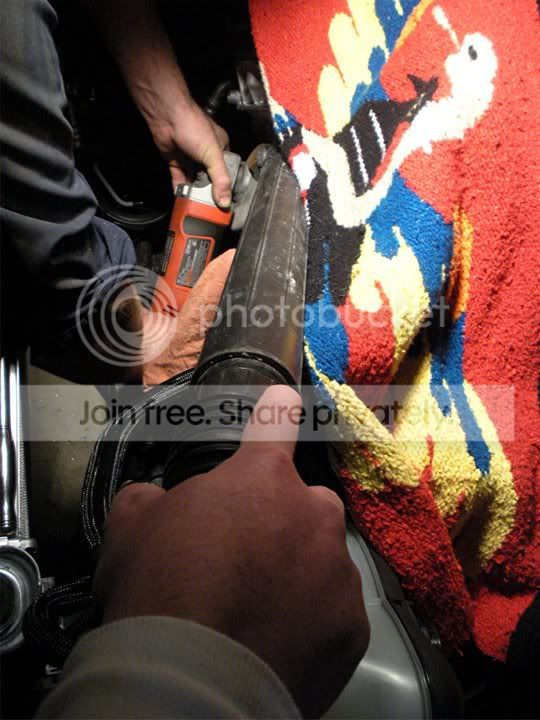
I Used a right angle grinder with a cutoff wheel and a dremel.

Take your time

Definitely want to cover the engine up and tape closed any openings. Also used a big shop vac while grinding because that aluminum dust will be everywhere!!!

whippleinstall21.jpg
 

1slo5ohh

Junior Member
Joined
Jan 19, 2011
Posts
11
Reaction score
0
if your going to use an endmill be really careful because when it bits if your not ready its gonna rip n go where the hell it wants to go lol .. if you do go this route probably wanna use a 3 flute, niagra and onsurd make a decent endmill and arent to crazy in price and dont be scared to run a decent rpm and let the endmill do the work...good luck
 

r.barn

Senior Member
Joined
Mar 22, 2011
Posts
1,118
Reaction score
2
Drimmles are good for 2 things. Dentistry and jewelry making.
 

lostsoul

2014 vett or 2015 stang..
Joined
Apr 13, 2007
Posts
6,963
Reaction score
95
Location
Gay Area
"The HO Intercooled System and Tuner Kit can be installed onto a completely stock engine and require absolutely no cutting or trimming of factory components and like all ProCharger HO Systems, fit under the stock hood." --


Third-party-facepalm.jpg
 

S197 GT

PINK Casting Director
Joined
Apr 5, 2007
Posts
5,431
Reaction score
31
Location
Nor Cal
"The HO Intercooled System and Tuner Kit can be installed onto a completely stock engine and require absolutely no cutting or trimming of factory components and like all ProCharger HO Systems, fit under the stock hood." --


Third-party-facepalm.jpg

He Who Has Spoken said:
Stage II System and Tuner Kit
When compared to the HO System components, the new Stage II System and Tuner Kit utilize a larger, front mounted intercooler, fabricated coolant tank, specially-designed radiator fan shroud assembly and a larger air filter. Installation of the Stage II components requires minor trimming to the inside of the stock lower front bumper cover (factory engine cover does not require modification or trimming). A 12-rib supercharger drive is also available with the Stage II System or Tuner Kit.

Yahtzee!
 

JDM74

Member
Joined
Jul 11, 2010
Posts
187
Reaction score
1
Location
Suffolk, Va
My advice, grind until you think you have enough clearance and then do some more. it really sucks to put everything together just to find out you have to hit a couple spots with the grinder again because a pulley is touching them.
 

KJGT

Member
Joined
Jan 2, 2011
Posts
317
Reaction score
1
Location
East, TN
My advice, grind until you think you have enough clearance and then do some more. it really sucks to put everything together just to find out you have to hit a couple spots with the grinder again because a pulley is touching them.

+1

Its not hard or doesnt take long with a 4" angle grinder once everything is moved out of the way, just a little messy.

But one part I didnt take quite enough off and it kind of sucked when the pulley touched it and the bracket would not tighten down.

If you search around for VMP's Roush/TVS article in 5.0 mag there are some good pics of what needs to be done. The Roush/TVS and FRPP/whipple use the exact same drive so grinding the cover is the same for both.
 

302

Senior Member
Joined
Jul 24, 2008
Posts
5,401
Reaction score
15
Location
Atlanta GA
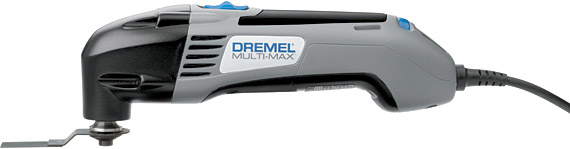
When i helped install the supercharger on my friends 2010 we used one of these:

dremel-multi-max.jpg


It worked a lot better than the traditional dremel tool with the spinning head.
 

VTXFrank

Obama SUCKS!
Joined
Sep 29, 2010
Posts
8,217
Reaction score
72
Location
Santa Rosa Beach, FL
When i helped install the supercharger on my friends 2010 we used one of these:

dremel-multi-max.jpg


It worked a lot better than the traditional dremel tool with the spinning head.

Nick, don't over think it brother. What 302 has listed here is a great way to go about this. No spinning components means the tool stays right where you put it. You may want to remove the radiator and fan if you wish more clearance. I know I would even though you don't HAVE too from what I've read on the subject. The best tools in mechanics are the ones that are the easiest to operate and still get the job done. If it takes me 30 minutes longer to do it, that's just fine with me. Speed is for when you're through with the install and going down the road. NOT while you're doing the install.

K.I.S.S., or just KISS. Keep It Simple, Stupid. It's a rule I learned to live by in the Army and is the critical one for you to practice during this install. Take your time. Don't worry about the end state, worry about your current job. Wear a dust mask cause fine shavings of aluminum can become lodged in your lungs and give you problems decades later. As said, cover EVERYTHING. I would personally cover the engine bay so that only the areas needing the modifying are exposed. Prep time saves cleanup time.

Good luck on it brother.
 

S197 GT

PINK Casting Director
Joined
Apr 5, 2007
Posts
5,431
Reaction score
31
Location
Nor Cal
My advice, grind until you think you have enough clearance and then do some more. it really sucks to put everything together just to find out you have to hit a couple spots with the grinder again because a pulley is touching them.

Thanks man! I appreciate the tip! I will be sure to grind it down completely the first time! That'd suck to have to pull everything back off just to do it again.

That's when I walk away from the car and double fist a couple of Dogfish's!

+1

Its not hard or doesnt take long with a 4" angle grinder once everything is moved out of the way, just a little messy.

But one part I didnt take quite enough off and it kind of sucked when the pulley touched it and the bracket would not tighten down.

If you search around for VMP's Roush/TVS article in 5.0 mag there are some good pics of what needs to be done. The Roush/TVS and FRPP/whipple use the exact same drive so grinding the cover is the same for both.

I'll look for that article. Thakns for pointing it out! I saw the article a while ago, but didn't pay much attention to that step.

When i helped install the supercharger on my friends 2010 we used one of these:

dremel-multi-max.jpg


It worked a lot better than the traditional dremel tool with the spinning head.

Adds to Cart!


Fuck that....need a bigger one! :naughty1:

Nick, don't over think it brother. What 302 has listed here is a great way to go about this. No spinning components means the tool stays right where you put it. You may want to remove the radiator and fan if you wish more clearance. I know I would even though you don't HAVE too from what I've read on the subject. The best tools in mechanics are the ones that are the easiest to operate and still get the job done. If it takes me 30 minutes longer to do it, that's just fine with me. Speed is for when you're through with the install and going down the road. NOT while you're doing the install.

K.I.S.S., or just KISS. Keep It Simple, Stupid. It's a rule I learned to live by in the Army and is the critical one for you to practice during this install. Take your time. Don't worry about the end state, worry about your current job. Wear a dust mask cause fine shavings of aluminum can become lodged in your lungs and give you problems decades later. As said, cover EVERYTHING. I would personally cover the engine bay so that only the areas needing the modifying are exposed. Prep time saves cleanup time.

Good luck on it brother.

You know me... I'll take my sweet time to insure it's done cleanly. If I fuck up and gouge my timing cover, I'll have to let Ted inscribe his name into it.

I etched my name into his a few years back when I was helping our buddy get his car running again. We had reinstalled his Procharger, and part of the process was grinding a portion of the timing cover and sealing it all off. When the timing cover was off the car, I etched our names into it.

Mine (S197 GT), Charlie Sheen (Roper), and our buddy Mike (Screamn03). I think I added Ted's name too. I'm pretty sure Ted is coming over to "help" so that he can retaliate!

I'll cover everything up well, and as suggested earlier, I'll also have my shop vac running. I'll get some eye protection and a dust mask too. I've also got a buddy coming over who's a metal fabricator. If need be, he can take care of this step if I run into a snag.

Not overthinking it at all. It's just the only "pain staking" step in the whole install. That and the wiring. I hate wiring!

Since I hadn't seen a thread about this, I thought it'd be a good idea to inform people of this step.

Hell, I didn't even know about this step until someone told me "good luck grinding the front cover".

 

lostsoul

2014 vett or 2015 stang..
Joined
Apr 13, 2007
Posts
6,963
Reaction score
95
Location
Gay Area

I'm lost.. thats what I got from prochargers website. I guess it makes since.. I think they have 2 versions of intercooler for our cars.. I'm not sure which one I have.. haha

Mine (S197 GT), Charlie Sheen (Roper), and our buddy Mike (Screamn03). I think I added Ted's name too. I'm pretty sure Ted is coming over to "help" so that he can retaliate!

Cool looks like you have someone that can get access to tools you need. I dont know if you still have contact with mikey, but it would be fun as hell if he was there too.. haha


make sure you have a big can free.. hahaha

e12c.jpg
 

Support us!

Support Us - Become A Supporting Member Today!

Click Here For Details

Back
Top