Vorshlag 2011 Mustang 5.0 GT - track/autocross/street Project

Status
Not open for further replies.

Vorshlag-Fair

Official Site Vendor
Official Vendor
Joined
Nov 12, 2010
Posts
1,592
Reaction score
107
Location
Dallas, TX
NICE! Good to see you guys back in the autocross scene Terry!

Yea, we missed it more than I care to admit. We are going to try to squeeze in a few more autocross events this year in the car, and of course have the Goodguys/Optima Challenge Qualifier on our schedule for Oct 4-6 @ Texas Motor Speedway. Hopefully the big BFG Rivals will be out by then (these have been re-scheduled and pushed back multiple times):)


have u found a need to upgrade your clutch line terry?

No.... why? Have people had these fail in some way? We still have a 100% stock clutch, pressure plate, flywheel and clutch hydraulics... and transmission, driveshaft, and more. Somebody asked me to list out all of the mods on another page today, so I will share them here. There are still a surprising number of OEM systems and parts we haven't touched yet.

... I'll try to list the current mods:
2011 Mustang GT 6-spd w/ Brembo option. Custom 18x11F/18x12R Forgestar wheels, 315/30/18 Hoosier R tires, Carbotech XP20F/XP16R pads, Vorshlag front brake ducting, Moton Motorsport Double Adj coilovers w/ remotes and custom valving, Vorshlag camber plates, 600#/inF/250#/inR springs, Whiteline adj bars F&R, Whiteline Watts Link, Whiteline rear LCAs + relocation brackets, Whiteline trans bushing insert, Boss 302-S rear UCA, Cobra Suzuka GT seats, Maximum Mtrsprt 4-point roll bar, ARH 1-7/8" full length headers, Vorshlag custom X-merge and dual 3" exhaust w/ cats. Energy poly front LCA bushings, Boss 302-S steering rack, Torsen T-2R diff on OEM 3.31 gears, custom oil/air seperator, custom rear diff fluid catch can, Steeda CAI, custom tuned by True Street using an SCT tuner. Boss 302 Leguna Seca front splitter and custom rear wing with APR GTC-300 element. Everything else is stock (for now): motor, transmission, clutch/pp/flywheel, driveshaft, full interior, radio/NAV, air con, emissions, fuel system, brake calipers/rotors, bodywork, and chassis. 3780 lbs with driver @ 424 whp (both tweaked for NASA TT3). That's it.
 

DTL

forum member
Joined
Jul 16, 2012
Posts
295
Reaction score
0
Location
SoCal
Speaking of your mods list: what's the word on that trans mount insert??
 

Ivan 5.0

Still learning...
Joined
Feb 13, 2011
Posts
665
Reaction score
0
Location
NoVA


This set-up is made by MultiMatic out of Canada and costs over $700 USD. It is based on OEM upper mount and UCA assembly, strangely enough, but it is heavily modified. Gone is the rubber mount in the UCA itself, as it looks like the lop off the rubber bushing end and weld their custom machined spherical bearing holder end in place. The also reinforce the factory upper chassis mount and machine their own bushings to actually fit their own spherical and the bolt - wow, what a concept, right?! That's what we did with the Spohn arm and UPR mount piece, neither of which fit each other or the factory bolt. This is a very nicely made set-up and we put this in the car before the TWS event. We don't sell this set-up, and there's of course a few little things we'd change, but overall it is a great unit... for a race car. Most folks will see the $700 price tag and laugh. But if you saw the parts in person, felt the fit between the components compared to most of the stuff out there... you'd likely understand. Very, very nice parts.

Any feedback on the Multimatic piece, after using it for some time now? I have the factory third link and I'm looking at options to finish my rear suspension upgrades.
 

Vorshlag-Fair

Official Site Vendor
Official Vendor
Joined
Nov 12, 2010
Posts
1,592
Reaction score
107
Location
Dallas, TX
Project Update for July 22, 2013: Dang, has it been six weeks since my last post in this thread? So much going on at the shop, been to the track 3 different times, lots of new S197 Development, our production E46 LS1 swap launched, and I got behind again. I started writing this post several weeks ago, then two of my guys went to support a racer at Pikes Peak and that put the picture and video processing from recent racing events behind schedule, and I put off finishing my post. But the longer I wait the more it keeps snowballing, so I am going to break this up over several smaller posts and just get started.

More Race Prep for the Vorshlag TT3 2011 Mustang GT

We almost never run the car the same way twice, as we're always trying to develop new parts to make the car faster. Hopefully some of them turn out to be parts we can sell - which is always a driving force in any of our Vorshlag project cars. Anyway, before the NASA event at Hallett, June 22-23, I wanted to work on a few front grip improvements. One thing I keep complaining about as we run at faster and faster tracks is a front end push in high speed corners. That 125mph entry into Turn 8 at NOLA was pretty hairy, and had significant understeer. The rear wing seems to be producing plenty of downforce, but the ABS plastic, OEM front Leguna Seca splitter isn't keeping up on the opposite end.

We didn't get to fix any of that aero imbalance just yet (we will have more on this in a future update this summer), but I've suspected that we have had a mechanical grip imbalance on the car for a while. This could be from a number of factors, such as a track width difference front to rear, as well as a wheel width deficiency on the front axle. As most folks know, even with the same tire width, the width of the wheel that the tire is mounted to can affect usable grip at the road surface. And while the 12" wide wheel on the back of our car seems to some as a bit of a stretch for the 315mm tires we run, the same 315 on the 11" wide front wheel looks a bit pinched. The shoulders of the front tire tread are significantly more curved when you look at them closely, when mounted. And I don't want to stick with 315mm tires forever, either - every time we've increased tire width the car gets faster.


Our 2011 GT with 18x11" front and 18x12" rears - can't fit much more without flares

As I have discussed in previous updates, we are running a set of Forgestar F14s in 18x11" front and 18x12" rear this season and part of the last, with the 315/30/18 Hoosier A6 (and R6) or Kumho V710 in 315/35/18 tires at both ends. As you can see in the picture above, those are extreme fitments on the S197 chassis, without fender mods. Any more wheel or tire width up front and the wheel would poke outside the fenders. Same for the rear, which is pretty much maxed out. But I still felt we could gain some front grip (and potentially room for more front tire) if we went with 18x12" wheels up front, but only if we were then willing to cut and flare the fenders. Well, that time has come. We also needed a second set of wheels for race weekends, so we could test and learn the track on a more cost effective, durable tire than the Hoosier A6 (super sticky autocross tire) and then mount the A6 set for one session (hopefully) of faster laps. So Jason, Ryan and I took some measurements and we ordered up a set of 4 more custom 18x12" wheels, again, with different front and rear offsets. We tweaked the rear wheel backspacing but essentially kept the front backspacing the same as the old 11's.


Originally we had this 18x12" wheel built to fit a 345/45/18 Hoosier, but sadly this 13" wide tire rubbed like mad out back. Someday...

To fit this rather large 18x12" out back on a Mustang under the stock fenders takes a lot of parts and some compromises, and I think for the more extreme S197 racers an 18x11" would be better fit at both ends. For that wheel width I think the optimum tire size would be something in a 295-305mm width, as the 315mm tire is a bit squeezed. Not a lot of R compound tires to choose from in that size, but we ran across some 305/650/18 racing slicks and bought a bunch of them recently. I will discuss a potential "mounted and balanced" race tire/wheel set in one of my next posts. We've got a set of 18x11's coming in here next week and we will confirm our sizing measurements on my 2013 GT (which is for sale, here - more on that in a bit). For most track guys the 18x10" wheel is an even better solution, as this wheel can work without spacers and still rotate front to back.


New set of 18x12" Forgestar F14 wheels in gunmetal with a "flat clear" + a new set of Hoosier R6 "practice tires" (winnings from NOLA weekend)

Forgestar was able to quickly build the new 18x12" set for us to our new specifications, but they were backed up a couple of weeks in powder coating so we had the set sent to us in the raw machined form. I took the raw wheels to our local powder coater, who does lots of wheels and knows the temperatures that you must stay under to avoid ruining the heat treat of the alloy (which we confirmed with Forgestar). He showed me some sample boards and then convinced me to try a new clear coat finish called a "flat clear". So on this set we kept the same gunmetal gray color code that Forgestar used on the first set of F14s, but went with this new flat clear coat final finish, which came out pretty damned good. This is different than a typical "flat" powder coat finish, which is flat in the base coat and doesn't have a clear coat at all. Those finishes can stain more easily but since this set-up has a separate clear coat (just one that has a flat finish) it should hold up better. Pretty slick, looks cool, and we'll see how it holds up to the heat and stresses of track abuse (2 events on them so far, and it looks perfect).


I knew all along we would have to trim the front fenders to clear these now 1" wider wheels, as the entire extra inch of wheel width is all outboard (we already had the wheels tucked right up to within 3mm of the strut on the inside). This increases the front track by 2" total now, and also means the tire is going to poke past the fenders about 1" per side. More front track generally adds more grip at that end, too. All part of the plan.


Left: The original fender is now "wall art". Right: Sometimes these crazy ideas do involve alcohol

We searched and found a slightly lower cost fender for the '10-12 Mustang online, but once you factored in shipping it was cheaper to get two new fenders from Ford. Fine with me, as I like to use factory sheet metal whenever I can. After those arrived in black e-coat, it was time to measure and cut up the brand new fenders. First we pulled off the OEM fenders (which Amy wanted to keep unmolested, and are now Wall Art - soon to be joined by the OEM hood and front bumper cover), pulled off a front spring, installed the new wheel/tire combo, reassembled the front suspension, loosely attached the new fenders, and compressed the wheel and tire up to full bump travel on the Moton struts. Then we marked this spot (the loose fenders were pulled out of the way of the compressed tire), transferred this mark to the new fenders and cut a 1/4" above that. The plastic fender liner was trimmed to the new outer fender contour as well.


This fender cutting is an ugly, temporary measure - we will make some proper flares when we have more time, over the next few months

This fender is now cut "beyond safe", as the tire cannot physically get to that point without the struts exploding. We checked for clearance with the front wheels turned in both directions at full lock, while compressed at full bump and dropped at full droop, as well. This amount of fender clearance and testing might seem like overkill to some, especially the Stance/VIP crowd (who strangely LIKE it when their wheels rub their fenders?!) but I've seen too many racers cut brand new tires on under-trimmed fenders. I don't want to end a race weekend over something we can prevent with proper preparation and testing (I'd rather hit a curb on track and end a day early that way, ugh!). Ryan cut the offending portions off of both fenders with an air nibbler and a cut off wheel, then swapped in a stiffer front spring (we went from 60mm x 7" x 550#/in spring to an 800 #/in rate up front now) and firmly attached the now cut and very ghetto looking "new" fenders. Once on the ground I asked the guys to lower the front ride height by 1", which I've been wanting to do for a LONG time.


Left: Even with -3.4° front camber we have some "poke" on the new 18x12s. Right: Running to get a tank of 93 octane and ice before Hallett

Rear Spring and Ride Height Changes

Out back we lowered the rear ride height an inch, to match the front. Finally, the car is at the proper ride height. Yes, we've been running the car a bit higher than we wanted for a while now, simply to keep the 315s from rubbing on the front fenders in a big bump. I'm paranoid as I've ruined front fenders before getting them too close to a new wide tire and wheel combo. The rear fenders already cleared the 12" wide rears at lower ride heights, and we had the rear LCA relocation brackets since last Fall (to fix any geometry issues on the very lowered rear heights), but the fronts were a worry.

No, fender rolling wouldn't have been enough - not even close. The 11's were already pushing the limits, and could have rubbed at a lower ride height. The 12" wheels were 1" out past the old 11's, so it would have been deep inside the sheet metal. Now that we have finally cut the front fenders, the overall ride height could drop. This will allow the front splitter to be more effective (the closer to the ground it is, the better it works) as well as lower the CG of the entire car by an inch - always a plus. We quickly found that loading the car onto our trailer just got a LOT harder, though. Doh! Oh well, nothing some longer ramps cannot handle (until we make the front end removable - later this summer, hopefully).


While the guys were working on the rear ride height, they swapped out the 250 #/in springs we had been running to a stiffer 350 #/in rate Hyperco spring, to match with the front spring rate bump. Why more spring rate? Well we had been noticing a lot more bodyroll than we liked in pictures of late. As grip and aero forces increase, spring rates need to rise as well. The Mustang is now truly "uncomfortably stiff" on the street (with the valving set for track use), but it isn't as bad as some cars I've driven over the years.

The custom valved Motons (using AST-USA's DDP digressive pistons) can be turned down a lot and it isn't as miserable as you'd think... but I'd still recommend lower rates for any dual-purpose car. If you are moving up to AST/Moton/MCS/Bilstein or another brand of monotube shocks we carry you can see them all compared on our revamped shock intro page. If you have any valving or spring rate questions beyond that, please feel free to call or e-mail us. Suspension is still the meat of our business.


A-ha! Finally remembered this one. I meant to put these rear control arm weights somewhere in this thread many months ago. We added these Whiteline rear Lower Control arms (LCA) in the Fall of 2012, after we left the SCCA's classing behind for this car (STU and ESP doesn't doesn't allow aftermarket rear LCAs, relocation brackets, and all sorts of other common aftermarket parts available for these cars - "its the SCCA", what can I say?). These lower control arms are adjustable in length, tubular steel, stiffer yet slightly lighter than stock, and filled with Whiteline's famous elastomer bushings. These things have worked very well on our Mustang (track, street and autocross), make no noise, and don't have the deflection of the SUPER SOFT rubber that are in the OEM arms (as well as the Roush billet aluminum arms with OEM bushings - an odd item, that we recently installed for a customer). OEM stamped steel arms were 6.0 pounds vs the Whiteline arms at 5.3 pounds. I wouldn't have thought that the flexy, stock stamped steel arms would be heavier than the thick walled, tubular, alloy steel, adjustable length WL arms, but the scale doesn't lie. I hate it when I talk about a particular part and forget to weigh the dang things, and the OEM part it replaces. So this is just a catch-up to previous posts. Trying to stay consistent.

(Continued below)
 

Vorshlag-Fair

Official Site Vendor
Official Vendor
Joined
Nov 12, 2010
Posts
1,592
Reaction score
107
Location
Dallas, TX
Mustang Braking Capabilities and Improvements

Now lets take a step back for a second and move to a higher level discussion of S197 Mustang brakes. This is another area we wanted to address on our TT3 Mustang, but a little background helps further the overall S197 discussion. We've been pushing the limits of the OEM 14" Brembo front/11.8" rear disc brake set-up that comes on the '11-up Mustangs (that have the Brembo option) as well as the Boss302 and most of the GT500 Mustangs (the GT500 upgraded to 13.8" rear discs in 2013 and 15" front discs and 6-piston calipers in 2014), and wanted to see what we could do next.

Long ago we found that these brakes could be overtaxed quickly on track if left 100% stock. The basics are there (size of rotor, proper caliper) but the factory installed "consumables" weren't quite up to the task of track events. Easy upgrades like flushing out the old stuff and installing real DOT4 brake fluid (like Motul RBF600), using proper track-compound brake pads (like Carbotech), installing upgraded brake flex lines, and especially front brake cooling ducts and hoses makes a huge improvement in braking with the S197 Mustangs on track. Yes, even with the big 14" Brembos, you need to think about these upgrades if you want to push it on a road course. These are BIG, heavy cars with 420+ hp, and it doesn't take much effort to overtax even the larger Brembo brakes on track.


Track pads, proper DOT4 brake fluid, good flex lines, front brake ducting - the Braking Basics

Most HPDE drivers in S197 5.0 Mustangs, even the casual 3-4 events per year HPDE guys, will want to do this list of brake mods above before taking it out and pushing the limits. Sure, if you want to roll around at 5/10ths of the car's maximum potential, you can do it on bone stock brakes, but the fluid will be the first to go. Once it boils, the pedal goes to mush and you lose all braking power and driver confidence. Track day is over. The stock brake pads will last to about 6/10ths of full speed. Once you have track worthy pads and push to about 8/10ths, you'll need front brake ducts. Not every track newbie will find the limits of the bone stock brakes on their first track day, but many often do. You can learn this on track, and have shortened track events (or take the "green line" unexpectedly), or you can plan for this and do these somewhat modest brake upgrades up front.


Our TT3 Mustang's times are closer to the STU cars (left) than the AI record holders (right) - maybe we should step up the brakes?

We have had nothing more than this list of "HPDE worthy" Mustang brake upgrades for a while, but we've been pushing the brakes way beyond those limits. Take into account the lap times this car is turning, noted abuse to consumables, and the brake temps we've been seeing. Our lap times alone should be a big clue that we need to do a little more to the brakes than basic HPDE upgrades. So we've been comparing our TT3 times to American Iron racers, simply because they share the same power to weight ratios (9:1 to 9.5:1) and basic layout of our car (solid axle, RWD, relatively heavy). Our TT3 set-up is still 300-500 pounds heavier than most of those AI cars in our region, and we run a wider/stickier tire, but still - it is a benchmark we use, and the closest thing we have to compare lap times to other than just the TT3/TT2 cars that run with us in TT. Last year this car was running a hair quicker than the AI track records, but this year it has been more like 3-7 seconds quicker.


Consequently, the brakes are getting a lot more beat up on our car this year. A lot more. Rear pad and rotor wear has been getting steadily worse the harder Amy and I push the car. Ryan noted some very high rear brake temps at NOLA, which got me thinking about a rear brake upgrade. I will admit, our Mustang is a bit of an oddity, as it is run at a very heavy weight (our current minimum is 3770 pounds with driver), with much wider wheels than most Mustangs you see on track (12"), and with some significant downforce. I will always "drive like an autocrosser", Left Foot Braking into every corner where I have to slow down, and braking VERY late. Also, we've stuck with the OEM Brembo brakes for a long time, rather than going to a pricy aftermarket Big Brake Kit, which a lot of folk just automatically do.

But should they upgrade to an aftermarket BBK? These 14" Brembos are pretty damned beefy, up front at least. I'm not sure a "different brand" BBK would help with longer wear or more stopping power. Consumable costs can and will go up when you go to an aftermarket BBK, however. Multi-piece 14" rotors often cost $400-800 each, or more. Aftermarket calipers also can reduce your brake pad choices, unless it is also using a pad profile that some other high volume (OEM) brake systems do. This is where the Mustang Brembos shine, because even though the calipers are made in Italy, they are the OEM fitment for many thousands of factory optioned Mustangs, so replacement calipers and associated hardware can be purchased at a Ford dealer for reasonable amounts, and the brake pad profile is fairly easy to find. The front rotor costs are also low because of their high OEM production numbers, so lots of replacement brands are available (we have the Centric premium 14" front rotor listed for only $99, for instance).


Do you need to get a BBK? the OEM 14" front rotors and brake pads used in the Brembo cars are less costly

We've tested so many brands of pads and rotors on this car since we started racing it 2010, we have found what we think works best. So we reached out to these manufacturers and become a dealer for several brake component brands. Part of the reason was to reduce the consumable costs for our own cars, too. But now we have enough stuff avilable and in stock that we added a brakes page under the S197 Mustang section of our online catalog.


We've burned through all of the parts, brands and compounds on OEM-based S197 brakes, and now we offer what works

Adding brake parts seems natural to some, but I resisted it for years. See, we've always been known for aftermarket suspension manufacture, development and service work, plus a few brands of aftermarket wheels, and our BMW LS1 swaps. But now we carry several brands of brake rotors and pads, make our own brake lines for several cars, and even have our own "big brake kits" based on some OEM bits. Our Mustang brake ducting kits are about to hit, too. So, we added a new section, and it seems to have been well received.

(continued below)
 

Vorshlag-Fair

Official Site Vendor
Official Vendor
Joined
Nov 12, 2010
Posts
1,592
Reaction score
107
Location
Dallas, TX
(continued from above)

GT500 Rear Brake Upgrade

Anyway, back to our TT3 Mustang's brakes - I've been abusing the components and the rears are wearing too fast and getting too hot. We had several options to address this. One, add rear brake ducting. That's... not a bad idea, and we will do that to reduce brake heat out back. But I wanted to add a bit more braking POWER at the same time as a larger heat sink (rotor). To accomplish this we could have gone to an aftermarket BBK option. But, I am kind of cheap at heart, and wanted to keep it OEM based to keep rotor and pad costs down. Naturally, that left one option: the '13-14 GT500 rear brakes. We have installed these and already have an upgrade kit for 2005-14 Mustangs, since we had several customers already asking us to do this work on their cars, and we sort of figured out some crucial cost savings in this rear brake upgrade.


Left: GT500 13.8" rotor and caliper installed. Right: The OEM rear discs are 11.8" in diameter and use the same caliper and brake pad

The 2014 GT500's brake components are becoming popular upgrades on the various Mustang forums. The 2014 GT500's front 15" 6-piston brakes are a bit extreme, and most of the draw is to the hard parking crowd, for the Big Brake/6-piston looks. Hey, I get it - looks cool, but very few racers have moved up from the 14" brakes to 15" brakes. Some of the Pro teams and endurance cars, sure, but not the club racers or Time Trial guys. What intrigued me more was the fact that the 2013 model GT500 got a big bump up in rear rotor size, from 11.8" up to 13.8", so we went with this upgrade first. Why? Because we were seeing problems in the rear, not the front, and this upgrade is fairly substantial for a very modest cost.


Left: GT500 13.8" rear rotor is 16 pounds. Right: The 11.8" rotor it replaces was only 12.5 pounds

We searched high and low and have rounded up the OEM GT500 13.8" rear rotors, the taller caliper brackets, and even the "GT500" calipers. The weights for these parts vs the 11.8" parts are shown here. Note where all of the added weight is - almost all of it is in the rotor. And the GT500 caliper? It is identical to the '11-up Mustang caliper, and even superceeds the 2005-2010 GT rear calipers. That is something we found after digging and testing, but Ford says this shouldn't be. They will have to revise their books, because the '11-up GT rear caliper is identical, from the casting numbers to the final machined part.


Left: The taller caliper bracket for the 13.8" brakes is 5.3 pounds. Right: The caliper bracket + support for the 11.8" brake = 4.84 pounds.

The 2" larger diameter GT500 rear rotor is almost 3.5 pounds heavier than the old 11.8" rotor it replaced, but my pic above was a very worn rear rotor (which had lost about a pound of metal), so it really only went up about 2.5 pounds. This is added metal that can absorb and shed heat, which isn't a bad thing. The taller caliper racket is almost a wash, with the GT500 version being about a half pound heavier than the shorter GT version. One thing to note is the GT's 11.8" rear caliper bracket has an axillary support bracket that clamps around the axle tube and adds some lateral support. This extra bracket doesn't exist on the GT500.


Left: The GT500 caliper is the same unit as the GT. Right: The rear dust shield for the smaller GT brakes

We went ahead and kept the "GT500" caliper we bought and used it on our 2011 Mustang, mostly because our old calipers were looking a bit worn and crusty. Ford insisted these were different calipers, but that just was not the case. We did another GT500 13.8" rear brake upgrade on a 2012 GT a week later and re-used the guy's old OEM calipers, which were identical so they fit identically. There is no dust shield for the 13.8" GT500 brakes, so the old one is removed (doesn't weigh much). The old brake lines worked on the new caliper location, too.


13.8" rotor installed with the old 11.8" rotor slide over the lugs, for scale

All told we added about 3 pounds per side on the 13.8" rear brake upgrade, compared to the brand new weights of the 11.8" disc brake parts. That's not bad for a TWO INCH upgrade in rear rotor diameter. This increase in diameter will increase rear braking torque, the added rotor mass will add more surface area and should help with rear brake cooling, and we hoped the ABS system can keep the braking balance in shape on track (it did).

The hardest part of the swap was pulling the axles out of the housing to be able to change out the caliper brackets. Not hard really, just messy. So you will need to replace the diff fluid and re-seal the diff cover if you plan on doing this rear brake swap. Since the axles have to come out it is a great time to upgrade the rear wheel studs (ARP 3" long rear S197 studs), but these technically can be done on the car (it is just more of a PITA). Also check your outer axle seals for melting/wear. Ours had been replaced earlier this year, so it all went back together and was about a 2 hour job, start to finish. We will go back and make/add rear brake ducting for this car soon, too.


Left: These larger 13.8" Rear brakes fill out the inside of the 18" wheels on our 2011 GT. Right: Same brakes on a 2012 GT with stock 19" wheels

After the new 18x12" wheels were fitted, new springs were in, front fenders were on and trimmed, the rear brakes were upgraded, axles were back in and diff fluid changed, the ride heights were finally squared away and the car re-corner balanced. Damn... this car is heavy.


We brought both R6 and A6 compounds of mounted Hoosiers to Hallett, a first for us

Another planned change for our TT3 car from all previous NASA events for 2013 was the switch from Hoosier A6 to R6 compound. The A6 tires just don't last very long on this heavy car, and we were hoping the R6 tires would be a better compound to test with. This is helpful when we go to the NASA events early and run the Friday Test-n-Tune, on tracks where we don't know the layout (driver training) or if we have had significant changes to the car since we ran here last (always!). The longer wearing R6 would help Amy and I learn this brand new (to us) track layout, but we didn't get wrapped up with the car in time to go to the Friday testing, so we had to learn the layout on race day. And then I broke the car almost immediately on Saturday... long story, tune in next time to hear more!

So the Hoosier A6 tire is terrible for track use. TERRIBLE. I wouldn't do it if this tire was penalized like the non-DOT racing slicks (it should be), but this is part of the TT Arms Race, so I keep bringing them. The A6 is very heat sensitive and after 1 hot lap on our car it has been falling off about 1 second per lap, and after 3 laps they are just a greasy mess. It has gotten to where I have to get in my best lap on my first lap, usually in the first (coolest) session, and I've stopped even scrubbing the tires at all on the warm-up/out lap. The R6 should be a lot more forgiving with regards to heat, we have nothing but hot months of racing and testing ahead, and I didn't know the next track on the schedule (Hallett) at ALL. The R6s went on the new 18x12" set and a set of worn A6s went on the older 18x11/18x12" set of wheels... but hopefully we wouldn't need them, and that set could stay in the trailer this weekend. I told my guys here that I'd only mount them if I was getting beat, heh.


Our service shop was slammed that week before Hallett. The guys handled all of this 12" wheel/fender/brake development and prep work on our 2011 GT in about a day and a half, in between customer jobs, during a super busy service week where we had too many cars scheduled. Our service workload has gotten pretty heavy of late - so much so that I've hired a third technician to help, who starts this week. We had no less than 7 Mustangs at the shop one day last week, along with the regular BMWs, Subarus, Miatas, Corvettes and four LS1 swap projects we have going on. So I've been busy looking at bigger buildings to buy to move Vorshlag into, and will update this thread and our blog after we find the right place.

Gotta stop it here. More soon,
 

Vorshlag-Fair

Official Site Vendor
Official Vendor
Joined
Nov 12, 2010
Posts
1,592
Reaction score
107
Location
Dallas, TX
Time to answer some questions...

Speaking of your mods list: what's the word on that trans mount insert??

We're still first on the list to get these. We put in a initial stocking order April 5th, and they said it would be about 90 days to go to production. So we're expecting them any day now.


Any feedback on the Multimatic piece, after using it for some time now? I have the factory third link and I'm looking at options to finish my rear suspension upgrades.

Its a nice piece, extremely well made and every part actually fits the mating parts perfectly - something we cannot always say about many of the UCA solutions out there. It is silent on our TT3 Mustang, but being spherical, it probably has some added NVH but we just can't hear it on track. Very expensive UCA solution, but it is proving to work well.


Have you run Raybestos ST43 pads for testing Terry? I can't say enough good things about them.

Not yet, but I have heard good things. From what we've seen, if a particular brake pad brand's option costs more than the Hawk equivalent, like 40-100% more, then it probably has less filler and will likely work well.


are slotted rear rotors available?

On second look, there is no slotted rear rotor available. Yet.

Thanks,
 
Last edited:

neema

forum member
Joined
Aug 30, 2010
Posts
748
Reaction score
0
Location
Fresno, CA
Are you guys running any titanium plates to help the Brembo dust seals stay alive longer? Which carbotech pads do you use?

Thanks for the great post (as usual), Terry.
 

Vorshlag-Fair

Official Site Vendor
Official Vendor
Joined
Nov 12, 2010
Posts
1,592
Reaction score
107
Location
Dallas, TX
Are you guys running any titanium plates to help the Brembo dust seals stay alive longer? Which carbotech pads do you use?

Thanks for the great post (as usual), Terry.

We gave up on keeping the dust seals fresh on the front Brembos long ago.

On the TT3 Mustang we use XP20 front, XP12 rear.


Terry, Steeda has been offering a "big rear brake kit" that reuses the stock calipers for years:

http://www.steeda.com/store/steeda-13-inch-rear-brake-upgrade-kit-for-ford-mustang.html

It uses brackets very similar to the GT500 ones you installed.

That's wonderful... ???

Their kit looks to be using a 13.0" rotor. So... "mine is bigger". :naughty1: And our kit has OEM quality, reliability, and costs $100 less.
 
Last edited:

51ngh

forum member
Joined
Feb 26, 2012
Posts
179
Reaction score
0
I saw the options were added for the rear brake kit but there was no option for slotted rotors. do you have slotted rotors available?
 

Vorshlag-Fair

Official Site Vendor
Official Vendor
Joined
Nov 12, 2010
Posts
1,592
Reaction score
107
Location
Dallas, TX
I saw the options were added for the rear brake kit but there was no option for slotted rotors. do you have slotted rotors available?

Well, crap. On second look, there is no slotted rear rotor available for the 13.8" rotor yet. I was confusing our newly added 14" front caliper/rotor upgrade kit with the rear stuff. On the 14" fronts there are several options for slotted, slotted and dimpled, or standard "smooth" rotors.
 

ArizonaGT

Road Course Member
Joined
Dec 2, 2009
Posts
1,248
Reaction score
3
Location
Phoenix, AZ

51ngh

forum member
Joined
Feb 26, 2012
Posts
179
Reaction score
0
Well, crap. On second look, there is no slotted rear rotor available for the 13.8" rotor yet. I was confusing our newly added 14" front caliper/rotor upgrade kit with the rear stuff. On the 14" fronts there are several options for slotted, slotted and dimpled, or standard "smooth" rotors.


just ordered this rear kit, it should go well with my stoptech 4-piston kit up front.
 

Vorshlag-Fair

Official Site Vendor
Official Vendor
Joined
Nov 12, 2010
Posts
1,592
Reaction score
107
Location
Dallas, TX
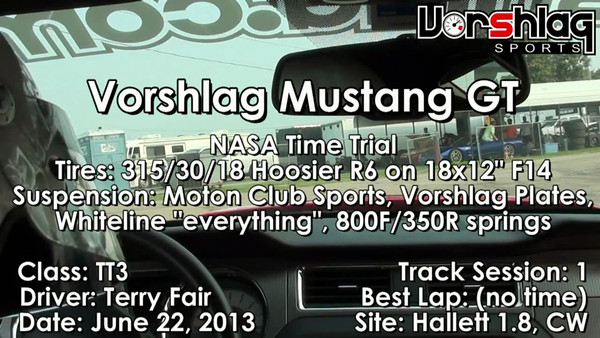
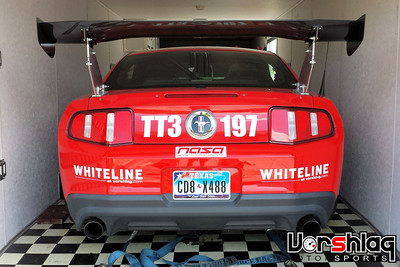
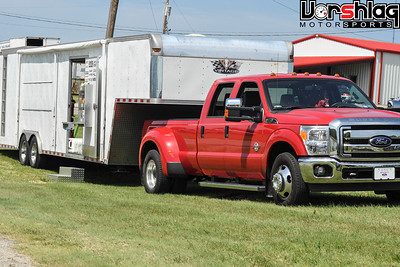
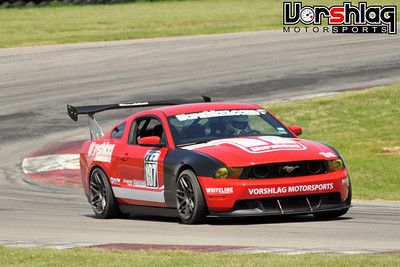
Project Update for July 24, 2013: Still playing catch-up from June events and developments with S197 Mustangs. So in our last update two days ago we talked about some brake parts and our 13.8" rear brake kit, the upgrade to 12" wide front wheels and the steps that took to fit, plus the lower ride heights we could finally get the car down to. Race prep car was wrapped up late Friday afternoon, June 21st, loaded in the trailer sitting on fresh 315mm Hoosier R6s, and Amy and I hit the road 5 hours north to Oklahoma for the NASA event Saturday and Sunday. We made it to our hotel outside of Tulsa and crashed out, set to arrive at the track at 7 am Saturday.

NASA at Hallett, Saturday, June 22, 2013 - CCW

This track has been looming on the schedule all year at me. I was half dreading going to Hallett... because I don't know this track at all. I cannot explain why, but after 26 years of competing in track events in Texas I've never made it to the Hallett Motor Racing Circuit in Oklahoma. Everyone I race with has, and they all rave about Hallett - with it's tricky/blind/off camber corners, the brutality on braking systems, and the short straights that can take the horsepower advantage away. Some folks made it sound like I would be lucky to beat TTE classed Miatas? So I didn't know what to expect, even after looking at some youtube in-car videos.


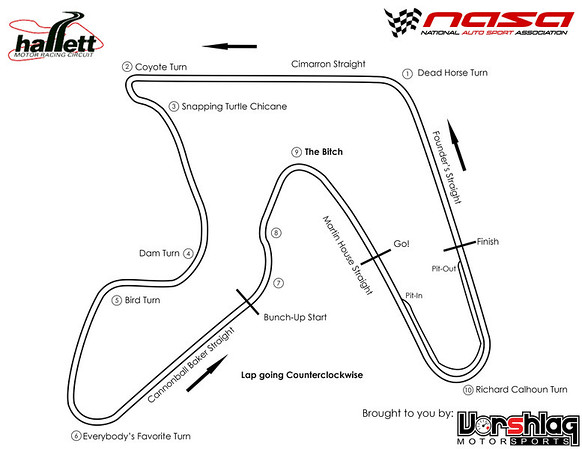
Here's the TT Track Map for Saturday that we made for the TT Racers

This track has been around for decades, and was designed to run in both directions - and it is often run both ways, which in itself is fairly unusual. From the looks of it I knew I would have a steep learning curve, but the timing with prep on the car and the growing service load in our shop didn't allow for the Friday Test-n-Tune day as I'd have liked. Doing that test Friday at NOLA made a huge difference helping Amy and me both learn this new track. And many folks I talked to said you needed to learn Hallett, respect the layout, and that it takes years to master. Everyone knows someone who has crashed in "The Bitch", an infamous off-camber uphill turn that will bite your ass. I had zero experience there - never been there, never driven a lap - and I was scheduled to drive only on Saturday's 4 sessions, with Amy taking the wheel on Sunday. Solid plan!


So if you click on the Saturday results below, you will notice my name listed at the bottom, but with no time, next to 3 no-shows (who paid but didn't show up that day). But I did show up, and even ran 3 whole laps Saturday, just didn't get any laps counted. Why, do you ask? Well first off, it was the TT Warm up (1st session on Saturday), so times only counted for Grid Position for TT session 1 that followed. But I didn't get even these provisional times, as I left my AMD wired transponder turned off (idiot!), left my Aim Solo lap timer in the race trailer (Idiot!) and managed to break the car by driving into a huge curb on lap 3 (IDIOT!!!).


So yea, on Saturday I got in a whopping total of three laps, no official times, had no idea how fast I was going, and my day was over by 9 am. This video below shows my epic driving fail.... but it is also helpful as I give a rolling commentary of the track, corner numbers, and you can see the layout at a very modest speed going CCW.


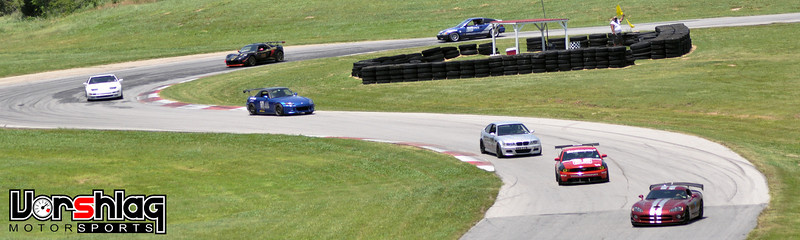
OK, so if you watched that, I will explain briefly what happened. We gridded up based on "what we think we will run", which is how you typically do it on the very first TT session Saturday. I lined up on grid so I could follow KenO's TTB classed E46 M3, trying to learn the racing line from him. That worked well enough but after a couple of laps he backed off (running A6s) and he gave me a point-by after Turn 3 on lap 3. Meanwhile I had a faster TT2 EVO working his way up through the field and breathing down my neck leading up to Turn 2, so I was preparing to get a little ahead of Ken then give the EVO a point by right after Turn 4. And since I was watching my mirrors instead of where I was going, you can guess what happens next... I 
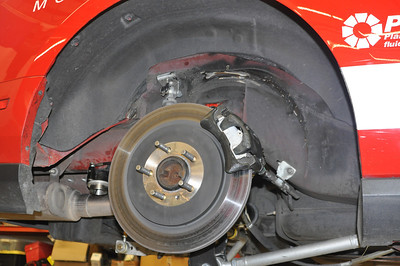
drove right off the inside of Turn 4, smacked a curb with the rear wheel, heard a huge BANG! and broke something in the rear suspension. I felt the impact and thought it had cut a tire, but it was part of the Watts Link. With Amy riding shotgun, of course. Oh FFS...

Its hard to see how far offline I was unless you know this track, but I was 10 feet from where I needed to be. I managed to drive into a big hole in the dirt right before the curbing starts, then WHAM! the wheel smacked the sharp, leading edge of the curbing. Huge impact, lots of tire smoke, and I thought we had a blowout. Idiot driver...

Assessing the Damage + Repairs at Vorshlag

After sitting out the rest of the TT session at the Turn 6 corner station, trying to see under the car through thick green grass, one of the wrecker drivers loaned me a bungee cord. I used that to get the lateral link tied up, that was otherwise dragging the ground, then drove the car back to the pits. Amy was calling me 
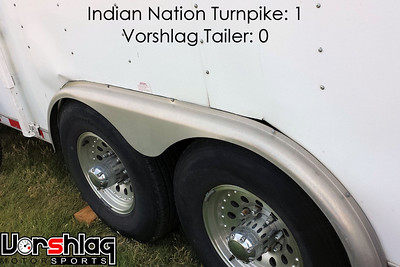
Curby McCurbison from that point on. One we got to our paddock spot it was time for a closer look. Oh, and that's when we noticed how we tore up the trailer on the tow up, driving on some horrible "toll road" in Oklahoma. So bumpy and bouncy that the tires on one side slammed into the fender and bent two panels on the side of the trailer. The F-350 rides so well we didn't notice how much bouncing around the trailer was doing. Glad we didn't cut a trailer tire. (Kurt has since fixed the trailer damage, moved the fender up, and clearanced the panels for more tire travel - on both sides)


Damn this car is low now. It took driving up on some boards but I finally managed to get a jack under the axle and raised the rear up in the air to take a closer look. I had fellow TT racers and even AI racers stopping by to help, telling me to take the car to the infield race shop for repairs, but when I saw what broke I knew our day was done. It was a solid hit and I sheared off one of the Watts Link propeller stands, which allows the axle to float side to side until the tires smacked the inner fender wells (which explains all of the tire smoke that I thought was a blown tire). With an impact like this, something had to give. Nobody's fault but my own. I knew this wasn't going to be an easy track-side fix - especially since the part that broke was missing in action (probably flew off and bounced out into the woods). I knew where the closest spare part was - at Vorshlag, 5 hours away in Plano, Texas. Time to load up, our day was over.

Quick mention about this track. Hallett is a picturesque track plopped in the middle of nowhere, Oklahoma. Surrounded by lush grass, old growth trees, ponds, and rolling hills. It is very unique in that all of the paddock, grid, pit lane, buildings, and spectator parking is located INSIDE the track layout. Most of the racers are paddocked near the track, behind fences and tire walls, but it makes for a great view of the race at all times. Also, there is no tunnel or bridge to get inside or out during a race session, so everyone has to wait for a break between sessions to access the infield. They have an efficient system of manned gates and every ~20 minutes they closed the track, then let cars pass over the track surface to access the infield or to leave. Beautiful little road course with LOTS of elevation change, trees and ponds everywhere, lush and green, and being 5 hours north of Dallas it was a hair cooler than home on this June day (high Saturday was 95°F but breezy).


We were loaded up, the car was strapped down by 11 am and were on the road back to Vorshlag. I had called our fabricator and head technician Ryan, who was luckily in town and not off supporting a pro race team, as he does on some weekends. He agreed to meet me at Vorshlag and we'd fix the car quickly, then get it reloaded and back to Oklahoma for Sunday. Just a quick 10 hour round trip, no problem! After seeing this kick ass track for the first time I wasn't about to let my curb smackdown end with a DNF for the entire weekend. Onward!


Amy and I went and got checked out of our hotel outside of Tulsa (and cancelled that night's stay), stopped for lunch, then drove back towards Dallas. Made it back to Vorshlag, unloaded the car (again, with the help of lots of boards), got it on a lift, and Ryan was wrenching by 4:15 pm. We robbed the part we needed from an S197 Watts Link kit we had in stock and he got the propeller and one of the lateral links (that dragged the ground for a ways and had some road rash) replaced and re-aligned by 4:40 pm. We checked out the rear tires for damage, they looked fine, and I reloaded the car and took the trailer to my house for the night. Got to sleep in my own bed instead of a hotel, which was a bonus.

NASA at Hallett, Sunday June 23, 2013 - CCW

We woke up by 1:30 and hit the road by 2 am, to make the 5 hour trek back north to Hallett. Yes, 2 am. We needed to be there and be unloaded by 7:15 am to make the grid for the first TT session. Amy had agreed the night before to give up her seat for Sunday to let me drive 3 if not 4 of the sessions. She also volunteered to drive the truck & trailer the entire 5 hours up, so I could sleep on the way. Amy... freagin... ROCKS!


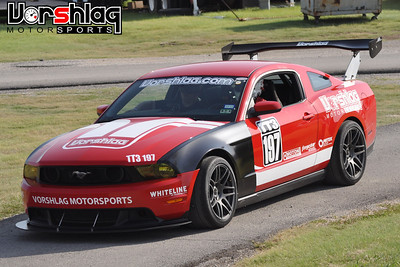
Sunday was going to be unique in that we were going to run the track in the OPPOSITE direction for TT session 4. It wouldn't count for points, but it would count for a track record, as TT had never run Hallett Clockwise. Since this car has been racking them up this year, I really wanted a chance to set two TT3 records on the same day. I was determined to get out on track for all 4 sessions, learn the layout quickly (in both directions), and get fast/clean laps going both ways. Remember, a 4-off or a spin is a DSQ for a TT session, so I had to learn the track layout quickly, stay clean, and go fast.


This ended up being a very hectic, busy day, and I neglected many normal "track test" procedures. I think I checked tire pressures once, fuel got so low it starved in one session (my quickest session, as it happened - this wasn't a good thing), and had zero time to make any real adjustments on the car or brand new set-up. Not having Ryan there for track-side support was tough, but what put us behind was the fact that we were in front of a lot of new faces. We had dozens of people stop by our trailer to say "hi" who had never seen us at Hallett, which was a lot of these folks' home track. Many were old and new customers, and lots who have read this build thread. Some wanted to talk about BMWs, Mustangs, suspensions, TT, and more. And one of our Mustang customers (Mark Council) who lives in Oklahoma was at the track on Sunday and I had promised him a ride-along in a TT session. He was there Saturday as well, but missed seeing us run, as I broke the car right before he got there. Not complaining - we always love talking to customers and friends - but I should have just asked one of the guys from Vorshlag to tag along to help with the car between sessions. We got spoiled at NOLA having Ryan and Brandon there with us.


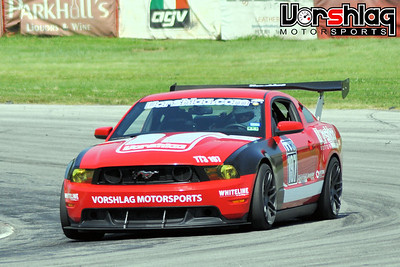
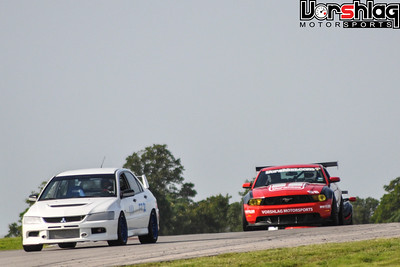
Anyways, I went out in TT session 1 with Mark riding along for most of the laps, throwing away my times for the session as I was taking a rider (automatic DSQ in TT with passengers). I was also taking it a little easy driving, which we're supposed to do if we have a rider along with us. I ran some dismal 1:26 laps, and after 4 laps I came in to let Mark hop out, hoping to get back out and take another 1-2 hot laps with only one person on board. By the time I got around to the start/finish they were throwing the checkers. Crap. I was still so green on this track I didn't take the same line on any consecutive laps, so far.

We were watching the ambient and track temps rise and knew from the forecast that it was going to get close to 100°F as the day progressed. This meant I wasn't going to be fast on track towards the end of the day. I threw away that first session (and was clearly still learning the track) and had only racked up a total of 7 laps over 2 days. I went into session 2 knowing that this was likely my last shot at getting clean, fast-ish lap going CCW, as session 3 would be HOT and session 4 would be going Hot and ClockWise. The video below is from TT session 2, shows about 5 laps with lots of driver mistakes, and right when I'm getting faster in the car... well, you'll see.


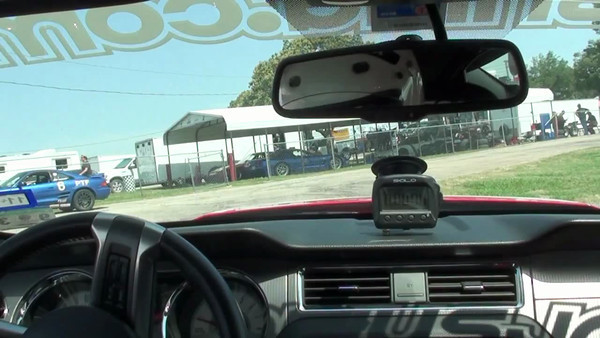
So as you see in the video above, my fastest CCW lap of the weekend happens on lap 2 (1:24.3). I made some driver mistakes on lap 1, 3 (and it fuel starved a bit in the 100 mph left hand Turn 1), and 4, but was really hoping to get a quicker time on lap 5. The predictive lap time on Lap 5 looked better even after passing a TT1 Viper coming out of Turn 6 (excellent point by, I lost no time). It was looking like a 1:23 lap, right until I exited Turn 9 (aka: the Bitch) when the motor laid down. I think it fuel starved again, which sent it into some sort of limp mode. Not the first time this has happened. The engine temps were fine, right in the middle, but it was down to about 50% power until I cycled the key. And when you turn the engine off and on, it resets the Traction / Stability control systems. The only way to turn them off then is to come to a stop for 5 seconds and mash a bunch of buttons, so that ended my session. No, we haven't found a way to disable the traction control system permanently in the SCT tuner, yet. The only "solutions" so far also kill the ABS, which I'm damn sure NOT going to do... Nope! I'm an ABS whore, and proud of it.


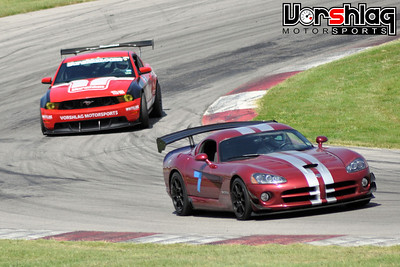
So that session was pretty disappointing. My fastest lap of the weekend happened after taking only 9 laps at a brand new track. Sure, as an autocrosser I should "learn the track quickly", but I'm just not that good at picking up an all new layout like this. I needed more laps, and more cool weather, but it wasn't to be. Sure, I went out again in TT session 3 but by then the ambient was in the mid 90s and everyone was slowing down. I had some high 1:24s and a lot of 1:25s in that session, and felt like I was pushing the car harder and getting better lines, but the grip just wasn't there. I also had a 2 wheels off on the exit of Turn 6, which the corner worker somehow interpreted as a 4 off, so they DSQ'd that session on accident. It didn't matter, as my times were slower anyway. Realistically, the car should have been running 1:22s or quicker going CCW, so I was pretty bummed, but at least this time was quicker than the old TTA record (have done that every time this year, so far), and a hair quicker than the AI track record (AI's top qualifier Was MikeP with a 1:25.7; he won all 4 AI races that weekend). Still, that 1:24 lap is nothing to brag about. Oh well, it gives us something to beat in 2014.

(Continued below)
 
Last edited:

Vorshlag-Fair

Official Site Vendor
Official Vendor
Joined
Nov 12, 2010
Posts
1,592
Reaction score
107
Location
Dallas, TX
(Continued from above)

Sunday TT Session 4 - CW

So for the 4th session Time Trial was to run the track in the opposite direction. There was a 2 hour charity endurance race Saturday afternoon run in this direction, but as far as I could tell not a single TT driver had run it CW all weekend. And since TT had never set any records going CW, we were all on equal footing on a new layout, to us. Again, as an autocrosser, I would hope that I could learn the CW track layout quicker than non-autocrossers, and I ended up closer to TT1 than going CCW. Other autocrossers did well going in this new direction, including KenO, who also set a TTB track record in both directions this weekend (beating his own, previously set TTB record for CCW).

_DSC_8614-L.jpg


We had 9 TT drivers stick around for the CW laps, so we lost some folks who left early. It was late in the day and ambients were 99°F, nobody knew this layout, so we figured the laps would be slower than normal. Some locals that run both directions said that CW is about a second slower than CCW, but we were all more than 2 seconds off our CCW times. Again - it was hot as balls and none of us really new this layout.

Driving this track clockwise was a weird experience, and I barely even had a dozen laps running the other way to compare it to. The big elevation change exiting turn 9 was now downhill on the entrance and braking zone going CW. Turn 3 and Turn 2, which are easily paired up CCW, where you accelerate hard through 3 going that way, ended up being a tricky braking sequence that sent two racers off track going CW. It seemed that a lot more turns were blind in this direction as well. So I gridded P2 and basically latched onto the rear bumper of the TT1 Viper, then just hoped he knew where he was going and tried to keep up. He did great and eventually gave me a point by after a few laps (he took a cool down), but all I could muster was a 1:26.7 lap, about 6 tenths off of the lone TT1 driver. The 100 degree temps made for unhappy tires, and I was getting pretty hot myself. Stayed out the whole session but the times were crap. Still, it was a TT3 track record, and the 2nd fastest CW lap for the TT session.


Looks like we had two drivers get DSQs in the Clockwise TT session. From what I heard one of them drove right off of Turn 2 and the other followed him! That must have been a hairy ride. So yea, I'm glad we stuck around for the last session of the day, as this 1:26 CW lap gave us the 6th TT3 lap record for the year. Neither the CW or CCW laps was exactly a barn burner, as I said before, but it was two new track records and I'll take it. I'm also glad we went ahead and fixed the car, drove back and didn't bail on racing on Sunday altogether - thanks to MikeP for pushing me to fix the car and return, to Ryan for giving up part of his Saturday doing the repair work, and to Amy for making it all possible (giving up her sessions Sunday, driving the tow rig like a boss in the middle of the night, etc).

kbrew8991 said:
New Track Record tables:
Code:
[U]Hallet Motor Racing Circuit (CCW)[/U]                
Class    Driver              Car        
TTU    Randy Andersen        Chevy Modified    01:26.134    Jun-13
TT1    Troy Messer        Chevy Corvette    01:18.720    Jun-12
TT2    Kong Chang        Mazda RX7            01:23.152    Jun-12
TT3    Terry Fair        Ford Mustang    01:24.365    Jun-13
TTA    Bryan Harrison        Chevy Corvette    01:24.671    Jun-11
TTB    Ken Orgeron        BMW M3            01:25.301    Jun-13
TTC    Norm Wilhelm        Subaru WRX            01:29.459    Jun-11
TTD    Joel Selman        BMW Z4            01:30.463    Jun-11
TTE    Chris Kearns        Mazda Miata            01:32.229    Jun-13
TTF    Ken Brewer        Toyota MR2            01:33.698    Jun-12

[U]Hallet Motor Racing Circuit (CW)[/U]                
Class    Driver                Car        
TTU                
TT1    Raymund Guerrero    Dodge Viper            01:26.161    Jun-13
TT2                
TT3    Terry Fair          Ford Mustang    01:26.786    Jun-13
TTB    Ken Orgeron        BMW M3            01:27.896    Jun-13
TTC                
TTD    Heberto Ferrer        Mazda RX8            01:36.606    Jun-13
TTE    Chris Kearns        Mazda Miata            01:37.892    Jun-13
TTF

Looks like 4 track records on the CCW course were reset and 5 all new records were logged for the CW direction that weekend. Traditionally this Hallett event is called the "Summer Championships", as it is the last NASA Texas event before a multi-month summer break. This means there were trophies for all of the weekend's Club Race and Time Trial winners, which is always fun - taking home some wood.

Car Set-up & R6 Tire Impressions

Watching my videos it is obvious I never got the apex on Turn 4 going CCW even remotely correct - I was always too early. Between course familiarity, switching to the A6s, and running faster in the cooler/early sessions, there was at least 2 seconds left in the car, if not more. So it is hard to give good impressions of the set-up when I was still learning the track all day, but I'll take a stab at it. While I didn't make almost any adjustments while at the track, due to time constraints in the paddock between sessions, we did come to this event with some significant changes... spring rates, ride heights, front wheel width, R6 tires, and more.

Even though I left the A6s in the trailer all weekend the R6s still felt like they did a fine job, and more importantly, this harder tire let me take a lot more laps than the A6s would have allowed. Really, the car felt pretty damned good on track with this new set-up. Low speed cornering felt faster, with understeer lessened greatly. It was still there at high speeds, like into Turn 1, but elsewhere the push was diminished. The brakes felt phenomenal, and lasted deep into each sessions without overheating, so I will say the 13.8" rear brake upgrade was a success. I could push the car HARD for 5+ laps and have no fade. The braking into Turn 2 was very intense, with a long straight from T1 to T2 I was topping out 4th gear (120-ish), then braking downhill into a tight 2nd gear turn.


Yes, the Mustang looks goofy with the oddly cut, black front fenders. It will only get uglier before the front gets repainted, too.

After my curb fiasco on Saturday I was staying well clear of the edges of the track, save my minor 2-off in TT session 3. Lots of experienced Hallett people use the curbs in many corners to widen the track (esp Turns 1, 3, 5, 7, 8 and 10) but I stayed the hell off of those things on Sunday! I wish I would have had a few more sessions to acclimate myself to the new car set-up and to this all-new-to-me track. I think if we would have been there Friday for the Test-n-tune event we both could have had some better lap times. Oh well, I caused the shortened Saturday, so I have nobody to blame but myself for the lack of track time. Next year.

So we still have a ton of things to cover from late June and into July, but that will have to wait for next time.

Cheers,
 
Last edited:

csamsh

forum member
Joined
Apr 9, 2012
Posts
1,598
Reaction score
2
Location
OKC
Thanks for the ride! It's fun to see firsthand what these cars will do with the time and resources you guys commit to them.
 

ArizonaGT

Road Course Member
Joined
Dec 2, 2009
Posts
1,248
Reaction score
3
Location
Phoenix, AZ
Terry--I can't remember if we touched on this already in the thread, but you can keep your ABS but permanently disable traction control by installing the 302R/S ABS module. It's about $300. No negative impact on a street car that I found, and on the track it's calibrated better for race tire friction levels. It's just the electronic module, not the entire ABS distribution block. Takes 20 mins to install.
 
Status
Not open for further replies.

Support us!

Support Us - Become A Supporting Member Today!

Click Here For Details

Sponsor Links

Banner image
Back
Top