
I've had a few members request on how to install the shift light with tach adapter,so I figured I'd do a write up to help anyone interested in doing the install.
First off not responsible for anyone who does this ,as I'm not there to supervise on the install....
Tools needed:
soldering gun and solder
shrink wrap
heat gun or lighter for shrink wrap
drill for mounting 9117
10 mm socket and socket wrench
8 mm socket
small flat head screw driver
1) roll each window down a few inchs before disconnecting the Neg battery cable.
2) unscrew 10 mm alt bolt and 1st small bolt on PCM

3) unclip the PCM , then turn over to get to bottom of pcm

4) take a small flat head screw driver and carefully unclip the small two clips on both bottom and top of green cover,this will let you remove the cover.

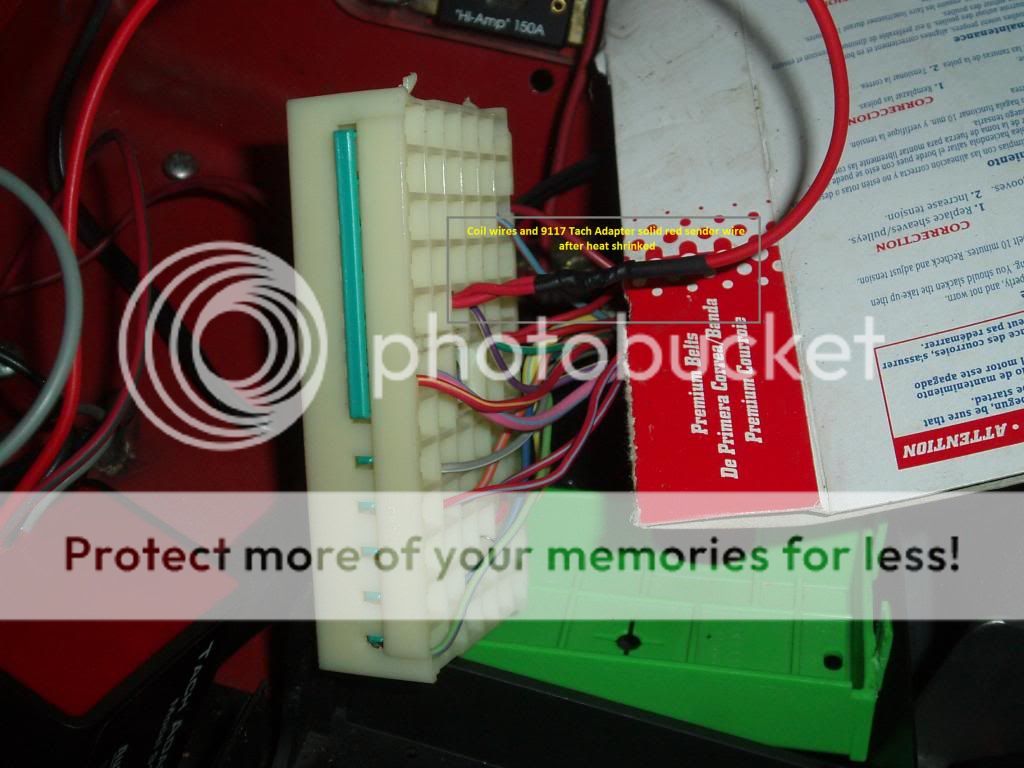
5) You'll look for the C5 location as pictured and cut the two red wires.
then twist together the two red wires on the PCM plug side slide shrink wrap over wires, then twist together solid red 9117 Auto Meter Tach adapter wire , then slide shrink wrap past twisted wire part so as not to get the shrink wrap hot ,then solder wires together, once cool enough slide shrink wrap on and shrink with heat.

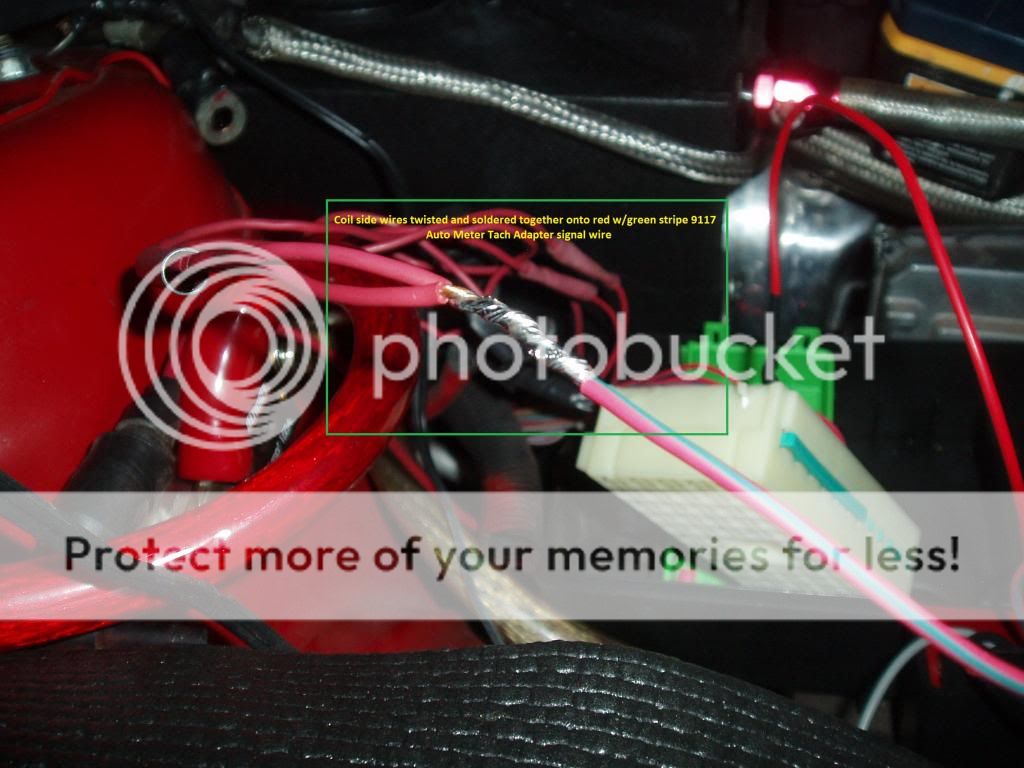
6) twist the red coil side wires together and solder them to the red/green
stripe 9117 tach adapter wire, by using same soldering and heat shrink procedure.

7) now you can put the green cover back on and put the PCM back together, before proceeding any further. then screw small bolt back down and connect the alt wire and screw down the 10 mm bolt.
8) find a location to mount the 9117 tach adapter and put some tape down and mark for holes to be drilled for mounting.

9) find a good bare metal ground location ( best ground is where you drill a hole and scrap some of the paint off to where the ground wire is contacting bare metal ,no paint at all under the screw location)
screw the black 9117 tach adapter wire to ground.
10) the 9117 gray wire is the sensor wire to solder to the green wire on the DPSS shift tach light.
Now just find you a good location to mount your gauge in the interior of the vehicle.
solder the red wire on the shift light to a 12v switched power source. I used the blue & white brake switch for my souce

connect the black wire on the gauge to a bare metal ground location.
the green wire is your sender wire that will be soldered to the gray 9117 tach adapter wire in the engine compartment.
On the DPSS shift light level 2 there is a blue wire that is optional: Connect to positive terminal of Trans-Brake or Line Lock Solenoid. Alternatively, connect to the Brake Light Switch, Clutch Switch,or a dedicated Remote Start Switch (normally open, momentary closed).
Now after soldering all the wires ,put interior together, connect Neg battery terminal and your ready to try it out.
First off not responsible for anyone who does this ,as I'm not there to supervise on the install....
Tools needed:
soldering gun and solder
shrink wrap
heat gun or lighter for shrink wrap
drill for mounting 9117
10 mm socket and socket wrench
8 mm socket
small flat head screw driver
1) roll each window down a few inchs before disconnecting the Neg battery cable.
2) unscrew 10 mm alt bolt and 1st small bolt on PCM

3) unclip the PCM , then turn over to get to bottom of pcm

4) take a small flat head screw driver and carefully unclip the small two clips on both bottom and top of green cover,this will let you remove the cover.

5) You'll look for the C5 location as pictured and cut the two red wires.
then twist together the two red wires on the PCM plug side slide shrink wrap over wires, then twist together solid red 9117 Auto Meter Tach adapter wire , then slide shrink wrap past twisted wire part so as not to get the shrink wrap hot ,then solder wires together, once cool enough slide shrink wrap on and shrink with heat.


6) twist the red coil side wires together and solder them to the red/green
stripe 9117 tach adapter wire, by using same soldering and heat shrink procedure.


7) now you can put the green cover back on and put the PCM back together, before proceeding any further. then screw small bolt back down and connect the alt wire and screw down the 10 mm bolt.
8) find a location to mount the 9117 tach adapter and put some tape down and mark for holes to be drilled for mounting.

9) find a good bare metal ground location ( best ground is where you drill a hole and scrap some of the paint off to where the ground wire is contacting bare metal ,no paint at all under the screw location)
screw the black 9117 tach adapter wire to ground.
10) the 9117 gray wire is the sensor wire to solder to the green wire on the DPSS shift tach light.
Now just find you a good location to mount your gauge in the interior of the vehicle.
solder the red wire on the shift light to a 12v switched power source. I used the blue & white brake switch for my souce

connect the black wire on the gauge to a bare metal ground location.
the green wire is your sender wire that will be soldered to the gray 9117 tach adapter wire in the engine compartment.
On the DPSS shift light level 2 there is a blue wire that is optional: Connect to positive terminal of Trans-Brake or Line Lock Solenoid. Alternatively, connect to the Brake Light Switch, Clutch Switch,or a dedicated Remote Start Switch (normally open, momentary closed).
Now after soldering all the wires ,put interior together, connect Neg battery terminal and your ready to try it out.

