RaffyTaffy

Junior Member
Joined
Mar 12, 2021
Posts
11
Reaction score
0
2006 V6
I had a light for this code for a pretty long time. I want to sell the mustang now and want to get rid of it since people usually don't like to hear "don't worry about it" about a check engine light. So I used my scanner and got P0401 (EGR flow insufficient) and P0402 (EGR flow excessive). After doing some research, the first thing I did was test the EGR by taking it off and using a pump to pull vacuum. It was bad so I replaced it and cleared the codes. Light came back on after a while. Scanned and I got just P0402 this time. I cleared it again and got it again later. Cleaned the MAF, came back. Cleaned the throttle body, came back. I used my scanner app to look at the live data and I didn't see any EGR error % when the command was 0. So I have no clue why it's saying the flow is excessive. Anyone experienced anything similar or have a guess of what could be causing it?
 

GlassTop09

Senior Member
Joined
May 24, 2019
Posts
1,145
Reaction score
526
Location
Farmington, NM
2006 V6
I had a light for this code for a pretty long time. I want to sell the mustang now and want to get rid of it since people usually don't like to hear "don't worry about it" about a check engine light. So I used my scanner and got P0401 (EGR flow insufficient) and P0402 (EGR flow excessive). After doing some research, the first thing I did was test the EGR by taking it off and using a pump to pull vacuum. It was bad so I replaced it and cleared the codes. Light came back on after a while. Scanned and I got just P0402 this time. I cleared it again and got it again later. Cleaned the MAF, came back. Cleaned the throttle body, came back. I used my scanner app to look at the live data and I didn't see any EGR error % when the command was 0. So I have no clue why it's saying the flow is excessive. Anyone experienced anything similar or have a guess of what could be causing it?
According to the FWM for 2006 S197 4.0L, the P0402 DTC is due to the PCM seeing EGR flow at engine idle (where the EGR valve should be closed when PCM commands a 0% PWM signal to the EGR vacuum regulator solenoid, thus no EGR flow should be detected by the EGR DPFE sensor).

Since you've already checked live data & verified PCM isn't sending an EGR PWM control signal to EGR vacuum regulator solenoid at engine idle & have already replaced EGR valve (and verified it's working), there are only 2 items left to check..... 1.) the EGR vacuum regulator solenoid to ensure it isn't leaking vacuum thru to the EGR valve causing it to crack open causing EGR flow when it shouldn't be or 2.) the DPFE sensor is giving a false EGR flow reading at idle.

The 1st is easy......just remove the vacuum line from EGR valve at idle & check to see if you have vacuum present in the line w\ PCM EGR PWM command at 0% & if you have vacuum present you know the EGR vacuum regulator solenoid is bad (if you have live data of the DPFE sensor readout you should also see the EGR flow go to 0 if vacuum line is disconnected).

The 2nd is easy if you have live data of DPFE sensor readout. Scan live data during KOEO, the DPFE sensor readout should be 0.....if it isn't then the DPFE sensor is bad (after verifying that both upstream & downstream ports from EGR pipe orifice to DPFE sensor are not restricted\plugged causing DPFE sensor to give a false reading).

Hope this helps.

PS edit--Just thought of a 3rd scenario.........the EGR pipe downstream of the EGR orifice section but upstream of the EGR valve may have a pin hole in it causing EGR flow across EGR orifice at idle w\ EGR valve closed.....so look for this if #1 & #2 check out as good.
 
Last edited:

RaffyTaffy

Junior Member
Joined
Mar 12, 2021
Posts
11
Reaction score
0
According to the FWM for 2006 S197 4.0L, the P0402 DTC is due to the PCM seeing EGR flow at engine idle (where the EGR valve should be closed when PCM commands a 0% PWM signal to the EGR vacuum regulator solenoid, thus no EGR flow should be detected by the EGR DPFE sensor).

Since you've already checked live data & verified PCM isn't sending an EGR PWM control signal to EGR vacuum regulator solenoid at engine idle & have already replaced EGR valve (and verified it's working), there are only 2 items left to check..... 1.) the EGR vacuum regulator solenoid to ensure it isn't leaking vacuum thru to the EGR valve causing it to crack open causing EGR flow when it shouldn't be or 2.) the DPFE sensor is giving a false EGR flow reading at idle.

The 1st is easy......just remove the vacuum line from EGR valve at idle & check to see if you have vacuum present in the line w\ PCM EGR PWM command at 0% & if you have vacuum present you know the EGR vacuum regulator solenoid is bad (if you have live data of the DPFE sensor readout you should also see the EGR flow go to 0 if vacuum line is disconnected).

The 2nd is easy if you have live data of DPFE sensor readout. Scan live data during KOEO, the DPFE sensor readout should be 0.....if it isn't then the DPFE sensor is bad (after verifying that both upstream & downstream ports from EGR pipe orifice to DPFE sensor are not restricted\plugged causing DPFE sensor to give a false reading).

Hope this helps.

PS edit--Just thought of a 3rd scenario.........the EGR pipe downstream of the EGR orifice section but upstream of the EGR valve may have a pin hole in it causing EGR flow across EGR orifice at idle w\ EGR valve closed.....so look for this if #1 & #2 check out as good.

Couldn't have asked for a better response, thank you so much!

I'll try one and two in a few. As for 3, I think I know the tube you're talking about (it's the copper one thats attached to the piece that the egr mounts to right?). I removed it when I cleaned the throttle body and spent some time trying to get as much gunk off it as I could.
 

GlassTop09

Senior Member
Joined
May 24, 2019
Posts
1,145
Reaction score
526
Location
Farmington, NM
Also how possible is it that I got a bad valve from Amazon?
This possibility always exists due to manufacturing QA\QC process of checking\testing parts off the line in random sample batches instead of checking\testing every part.......always the chance a bad part got thru thus if possible, we should test every new part for integrity before installation (why I typed in parenthesis in 2nd paragraph of my post after replace EGR valve "and verified it's working"......I can only assume that you did this.....).

So, you can always retest the EGR valve seat now for sealing.....but this should have been done before wrenching on it (easier to return bad part if never installed.......).

So I'd suggest to keep it in mind while you check the other items since they're the original parts (which odds are they've failed opposed to the new EGR valve) then test the EGR valve seat as a last resort.

If you do find the new EGR valve seat to be bad & that valve wasn't OEM FoMoCo or MotorCraft part, I'd strongly suggest to replace w\ the OEM part (cost more but these OEM parts are tested\certified to maintain OEM Ford vehicle powertrain warranty specifications thus are more reliable to be good & function properly OOTB).

Spraying the EGR pipe\connections w\ soapy water while engine is running should ID any leaks in piping & connections.

Hope this helps.
 

RaffyTaffy

Junior Member
Joined
Mar 12, 2021
Posts
11
Reaction score
0
This possibility always exists due to manufacturing QA\QC process of checking\testing parts off the line in random sample batches instead of checking\testing every part.......always the chance a bad part got thru thus if possible, we should test every new part for integrity before installation (why I typed in parenthesis in 2nd paragraph of my post after replace EGR valve "and verified it's working"......I can only assume that you did this.....).

So, you can always retest the EGR valve seat now for sealing.....but this should have been done before wrenching on it (easier to return bad part if never installed.......).

So I'd suggest to keep it in mind while you check the other items since they're the original parts (which odds are they've failed opposed to the new EGR valve) then test the EGR valve seat as a last resort.

If you do find the new EGR valve seat to be bad & that valve wasn't OEM FoMoCo or MotorCraft part, I'd strongly suggest to replace w\ the OEM part (cost more but these OEM parts are tested\certified to maintain OEM Ford vehicle powertrain warranty specifications thus are more reliable to be good & function properly OOTB).

Spraying the EGR pipe\connections w\ soapy water while engine is running should ID any leaks in piping & connections.

Hope this helps.

Yeah that's my bad. Im still fairly new to wrenching so the habits aren't all there yet. Thanks for the advice though.

As for the code situation, I just got home and pulled the vacuum hose while it was idling and put my finger on it and, sure enough, I felt pretty strong suction. I'm gonna look up how to replace the solenoid and where its even is (lol), but if you got any more info on this I would really appreciate it!
 

GlassTop09

Senior Member
Joined
May 24, 2019
Posts
1,145
Reaction score
526
Location
Farmington, NM
Yeah that's my bad. Im still fairly new to wrenching so the habits aren't all there yet. Thanks for the advice though.

As for the code situation, I just got home and pulled the vacuum hose while it was idling and put my finger on it and, sure enough, I felt pretty strong suction. I'm gonna look up how to replace the solenoid and where its even is (lol), but if you got any more info on this I would really appreciate it!
I'd just trace the vacuum line routing away from the EGR valve......should lead you to the EGR vacuum regulator solenoid then take it from there. If you want to verify a second time, unplug the solenoid so you remove the possibility of a short in ground wire from solenoid to PCM (which shouldn't be 1 due to this will blow a fuse in BEC, which would have set a EGR circuit DTC.....but strange things can occur so be advised) causing solenoid to open, then recheck vacuum line at EGR valve for leaking vacuum.......should still be leaking if solenoid is bad. If this action causes the leak to stop then your issue is electrical.......most likely this isn't your issue, the solenoid is.

Hope this helps.
 
Last edited:

RaffyTaffy

Junior Member
Joined
Mar 12, 2021
Posts
11
Reaction score
0
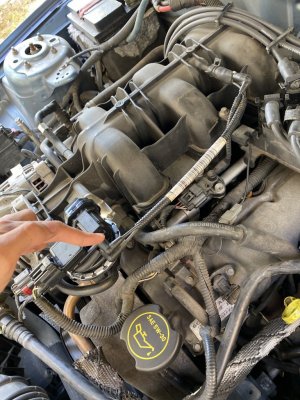
Am I blind? I can't find the solenoid. The vacuum line just leads to the intake manifold. Im attaching a picture and im pointing to the line I pulled out to check for the vacuum.

image.jpg
 

GlassTop09

Senior Member
Joined
May 24, 2019
Posts
1,145
Reaction score
526
Location
Farmington, NM
Am I blind? I can't find the solenoid. The vacuum line just leads to the intake manifold. Im attaching a picture and im pointing to the line I pulled out to check for the vacuum.

View attachment 84517
The solenoid is under your hand...............the part that is located on top of the EGR valve (this is the integrated EGR control setup where the vacuum regulator solenoid & EGR orifice is built in w\ the EGR valve....called the ESM). The EGR orifice is built into the EGR mounting gasket-to-intake manifold so you might check the gasket for leaks.....otherwise check the EGR valve seat for any trash lodged under it or sealing integrity. Also make sure that you have the vacuum lines hooked up to the right ports.

I was going off the traditional EGR system diagram for this engine which has the parts separate.....not integrated. The picture helped me to see that you have the ESM version of EGR system.
 
Last edited:

RaffyTaffy

Junior Member
Joined
Mar 12, 2021
Posts
11
Reaction score
0
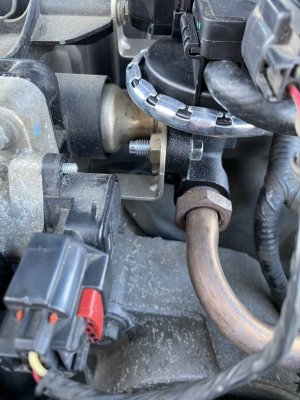
Yeah I figured. Honestly seems like the non-integrated EGR systems are so much easier.

The valve seat you mentioned. Is it the part that bolts up to the intake manifold?

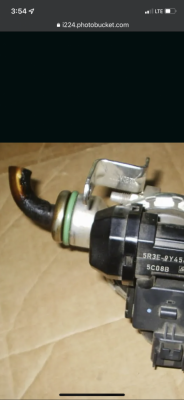
In other words is it this? (See pictures)

The second one is from another thread on the same topic. Mine looks similar but more gunked up on the pipe.

D66B0FA4-1D2E-407E-A4EF-5DC8C3DE8000.jpeg

26B713D4-B2AA-4584-86CC-388555DE0428.png
 

GlassTop09

Senior Member
Joined
May 24, 2019
Posts
1,145
Reaction score
526
Location
Farmington, NM
Yep. The orifice gasket is mounted between the EGR black valve body & the SS tube venturi nozzle that mounts to the intake manifold.
 
Last edited:

GlassTop09

Senior Member
Joined
May 24, 2019
Posts
1,145
Reaction score
526
Location
Farmington, NM
Yeah I figured. Honestly seems like the non-integrated EGR systems are so much easier.

The valve seat you mentioned. Is it the part that bolts up to the intake manifold?

In other words is it this? (See pictures)

The second one is from another thread on the same topic. Mine looks similar but more gunked up on the pipe.

View attachment 84518

View attachment 84519

IMG_0597.JPG IMG_0598.JPG
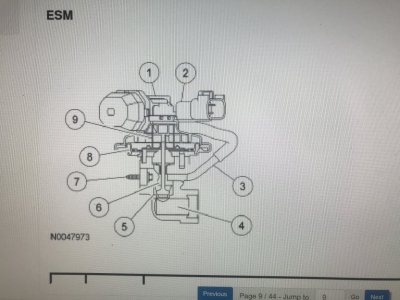
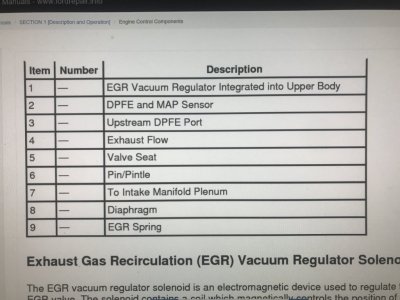
Here's a couple of pictures of 1.) cutaway of the ESM & 2.) description of each part that makes up this ESM. This comes from the FWM. The seat (5) that needs to be checked for leakage is located in the black valve body where the exhaust line from exhaust manifold screws into (4). With unit unplugged & vacuum lines disconnected, you should not be able to blow air thru the ESM thru (4) to (7). If passes this test, then check to make sure that the engine manifold vacuum lines are attached to EGR vacuum regulator of ESM correctly to not accidentally bypass the regulator putting engine manifold vacuum directly to EGR valve diaphram.

Hope this helps.
 

RaffyTaffy

Junior Member
Joined
Mar 12, 2021
Posts
11
Reaction score
0
View attachment 84534 View attachment 84535
Here's a couple of pictures of 1.) cutaway of the ESM & 2.) description of each part that makes up this ESM. This comes from the FWM. The seat (5) that needs to be checked for leakage is located in the black valve body where the exhaust line from exhaust manifold screws into (4). With unit unplugged & vacuum lines disconnected, you should not be able to blow air thru the ESM thru (4) to (7). If passes this test, then check to make sure that the engine manifold vacuum lines are attached to EGR vacuum regulator of ESM correctly to not accidentally bypass the regulator putting engine manifold vacuum directly to EGR valve diaphram.

Hope this helps.
Thanks for the info GlassTop.

I watched some videos on how to test components in the ESM. I tested the vacuum regulator (1) by removing a cap opposite to where the vacuum line connects to and plugging it with my finger. The car started running rough, meaning that part works. Next I went to the DPFE sensor (2) connector and pinned the signal wire (I think it was) and read the voltage (~12 volts). They then said that to test the DPFE sensor you could use a test light to ground the wire which would signal the valve to open which should yield the same result as the first test. I did this and the test light turned on but the car continued to run perfectly. Therefore I think that the part has a faulty DPFE sensor. I ordered a motorcraft valve from autozone and will pick it up and test it today. If it passes these tests then I'll know for sure that was the issue. I'll let you know my results here.

Thanks for your help!
 

GlassTop09

Senior Member
Joined
May 24, 2019
Posts
1,145
Reaction score
526
Location
Farmington, NM
Thanks for the info GlassTop.

I watched some videos on how to test components in the ESM. I tested the vacuum regulator (1) by removing a cap opposite to where the vacuum line connects to and plugging it with my finger. The car started running rough, meaning that part works. Next I went to the DPFE sensor (2) connector and pinned the signal wire (I think it was) and read the voltage (~12 volts). They then said that to test the DPFE sensor you could use a test light to ground the wire which would signal the valve to open which should yield the same result as the first test. I did this and the test light turned on but the car continued to run perfectly. Therefore I think that the part has a faulty DPFE sensor. I ordered a motorcraft valve from autozone and will pick it up and test it today. If it passes these tests then I'll know for sure that was the issue. I'll let you know my results here.

Thanks for your help!
Good deal. Just as a suggestion........

When\after you replace this ESM, 1st turn KOEO & wait for the MIL light to turn itself off before continuing to start engine. The PCM runs self-check tests during KOEO on all sensors that don't need the engine running to test.......when the MIL light turns off, this indicates that the PCM KOEO sensor self-check tests were completed\successful. 1 of these KOEO tests is the PCM checking the EGR ESM DPFE\MAP sensors & recording a reference voltage reading on the DPFE\MAP sensor output signals when there is a known no EGR flow thru EGR valve to store it in KAM to use to determine the no flow state thru DPFE sensor when engine is running\idling.

So, sometimes this may need to be periodically repeated over time for the PCM to update this reference DPFE voltage in KAM as the sensor ages over time. Most folks don't know\realize this is going on & usually don't allow enough time (I've found approx 5-7 secs to be sufficient) for the PCM to finish running all these KOEO self-check tests before starting the vehicle thus the PCM is constantly trying to "catch up" over several key cycles thru KOEO to startup to run these tests.

I have found that it is a good practice to always wait after KOEO for the MIL light to turn off before startup & make this a habit w\ these new modern computer-controlled vehicles so that the PCM can "keep up" w\ all the sensor "conditioning" to eliminate any varying nagging issues.
 

RaffyTaffy

Junior Member
Joined
Mar 12, 2021
Posts
11
Reaction score
0
Good deal. Just as a suggestion........

When\after you replace this ESM, 1st turn KOEO & wait for the MIL light to turn itself off before continuing to start engine. The PCM runs self-check tests during KOEO on all sensors that don't need the engine running to test.......when the MIL light turns off, this indicates that the PCM KOEO sensor self-check tests were completed\successful. 1 of these KOEO tests is the PCM checking the EGR ESM DPFE\MAP sensors & recording a reference voltage reading on the DPFE\MAP sensor output signals when there is a known no EGR flow thru EGR valve to store it in KAM to use to determine the no flow state thru DPFE sensor when engine is running\idling.

So, sometimes this may need to be periodically repeated over time for the PCM to update this reference DPFE voltage in KAM as the sensor ages over time. Most folks don't know\realize this is going on & usually don't allow enough time (I've found approx 5-7 secs to be sufficient) for the PCM to finish running all these KOEO self-check tests before starting the vehicle thus the PCM is constantly trying to "catch up" over several key cycles thru KOEO to startup to run these tests.

I have found that it is a good practice to always wait after KOEO for the MIL light to turn off before startup & make this a habit w\ these new modern computer-controlled vehicles so that the PCM can "keep up" w\ all the sensor "conditioning" to eliminate any varying nagging issues.

I drove a little over 80 miles since I replaced it and no CEL so far. Whereas before the light would come back on after around 50. I've also been doing the waiting before startup. I'm cautiously optimistic. Will update after more miles.

^^^ DAG THIS GUY IS GOOD!

I know! I'm seriously super lucky to have had someone so capable help me out with this. I love forums!

Seriously thanks a ton GlassTop.
 

RaffyTaffy

Junior Member
Joined
Mar 12, 2021
Posts
11
Reaction score
0
CEL hasn't came on.

Code P1000 went away today and 0402 hasn't come back so I think it's safe to say the issue was the Amazon EGR valve and it's now resolved.

For anyone looking at this thread in the future, let this be a lesson. Don't trust non OEM cheap parts for this stuff, even if the reviews are good.
 

GlassTop09

Senior Member
Joined
May 24, 2019
Posts
1,145
Reaction score
526
Location
Farmington, NM
CEL hasn't came on.

Code P1000 went away today and 0402 hasn't come back so I think it's safe to say the issue was the Amazon EGR valve and it's now resolved.

For anyone looking at this thread in the future, let this be a lesson. Don't trust non OEM cheap parts for this stuff, even if the reviews are good.
Glad all is well.
 

Latest posts

Support us!

Support Us - Become A Supporting Member Today!

Click Here For Details

Sponsor Links

Banner image
Back
Top