High beam issue with new Raxioms

kstall

Member
Joined
Feb 22, 2021
Posts
106
Reaction score
78
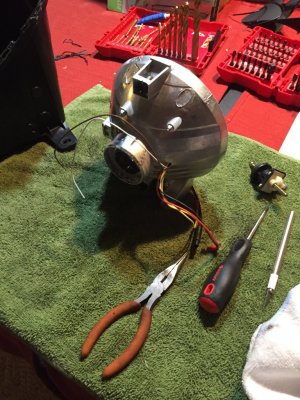
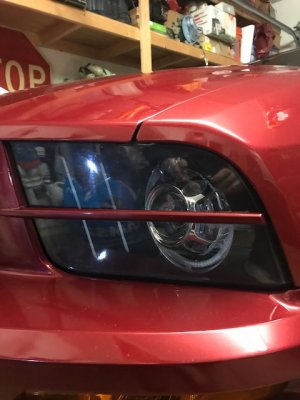
Hey there fellas, we got my son some new Raxiom projector headlights go on his 06 GT and we have some issues with the high beam on the driver side. With the old headlights in both low and hi beam work. With the new lights in both low beams work but only passenger side hi. If we leave in old on the passenger and new on the driver side both low and hi beams work. This makes no freaking sense. We got these from AM and this is the second set and both are doing the same thing. Any ideas?
 

Juice

forum member
Joined
Aug 24, 2017
Posts
4,622
Reaction score
1,905
Need more info. There is no canbus monitoring of headlamps on that year. The only monitoring is done by the SJB, and will set a code if there is a problem with the circuit. It is just a load sensing circuit. And can only report open or shorted circuit.
You could scan the SJB for codes (Forscan). These are LIVE only, none are stored.
My best guess is that the high beams draw too high current, and the SJB is 'protecting' the wiring and shutting down that circuit for over current detected.
Or measure bulb resistance with a DVOM of old and new bulbs. If my suspicion is correct, the raxiom bulbs will read lower resistance.
Yea, I fucked with my lighting some..... lmao
 

kstall

Member
Joined
Feb 22, 2021
Posts
106
Reaction score
78
Here is the weird thing with these lights. The bulbs that came in it are single filament H9 that have the adapter in order to hook into the stock harness. So for the high beam to work, there is a spring inside the light that I guess moves some kind of panel or something up and down depending on low or high beam. When you switch between beams you can hear an audible click as it moves. I've never had any type of projector housing so this is all new to me. We swapped out the H9 bulb that came in it for an LED and it still does the same thing. These are the ones we bought:
https://www.americanmuscle.com/2010-headlight-black-0509.html
 

DieHarder

Senior Member
Joined
Nov 9, 2019
Posts
1,467
Reaction score
758
Need more info. There is no canbus monitoring of headlamps on that year. The only monitoring is done by the SJB, and will set a code if there is a problem with the circuit. It is just a load sensing circuit. And can only report open or shorted circuit.
You could scan the SJB for codes (Forscan). These are LIVE only, none are stored.
My best guess is that the high beams draw too high current, and the SJB is 'protecting' the wiring and shutting down that circuit for over current detected.
Or measure bulb resistance with a DVOM of old and new bulbs. If my suspicion is correct, the raxiom bulbs will read lower resistance.
Yea, I fucked with my lighting some..... lmao

Yea, I fucked with my lighting some..... lmao Yeah, I have too.

The reason for the CANBUS/Headlight adapters (see link above) is they also act as load resistors of sorts. Adding them to the headlight circuit may resolve the operational issue the OP is experiencing without cutting wiring or adding load resistors. When the resistance presented by the LED lights is lower than expected it's as you say the SJB thinks it's seeing a short and shutting down to protect itself... A decent generic explanation of this and other issues/ challenges involved is explained in this post by Redroll: https://www.wranglerforum.com/threa...e-whole-canbus-or-is-it-cambus-thing.2376239/
 

Juice

forum member
Joined
Aug 24, 2017
Posts
4,622
Reaction score
1,905
Last thing I would do is add resistance to a circuit that sounds like is at the treshold of overload.
 

DieHarder

Senior Member
Joined
Nov 9, 2019
Posts
1,467
Reaction score
758
LED's are diodes which tend to act like switches (either on or off/ vs filaments which act like resistors). The issue is not enough resistance vs too much. If the circuit is expecting 100 ohms but only seeing 10 as you say it thinks it's seeing a short/too much current and may manifest that lack of resistance in odd ways... same thing happens in our cars when the ground systems start to go (greater resistance/not enough current flow). All I'm saying is there is a low cost fix for these LED lights to resolve this type of behavior. At $15 - 20 it's a worthwhile troubleshooting step and may just solve the OP's problem.
 

Juice

forum member
Joined
Aug 24, 2017
Posts
4,622
Reaction score
1,905
I have installed all LEDs except trunk lamp.
I only get codes for "shorted to voltage" in the SJB, but everything works. I added resistors to rear to correct hyperflash.
 

DieHarder

Senior Member
Joined
Nov 9, 2019
Posts
1,467
Reaction score
758
Absolutely correct... adding resistance corrected the hyperflash condition because the diodes act like switches/valves and need the extra resistance to cut down the amount of current flowing in the circuit. Without the load resistors the current flow is too high and essentially overcomes the inherent resistance in the diode P/N junctions manifesting as a hyper flash condition. Adding resistance (across the ends of the circuit in parallel) cuts down the max amount of current that can flow allowing the diodes to function normally again. Per your codes the SJB is reporting too much current (short) but may still operate due to whatever level of inherent resistance is in the LEDs. To correct this condition try adding load resistors to all circuits that you installed LEDs and I'll guarantee the SJB codes go away.
 

DieHarder

Senior Member
Joined
Nov 9, 2019
Posts
1,467
Reaction score
758
Actually built my own since I couldn't find anything that I liked and I'm too cheap to pay somebody $300 - $700 or more for something I can do myself for ~$250 in parts (at the time) over a weekend. Obviously, much more now.... As detailed below most all parts are still readily available on the internet/ feebay. May need to look for awhile to find the best deals however.

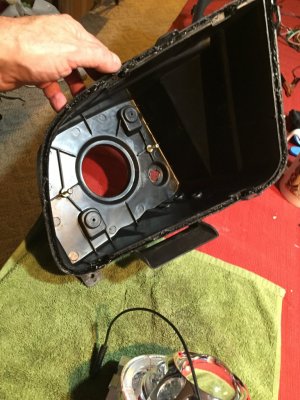
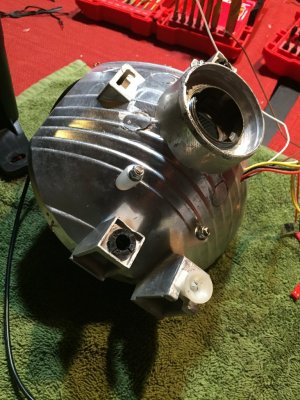
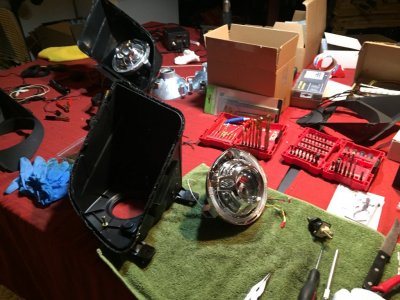
I started with a generic set of replacement lights; think they cost me ~$50 at the time. I used a standard heat gun and small pry bars/screwdrivers to separate the lens cover from the body. Actually, not too difficult once you get it started. Next, using a couple of kits you can buy (on feebay); Projectors; Headlight Retrofit mounting kit and screw kit mount the projector into the back of the reflector. Sorry I didn't do step-by-step pics.

Links to parts at the bottom of the page.
IMG_0948.JPG IMG_0942.JPG
Pic #1 - Body of light Completed reflector
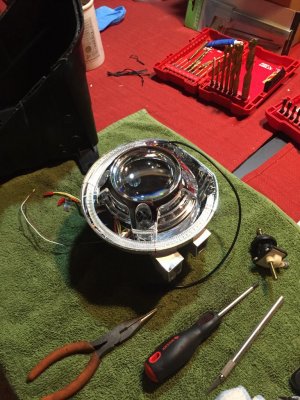

IMG_0941.JPG
Completed reflector body w/projector and LED switchback surround.
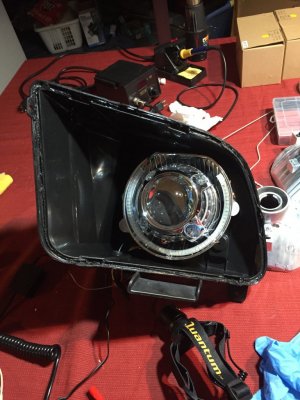
IMG_0938.JPG

I added the LED switchback surrounds wiring them in place with fine copper wire and installed the assemblies back into the body of the light.
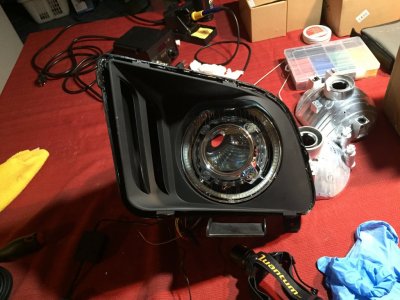
IMG_0954.JPG
75% completed

Next, I ran the wiring for projector controls and LEDs out the bottom of the lights thru rubber grommets I picked up at Harbor Freight.
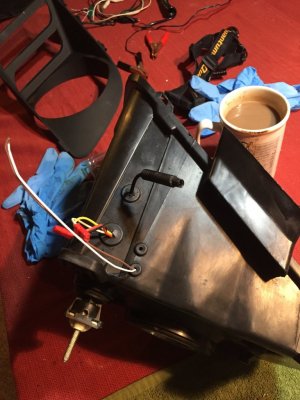
IMG_0955.JPG

To get the lenses back on just heat up the butyl sealer with a heat gun for a few minutes and clamp together well with some plastic clamps. Again, not difficult to do. Just ensure you have enough to clamp all the way around the lens seal.

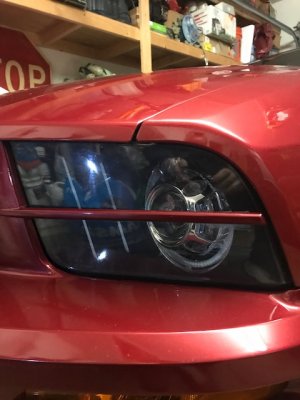
Finally, I installed them back into the car using pre-made two-wire connectors by soldering and heat shrinking all of the wiring after interfacing it with the front turn signals and lighting circuits. After some testing pronounced everything good to go. The two white strips are SMD turn signals that I added but haven't hooked up yet as the switchbacks are doing a fine job in that regard. Apparently, I've reached the limit for what you can upload in one message so will need to create another message if you're interested in wiring details on the car side and seeing them operational.

Overall, at least IMHO I think they look and perform as good/better than most anything you can get on the market. I also added projector specific bulbs that really make a difference in the light output performance of these projectors.
IMG_2383.jpg

Links:

Headlight bodies: https://www.ebay.com/itm/313535462232?fits=Model:Mustang|Make:Ford&hash=item49002b7b58:g:Rw4AAOSwWcxhmF7E

Headlight Retrofit Mounting Tools: https://www.ebay.com/itm/322532454236?ssPageName=STRK:MEBIDX:IT&_trksid=p2060353.m1438.l2649

Headlight Retrofit Screw/Nut Kit: https://www.ebay.com/itm/322920762180?ssPageName=STRK:MEBIDX:IT&_trksid=p2060353.m1438.l2649

3" Projectors: https://www.ebay.com/itm/322858118898?ssPageName=STRK:MEBIDX:IT&_trksid=p2060353.m1438.l2649

Projector LED bulbs: https://www.ebay.com/itm/313053747878?ssPageName=STRK:MEBIDX:IT&var=611757521486&_trksid=p2060353.m2749.l2649

LED Switchbacks: https://www.ebay.com/itm/115105821802?epid=214879686&hash=item1accd7746a:g:XboAAOSwp09hmrrX
I'd keep looking; Oracle is too expensive. I believe I paid $35 for what I have..
IMG_0945.JPG

IMG_0951.JPG

IMG_2383.jpg
 
Last edited:

Juice

forum member
Joined
Aug 24, 2017
Posts
4,622
Reaction score
1,905
Absolutely correct... adding resistance corrected the hyperflash condition because the diodes act like switches/valves and need the extra resistance to cut down the amount of current flowing in the circuit. Without the load resistors the current flow is too high and essentially overcomes the inherent resistance in the diode P/N junctions manifesting as a hyper flash condition. Adding resistance (across the ends of the circuit in parallel) cuts down the max amount of current that can flow allowing the diodes to function normally again. Per your codes the SJB is reporting too much current (short) but may still operate due to whatever level of inherent resistance is in the LEDs. To correct this condition try adding load resistors to all circuits that you installed LEDs and I'll guarantee the SJB codes go away.

I could care less about fault codes in the SJB, lol, they set no warning lights. I was simply saying that even the codes are not accurate. It should be 'bulb outage detected', but instead, some engineer made it "shorted to voltage or shorted to ground". lol
 

kstall

Member
Joined
Feb 22, 2021
Posts
106
Reaction score
78
Well I guess we don't need to worry about lights for a while. Son got t-boned last coming home from work. Luckily no one got hurt but the stang will need a new fender and door. Front wheel is bent in slightly so we are praying for no frame damage. Hopefully it can all be fixed
 

Laga

Senior Member
Joined
Aug 10, 2019
Posts
999
Reaction score
521
Location
Chicago
Well I guess we don't need to worry about lights for a while. Son got t-boned last coming home from work. Luckily no one got hurt but the stang will need a new fender and door. Front wheel is bent in slightly so we are praying for no frame damage. Hopefully it can all be fixed
Oh no. Glad no one was hurt. Hope it can be fixed.

BTW, A couple of months ago, my daughter got rear ended, no injuries, in her 2015 Honda Fit with 110K miles. Damage didn’t look that bad as it only caught the rear corner and some minor side swipe. Both drivers had State Farm. SF totaled the car and paid my daughter $12,400. She paid a total out the door of $16,200, 6.5 years ago when it was new. Your insurance may want to total your 06.
 

kstall

Member
Joined
Feb 22, 2021
Posts
106
Reaction score
78
Dang are you serious? Was she able to keep it after they totaled it or how does that work? He loves this car so I would really hate to see it get junked for some minor damage.
 

Laga

Senior Member
Joined
Aug 10, 2019
Posts
999
Reaction score
521
Location
Chicago
I went to HS with the owner of the body repair shop I go to. He estimated $9500 for repairs. After looking up the value of the car at Kelly Blue Book, we figured we’d be lucky to get $7K-$8K. So when they said $12.4, she said sold. The price of used cars is really stupid right now. Even damaged ones. I know you can buy back a totaled car on a salvage title, but I never did it and not sure how it works.
 

Juice

forum member
Joined
Aug 24, 2017
Posts
4,622
Reaction score
1,905
It is called owner retention. Just tell the insurance that you want to keep it. They will tell you how to do it.9k repair on a 12k car, they will total it. No room for any supplements.
 

kstall

Member
Joined
Feb 22, 2021
Posts
106
Reaction score
78
Its being taken to body shop for the estimate today. Stay tuned
 

kstall

Member
Joined
Feb 22, 2021
Posts
106
Reaction score
78
So as an update not that anyone cares really lol, got the quote from body shop and insurance approved. ITS STILL IN THE FREAKIN BODY SHOP! 5 weeks now and it still isnt finished!!! 5 weeks to replace a door, fender, and front suspension. Stopped by yesterday and the damn front bumper isnt even painted yet. My patience with this is about to reach a boiling point
 

Laga

Senior Member
Joined
Aug 10, 2019
Posts
999
Reaction score
521
Location
Chicago
That sucks. Are they waiting on parts, or just slow?
 

kstall

Member
Joined
Feb 22, 2021
Posts
106
Reaction score
78
parts have been in the shop since week 2. Slow is an understatement lol
 

Latest posts

Support us!

Support Us - Become A Supporting Member Today!

Click Here For Details

Sponsor Links

Banner image
Back
Top