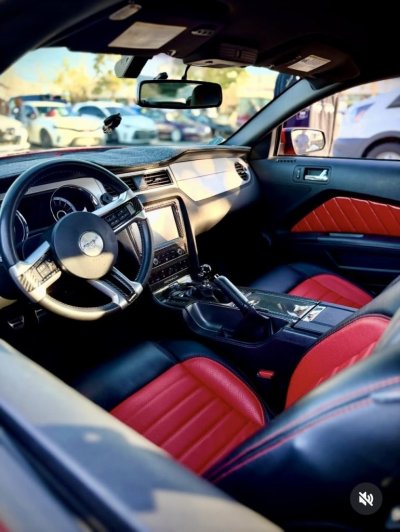
My 05' GT factory seats w/125K+ had some rips in the lower sections but the rest of the seats were in great shape. I am a stickler for nice cars (interior & exterior), so have been considering and looking for seat options. I have a set of Recaro's that I could have installed but they are cloth & want those for another project.
Shopping around most local upholstery shops wanted $2k+ to re-cover the factory seats. Online searches had leather (real or faux/fake) seat covers from $400-1,600+. I love Ebay (yes, I know flea bay). I saw a USA vendor with excellent reviews and the with holiday discount got the real leather seats for $475.00. When I called the vendor to confirm the full set includes headrest, they quickly said NO and that the seats are OEM replacement which means leather and vinyl is used in some areas. OK, so paid an additional $90.00 for real leather headrest. So, I am in for $565.00 plus $20.00 for hog-ring pliers from Amazon.
Vendor:
https://autoseatreplacement.com/
Ebay info:
https://www.ebay.com/itm/226737908136?var=525903991844
Seats arrived within a week, and the vendor even included a bag of hog-ring staples. The seat covers have that smell of real leather and are supple and easy to see what parts fine grain leather are and what are vinyl sections. I am pleased with the purchase and decided to install the day after Christmas.
I tackled this project with my lovely & patient wife. It "kicked both of our ASS!" This is a "2-man job" not being sexist, but my wife is 5' 99lbs (my pit bull weighs as much) and we struggled getting the covers on/off. I am a big strong guy, 6'2" 200lb but fought pushing & pulling the seats covers and moving & turning the awkward seats to accommodate different positions. The passenger seat took us about 2-hours, so we decided to do the drivers which took us a long 4 hours due to reinstalling the hog-rings which was virtually impossible on that seat. Also, the driver seat is power, so heavier than the passenger seat and by this time the sun was overhead, and we had to relocate to inside the garage.
I watched this installation video online:
I was lucky that my foam was in great shape, so I didn't have to steam them. Also, only on the driver seat did the Velcro on the lower section start to peel up. Simple 3M adhesive and it was glued back in place. The lower seat covers were easily identifiable Driver & Passenger, but the uppers seem to be universal. The covers are 90% replicas of the OEM Ford and came with the perforated inserts, but some of the mounting tabs and pockets are not stitched in as the OEMs. The uppers do not have cut-outs for the headrest or the seat recliners. Not an issue, I used an awl to find the center and then exacto-knife to cut a small square, trim with small scissors and the leather stretches around the clips. On the recline lever, I used a black sharpie to draw a vertical line where the channel is and then the exacto-knife to cut a small slit (about 3"). From there I could see how much I had to trim in order for the plastic cover to go in place. There are some other areas where you need to modify, use your own push-pins to secure the hanging leather pieces, but not an issue. I did have to do some plastic repair on the driver side power side panel. The Christmas tree clips (I have no idea why they are called this) they should be called "destruction clips" because they chew up the factory plastic making the trim panel loose and not sit flush with the seat. I used a 2-part plastic epoxy to fix the broken plastic clips. I have used this stuff on M4 handguard and have held up well in that environment. LOL
Another tip, leaving the new leather covers outside in the sunlight to make it pliable. Also, on the hog-ring pliers get the ones which are spring loaded, they hold the staple in place while you align it with the cover and seat retention cable. A trim push-pin clip removing/pry tool is a must as are different plastic pry bars (interior trim removal tool) so you can hold down fabric while installing hog-rings.
I am very pleased with the outcome, and the interior looks better than factory. We also shampooed the carpet since the seats were out. Now I need to do my timing chains, tensioners, etc. in the next few months. LOL
View attachment 113037View attachment 113038View attachment 113039View attachment 113040View attachment 113041View attachment 113042View attachment 113043View attachment 113044View attachment 113046
View attachment 113045