DieHarder
Senior Member
- Joined
- Nov 9, 2019
- Posts
- 1,467
- Reaction score
- 758
A little background... Since installing a DOB supercharger kit (2 years ago) I've been experiencing a low voltage issue. At first it seemed like I had a bad alternator. I thought that was weird since I bought DOB's best (read very expensive) alternator. Still, I could not get more than about 11.5 - 12v volts out of it and the idiot lights on my dash came on indicating a non-charging condition. I couldn't find anything wrong electrically at the time so I took the car to several places for "expert" opinions who all said I had a bad alternator. I also removed the alternator and took it into a couple of auto stores for testing. All said it was bad. Again, I thought that odd so I found a place that rebuilds alternators and had them test it. They said it was fine. Still, I couldn't get more than 12v out of the system.
Frustrated, I called Jason at DOB, got a return authorization and sent it back to the manufacturer for testing. That alternator shop too said the alternator was perfect and sent it back. Now, I'm really ticked off and thought time to start looking for other causes. Did I damage something when I installed the new one? Were my cables bad? Had I reversed something when I extended the cables to relocate the alternator? Did I have a bad PCM? Given I have some electrical background... used to be an Electronics Tech in the military I decided to go back to basics. First rule of troubleshooting; understand the circuit you're working on. Broke out the manuals and read up on how Ford alternators work... interesting to say the least.
My other mantra for troubleshooting electrical issues is if it worked before 99% of the time the problem will be something you've touched, changed, damaged, forgotten or missed reconnecting after you've worked on it. After verifying that everything I touched on the car was correct I was still left with this low voltage issue.
Then I started reading up on grounds.... yup, simple, everyday grounds. When I looked at the system all of the cabling seemed good but I read several stories of issues with grounds in these cars and started looking closely at them one by one. I ended up removing several; cleaning and reconnecting them to no avail. Eventually, I ended up stumbling on the idea of dissimilar metals (and anodizing which I opted for my manifold) and thought maybe adding a ground from the body of the alternator to one of the main battery grounds would be a worthwhile troubleshooting step. To ensure a good ground I bought a 5 foot (4 gauge) heavy duty stranded copper cable at my local hardware store, a couple of cable ends with bolt eyes and using a torch soldered the ends of the cable and connected it from a mounting bolt on the alternator back to the main ground on the passenger strut tower as shown.
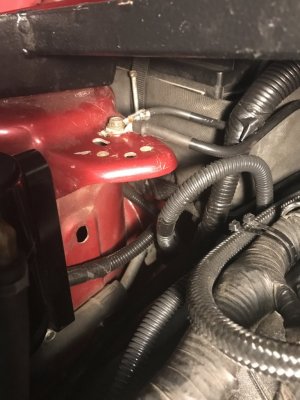
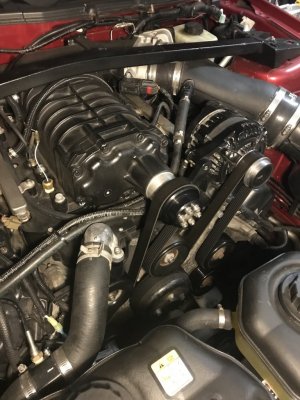
Main ground on passenger strut tower. Connected ground cable to alt mounting bolt.
Note additional 4 gauge ground cable.
Started her up and low and behold the idiot lights went out and my alternator was working. At this point I was getting about 13.2 - 13.3v out of the system. At the time I was extremely happy and just glad I could drive the car without issues.
So, fast forward to last week still unhappy with overall system performance I figured the wiring in our cars is 15 years old and likely seen better days so figured I'd try replacing the main battery/starter cable and ordered an OEM Motorcraft unit from a dealer and installed it. Again, pleasantly surprised my voltage output went from 13.3v to 14.0v.
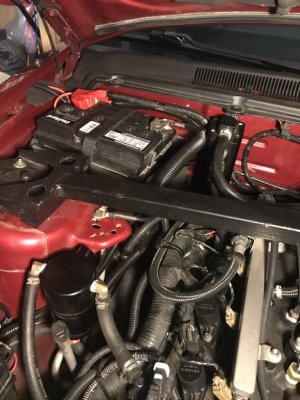
New main Battery/Starter Cable Harness
Now, I figured I was on to something and started looking into the manuals again and noticed there was a section on troubleshooting the charging system that I had seen but didn't necessarily delve into that deep at the time when I was working on the original problem. That said, in re-reading it I noticed the discussion about measuring voltage drops for grounds and the B+ circuit and figured what the heck I'd take another look at it. In measuring the grounds all seemed to be working but when I measured from the body of the alternator to the ground cable that ran back to the strut tower I noticed I had a 1v voltage drop or almost a 10% drop.
In looking around I figured I'd try adding another ground from a body ground on the alternator to the main ground I'd added that ran back to the passenger strut tower. The new wire only needed to be about 4-5" long so shouldn't pose that much of a current issue since the primary load was still being handled by the 4 gauge cable. I found a piece of 10 gauge wire; soldered both ends and added eyes. I connected one end to a ground on the back of the alternator and the other to the upper mounting bolt on the alternator which is the same point where the 4 gauge cable connects. So now, the charging circuit ground is at the same potential end-to-end.
Started up the car. New readings 14.5v. Eureka! Finally!! YKYMF!!!
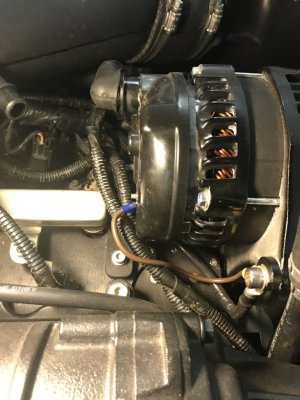
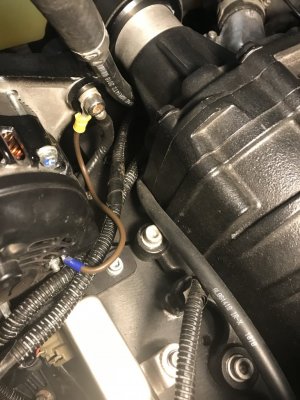
Ground added from back of alternator to a mounting bolt for the alternator.
That, of course means I still have at least one or more bad engine/body ground/s somewhere. I don't like having to jump around bad grounds but compared to what I was dealing with I'll take the results. I figure the only way to truly "fix" all of them would be a new harness. Alas, that's probably not in my future. I suppose I now need to chase down that engine ground in the back of the engine bay that disappears down towards the transmission. Anyone have any experience with that one? Easy/difficult to get to?
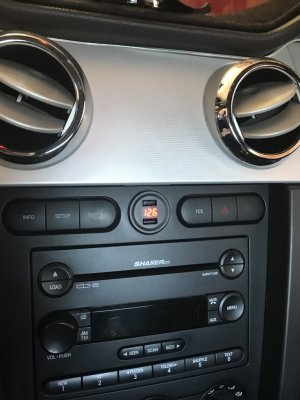
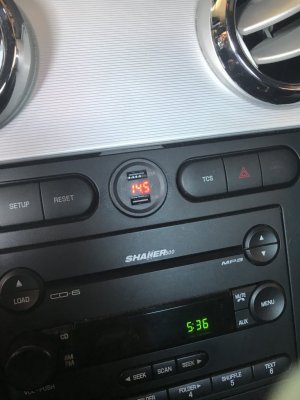
Original running voltage. Final after all grounds fixed/added.
So, I suppose the moral of the story is bad/poor grounds will cause a number of headaches from burning out fan motors and wiring to wasting hundreds replacing charging system components that don't need to be replaced. All I can say in the end is adding a ground wire to two to verify/validate whether a ground issue exists is a legitimate troubleshooting step and can help you solve a host of electrical issues that you'll otherwise end up wasting scores of hours over when the issue is poor grounding. And, by all means follow the troubleshooting steps in the manuals. They're there for a reason. To help you narrow down the real problem and help you feel less foolish when you finally!!! figure out "WTF" the car was trying to tell you all along. Welcome to the matrix...
Frustrated, I called Jason at DOB, got a return authorization and sent it back to the manufacturer for testing. That alternator shop too said the alternator was perfect and sent it back. Now, I'm really ticked off and thought time to start looking for other causes. Did I damage something when I installed the new one? Were my cables bad? Had I reversed something when I extended the cables to relocate the alternator? Did I have a bad PCM? Given I have some electrical background... used to be an Electronics Tech in the military I decided to go back to basics. First rule of troubleshooting; understand the circuit you're working on. Broke out the manuals and read up on how Ford alternators work... interesting to say the least.
My other mantra for troubleshooting electrical issues is if it worked before 99% of the time the problem will be something you've touched, changed, damaged, forgotten or missed reconnecting after you've worked on it. After verifying that everything I touched on the car was correct I was still left with this low voltage issue.
Then I started reading up on grounds.... yup, simple, everyday grounds. When I looked at the system all of the cabling seemed good but I read several stories of issues with grounds in these cars and started looking closely at them one by one. I ended up removing several; cleaning and reconnecting them to no avail. Eventually, I ended up stumbling on the idea of dissimilar metals (and anodizing which I opted for my manifold) and thought maybe adding a ground from the body of the alternator to one of the main battery grounds would be a worthwhile troubleshooting step. To ensure a good ground I bought a 5 foot (4 gauge) heavy duty stranded copper cable at my local hardware store, a couple of cable ends with bolt eyes and using a torch soldered the ends of the cable and connected it from a mounting bolt on the alternator back to the main ground on the passenger strut tower as shown.


Main ground on passenger strut tower. Connected ground cable to alt mounting bolt.
Note additional 4 gauge ground cable.
Started her up and low and behold the idiot lights went out and my alternator was working. At this point I was getting about 13.2 - 13.3v out of the system. At the time I was extremely happy and just glad I could drive the car without issues.
So, fast forward to last week still unhappy with overall system performance I figured the wiring in our cars is 15 years old and likely seen better days so figured I'd try replacing the main battery/starter cable and ordered an OEM Motorcraft unit from a dealer and installed it. Again, pleasantly surprised my voltage output went from 13.3v to 14.0v.

New main Battery/Starter Cable Harness
Now, I figured I was on to something and started looking into the manuals again and noticed there was a section on troubleshooting the charging system that I had seen but didn't necessarily delve into that deep at the time when I was working on the original problem. That said, in re-reading it I noticed the discussion about measuring voltage drops for grounds and the B+ circuit and figured what the heck I'd take another look at it. In measuring the grounds all seemed to be working but when I measured from the body of the alternator to the ground cable that ran back to the strut tower I noticed I had a 1v voltage drop or almost a 10% drop.
In looking around I figured I'd try adding another ground from a body ground on the alternator to the main ground I'd added that ran back to the passenger strut tower. The new wire only needed to be about 4-5" long so shouldn't pose that much of a current issue since the primary load was still being handled by the 4 gauge cable. I found a piece of 10 gauge wire; soldered both ends and added eyes. I connected one end to a ground on the back of the alternator and the other to the upper mounting bolt on the alternator which is the same point where the 4 gauge cable connects. So now, the charging circuit ground is at the same potential end-to-end.
Started up the car. New readings 14.5v. Eureka! Finally!! YKYMF!!!


Ground added from back of alternator to a mounting bolt for the alternator.
That, of course means I still have at least one or more bad engine/body ground/s somewhere. I don't like having to jump around bad grounds but compared to what I was dealing with I'll take the results. I figure the only way to truly "fix" all of them would be a new harness. Alas, that's probably not in my future. I suppose I now need to chase down that engine ground in the back of the engine bay that disappears down towards the transmission. Anyone have any experience with that one? Easy/difficult to get to?


Original running voltage. Final after all grounds fixed/added.
So, I suppose the moral of the story is bad/poor grounds will cause a number of headaches from burning out fan motors and wiring to wasting hundreds replacing charging system components that don't need to be replaced. All I can say in the end is adding a ground wire to two to verify/validate whether a ground issue exists is a legitimate troubleshooting step and can help you solve a host of electrical issues that you'll otherwise end up wasting scores of hours over when the issue is poor grounding. And, by all means follow the troubleshooting steps in the manuals. They're there for a reason. To help you narrow down the real problem and help you feel less foolish when you finally!!! figure out "WTF" the car was trying to tell you all along. Welcome to the matrix...


