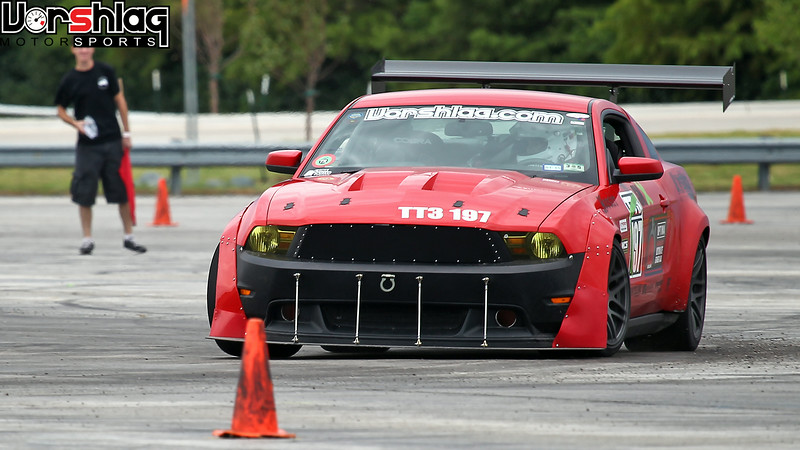
Update for August 26th, 2014: We were fairly well caught up in the last post, which was a big one, so this one should be a quicker read. Only one competition event (SCCA autocross in August), and still no news on our 2015 Mustang (we have 2 on order, to try to get one quicker). The USCA/Optima event from March was televised, and we had a big party with most of the Dallas entrants to watch the show - where we actually saw a lot of the 8 Vorshlag entries from the event, including my own car. Catch re-runs on MAVTV, it was good! Of course we have worked on a number of Mustangs at the shop that I'll show progress on - namely Jamie Beck's ST3 Mustang build. Shop Manager Brad Maxcy has stepped up and is taking some good photos of this project (and all others) and we share a lot of tech along the way - namely, weights of every part removed or added during the NASA TT3/ST3 class prep. But first I'll briefly cover some new parts and statuses on popular Mustang bits.
New S197 Products + Lead Times
If you've been reading any of my online forum posts for the past 21 years, you know I love to measure, weigh and test things. The goal for all of this data is to make a car lighter, handle better, run cooler, or lower lap times. Sometimes I even follow my own advice.


One key piece of data gathering I learned this year from fellow NASA racer, former autocross co-driver of mine and long time friend Paul Costas was...
Alcon caliper temperature strips. These little heat-activated, mark-and-hold data logging strips are applied directly to the brake caliper to measure maximum temps reached there - where the sensitive brake fluid is closest to the brake pad and rotor. Theoretically you look at the caliper temps, compare them to
this chart, and take actions as needed. Well as you know I had been running front caliper temps in the 490°F range, which is past the 475°F peak "Danger Zone" recommended by Alcon. We know what happened when I ran out of these strips, ignored previous data, and ran a long stint at Road Atlanta (boiled brakes + crash). So now not only do I keep enough on hand for our own cars, we keep a LOT of them on hand to sell to other folks. $45 gets you 14 strips, which is enough for several race weekends. Cheap and easy way to know how hot the calipers are getting, and reading them is good insurance.
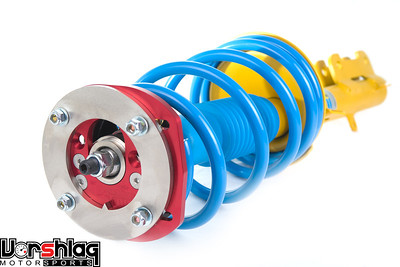
We have been selling the cost effective
Vorshlag Bilstein "StreetPro" suspension kits (monotube inverted shocks + choice of FRPP springs + Vorshlag camber plates, all pre-assmebled and ready to install without re-using any OEM parts) like they are going out of style, and that has meant that we've bought the entire continent out of stock of the specific front strut we utilize - the one that fits the S197 but is 1.5" shorter than stock, to gain bump travel when lowered. Over the summer we bought out Bilstein USA and eventually scooped up all of the inventory of every distributor that held any stock during August, and Bilstein says they will have more in late September. The popularity of this one part caught Bilstein short during a peak in the popularity of this kit, but these dampers are made in Germany and they make them on their own schedule. What can we do?

Another part that has been in and out of stock is our own camber plates. After a key piece was finally delivered from a machine shop supplier our Vorshlag S197 camber plates went off of backorder in July and we fulfilled every single open order. There were a lot. Word got out that we had this camber plate in stock again, and in just a couple of weeks y'all had bought us out of another machined part needed for these, ugh! The volumes we are seeing lately are simply unprecedented. For a market that is price sensitive (Mustang), and an offering that is admittedly one of the higher cost options, we sure have trouble keeping them in stock.


Running out of machined parts has always been a struggle for a small niche suspension shop like us, as we have to depend on outside CNC shops to make many of our parts to our drawings and specs. But being an engineer and a racer myself, I'm very picky about our specs and who we allow to make our parts. After 10 years and about 15 different machine shops we still struggle with unpredictable lead times from outside vendors - and that's after weeding out more than dozen shops that couldn't meet our quality expectations, lead times, specified tolerances or shipping concerns. What used to take 2-4 weeks lately is taking 3-4 months, and that's with 100% domestic suppliers (we will NEVER have anything made overseas that has our name on it). A lot of this has to do with the economic downturn of 2008, when we lost a big chunk of the smaller CNC shops across the country. Now we're working on a brand new solution that we will implement to hopefully alleviate this problem, or tank my business completely, one or the other. No risk, no reward, right? I'm going to cover this
big change for Vorshlag in detail soon, but until then please be patient while we push through these growing pains. If you have any doubts about any big ticket item you might want to purchase from us, feel free to
call or email us to
check inventory status or to
place a phone order vs an online order. Thanks.
S197 Battery Tray + Mount Under Development
At long last, we're finally moving forward with an easy kit to install a 14 pound Odyssey PC680 in the S197 Mustang.
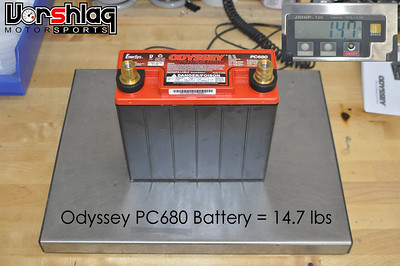
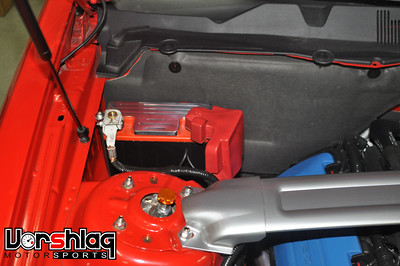
Many of you that have been reading this S197 Build Thread since 2010 might recognize the images above of the custom battery tray I made for my own 2011 GT to mount an
Odyssey PC680. For many years I have preached the advantages of using low weight, high output AGM style batteries in place of old school wet lead acid batteries. Unless you need the ballast, a heavy lead-acid wet battery is just... weight.


I've put these lightweight AGM batteries in all of my own track/autocross/street cars over the past decade, and they each tend to work great for 3-4 years without complaint, even in daily driven cars in Texas heat. It is a great way to drop 20 pounds off the nose of an S197, and in some BMWs it can be a whopping 40 pound drop (the BMW E46 comes with a MEGA sized 54 pound battery!). And while the textbook response might be "move the weight to the trunk!" that comes with some added hassles and complications. First, you have to run (heavy and costly) larger gauge copper cable to the trunk, then make a whole new battery box back there, and do something about the power distribution block on the front of theS197. So instead I took the easy route and just plopped the 14 pound
PC680 right where the stocker was (which was over 33 pounds).


Many of you have asked us over the past 3 years to make a production version of the replacement battery tray I made for my own car (detailed in
this instruction gallery), and last week Jason sketched up some ideas and Olof started cutting aluminum plate to make a prototype for a reproducible version using Jerry Cecco's 2012 Boss302 Mustang as the test car. Jerry's OEM battery sort of exploded, so we supplied him with a PC680 and will have this production installation kit available soon.


There are some elaborate, heavy and complicated battery mounting brackets out there (see above, right) but what we're working on is a battery mount + replacement battery tray. The battery will stay in the same OEM location, so it is easy to access/charge/test, but it will just be a lot lighter. Look for more pics of this finished prototype in my next post.
Jamie Beck 2013 Mustang GT - ST3 Prep
Last time we showed this Mustang we were just beginning to make the main hoop in the roll cage, after removing the interior, dash and door guts. After about 50 hours of work by Ryan on the roll cage, that aspect of this project is almost complete. We also have weighed a lot of parts that some of you might be interested in. We took pictures and will share all of this with you as we go.
Jamie's Project Gallery (250+ pics): http://vorshlag.smugmug.com/Projects/Jamie-Becks-S197-Mustang/

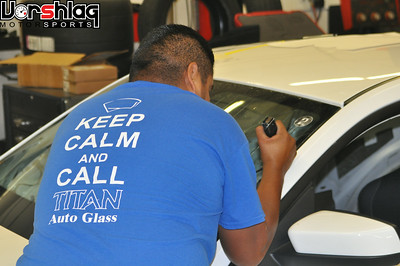
One step on almost all roll cage jobs includes removing the front and rear glass, so we called the pros at Titan Auto Glass to extract the windows. In this case the windshield was salvaged and will be reused, but Jamie had always planned on going Lexan on the rear and side quarter glass, so those were removed (intract) and thrown out.

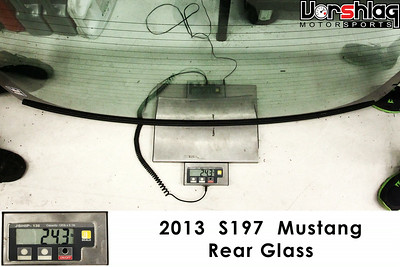
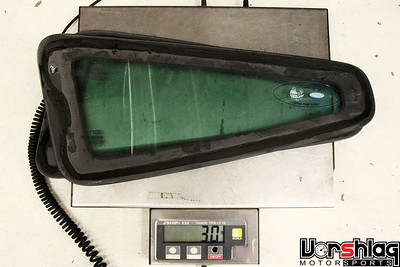
The Windshield is going back in, and being that's its a multi-pane, laminated windshield there's no surprise that it weighs 29.0 pounds. Going Lexan here would save a few but having windshield wipers is a nice bonus with real glass (Lexan scratches fairly easily), not to mention the safety aspect of stronger OEM style windshield. The rear glass with integral defroster grid was still a hefty 24.3 pounds, and that is getting replaced with Lexan. I'll show the Lexan weights after they are trimmed, fitted, borders are painted, but before they go in for the last time.

The side, rear quarter glass is fairly light at only 3.0 pounds, but each one is relatively small. But we found some pounds in the A/C system removal, shown below...
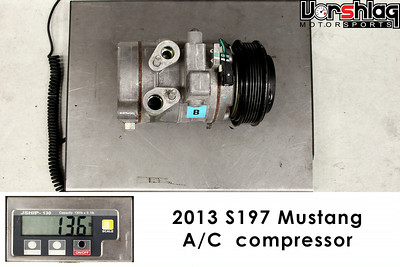
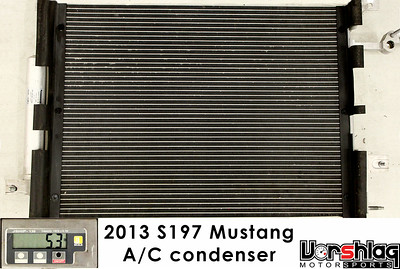
To be honest, I thought the A/C compressor would weigh a good bit more, but it only tips the scales at 13.6 pounds. Likewise the condenser is a svelte 5.3, but removing this is more to help airflow to the radiator. We pulled the condenser off of my 2011 Mustang for similar reasons (and because it got busted at RA), but it will be reinstalled and functional for Optima event in Vegas. We gotta stay cool on the road rally, yo!
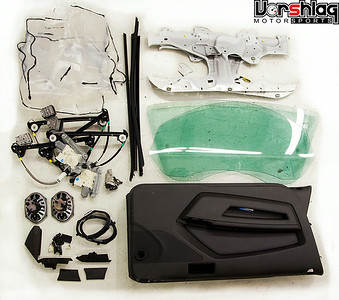
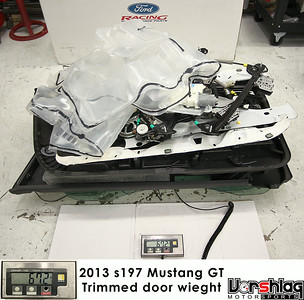
We had removed the guts from both doors when I wrote my last installment, but hadn't weighed all of it, which included: interior door panels, speakers, trim, weatherstripping, door glass, window motor, regulator/tracks, and inner door structure. As you can see it all weighs in at 67.2 pounds, but that doesn't include the door bars (which were left in place last time).

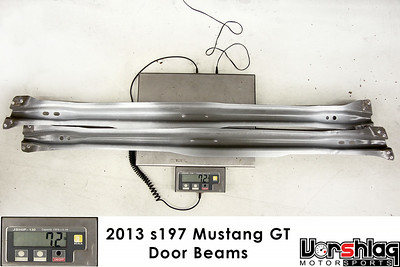
As you can see above left, the glass, regulators/tracks and motors alone were 34.2 pounds of that. And after the door bars were built it was shown that the OEM "crash bars" would be in the way, so 4 quick spot welds later those were both removed, for another 7.2 pounds of steel. All together, the door modifications for the roll cage installation have removed (67.2 + 7.2) 74.4 pounds. It is all adding up...
Cage Progress + Rules Interpretation
Whenever you build a roll cage for a given car for the first time, there are always some gray areas that pop up. In this case I wanted to use the Maximum Motorsports bolt-in angle brackets from their
roll bar installation kits for this cage. Would this brace becoem a "roll cage mounting plate", and if so, would this be legal to use with the cage? Our hope was to remove the stamped steel OEM bracket at the B-pillar to rear seat bulkhead junction (shown below left in RED), replace them with raw steel MM brackets (shown below right in WHITE),
weld the MM brackets to the chassis, then land the main roll hoop to this beefy support.


Ryan was skeptical of the allowance in ST, which uses the NASA CCR's 100 sq inch maximum plate rule for mounting plates for cage tubes. Sure enough, the MM bracket was much more than 100 sq inches on the outer surface and would seemingly violate that rule. Strangely enough the American Iron ruleset has an allowance that supersedes the CCR and does allow more than 100 sq inches, which is one of the only times the AI cage rules are more liberal than ST.

We were stuck, so I wrote a letter to the National ST series director for clarification and asked our local ST race director (Mike P) for his input. Mike seemed to think this "like for like" replacement would be legal, but we were still worried about the 100 sq inch rule if we welded it onto the chassis. Jason measured each face, input the many weird shapes into SolidWorks, and then had the software add up the surface area for one side of each external surface and it was over 188 sq inches, so it would easily violate this rule. After about a couple of emails, some input from other NASA directors, an official ruling came back a week later - this could be used, if it was bolted in. That... wasn't what we had wanted to do, as we'd always want to weld the mounting plates for cage tubes to the chassis, so we punted.
continued below