You are using an out of date browser. It may not display this or other websites correctly.
You should upgrade or use an alternative browser.
You should upgrade or use an alternative browser.
Anyone replace a the positive side battery cable? 05 GT
- Thread starter ZwookY
- Start date
-
- Tags
- battery cable
What car? Kind of important.
Typically, the positive cable connector is an 'all or nothing' thing from the OEM standpoint. You'll have to replace the entire cable to get just that end. Or get that new cable, then cut it and splice it to your current cable as needed, but I'd not recommend that. Too much possibility for failure that way.
You can also get an aftermarket terminal. Get a *good* one, not one at (insert cheap discount place), and not even the cheap ones at (insert any auto parts store). ABSOLUTELY do not get this kind: https://www.walmart.com/ip/ROAD-POWE...minal/22452726. The reason is that the two bolts used are going to strip the holes they're screwed into on the terminal, and therefore cause bad connections.
Something like this for the cable end: https://www.walmart.com/ip/5pcs-Bron...eeve/960905723
And then this to attach that to: https://www.walmart.com/ip/Performan...1687/994596718
would be a better alternative. That's similar to how my '06s positive terminal is set up.
You could also go to car-part.com and enter your car's information and maybe find a junkyard to acquire the entire cable.
And when you're all done redoing the terminals, go read this, it might help prevent the issue if it was a corrosion problem: https://themustangsource.com/forums/...4/#post6917899
It's an 05GT.
I ordered the whole assembly (OEM motorcraft), definitely don't want to splice anything or use an crappy terminal from autoparts store.
I was hoping for a video as there are like 5 or 6 places it bolts into, not to mention the old one is all wrapped up in the wire assembly. Just wanted to know what I'm getting into before starting.
It's an 05GT.
I ordered the whole assembly (OEM motorcraft), definitely don't want to splice anything or use an crappy terminal from autoparts store.
I was hoping for a video as there are like 5 or 6 places it bolts into, not to mention the old one is all wrapped up in the wire assembly. Just wanted to know what I'm getting into before starting.
Being very careful, slice the tape off the old wire, take pictures of all the places it bolts to. Remove old wire, bolt it back (look at pictures), wrap it with new tape all done.
Joe combs
Member
What is to slice and cut since he bought a new motorcraft cable? Its simply take off the old one and install the new one.Being very careful, slice the tape off the old wire, take pictures of all the places it bolts to. Remove old wire, bolt it back (look at pictures), wrap it with new tape all done.
Positive terminal is completely corroded and "sliding" tightening bolt is broken.
Ordered the assembly but was hoping to see a Youtube video or guide some where but can't find any.
I have a spare laying in my trunk right now... i will grab it out and see if i can do a brake down by connector for you.... I'll send it by PM....
Dino Dino Bambino
I have a red car
In case anyone needs the part no., it's Motorcraft WC95954 or 5R3Z14300BB.
Joe combs
Member
It's an 05GT.
I ordered the whole assembly (OEM motorcraft), definitely don't want to splice anything or use an crappy terminal from autoparts store.
I was hoping for a video as there are like 5 or 6 places it bolts into, not to mention the old one is all wrapped up in the wire assembly. Just wanted to know what I'm getting into before starting.
Tried to PM you but the system will not let me.
You are going to have the 2 connections at the battery (disconnect first). Then disconnect the lead to the alternator from the positive cable. From there you will have a ground at the passenger shock tower to disconnect, followed by the connection to the under hood fuse box. After you have that loose your next 2 connections will be the ground to the block (you will need to get under the car to get at it), then the connection at the starter. Be careful on that one as it could have corrosion on it and end up snapping off that stud that the cable attaches to if not careful.
Once you have the old cable out and the new cable installed connect your alternator lead to the positive cable end. Then connect the battery terminals.
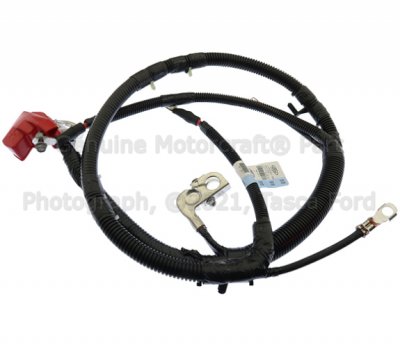
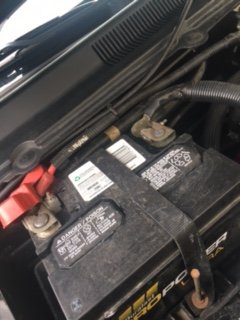
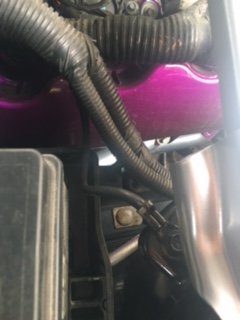
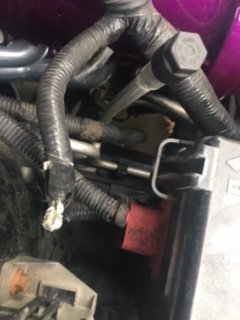
Pictures I attached show the new cable ford shows then my first picture shows the connection at the battery and the alternator lead coming off of it. Then the ground at the strut tower. The connection at the under hood fuse box, where you also see the cable turning down to go to the block ground and back to the starter... The last picture shows a picture of those ends on the battery cable that I have.
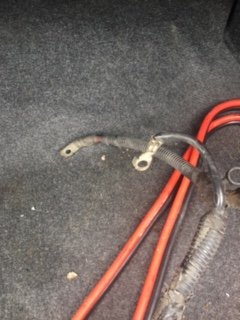
Tried to PM you but the system will not let me.
You are going to have the 2 connections at the battery (disconnect first). Then disconnect the lead to the alternator from the positive cable. From there you will have a ground at the passenger shock tower to disconnect, followed by the connection to the under hood fuse box. After you have that loose your next 2 connections will be the ground to the block (you will need to get under the car to get at it), then the connection at the starter. Be careful on that one as it could have corrosion on it and end up snapping off that stud that the cable attaches to if not careful.
Once you have the old cable out and the new cable installed connect your alternator lead to the positive cable end. Then connect the battery terminals.
Pictures I attached show the new cable ford shows then my first picture shows the connection at the battery and the alternator lead coming off of it. Then the ground at the strut tower. The connection at the under hood fuse box, where you also see the cable turning down to go to the block ground and back to the starter... The last picture shows a picture of those ends on the battery cable that I have. View attachment 85271 View attachment 85272 View attachment 85273 View attachment 85274 View attachment 85275
Thanks!!! Exactly what I was wanting to hear!!!
A few years ago my wife's car had the issue of not being able to tighten the clamp enough on the battery post. The cable had a wonky fusible link built into the terminal and such and was a couple hundred dollars. I went and got a lead battery post cap and slipped it over the battery post and she's been good since.
This one is copper but same same.
https://www.grainger.com/product/25...s1j-IzRoIvVSdsBbXxxoCpPwQAvD_BwE&gclsrc=aw.ds
This one is copper but same same.
https://www.grainger.com/product/25...s1j-IzRoIvVSdsBbXxxoCpPwQAvD_BwE&gclsrc=aw.ds
DieHarder
Senior Member
- Joined
- Nov 9, 2019
- Posts
- 1,480
- Reaction score
- 762
Thanks!!! Exactly what I was wanting to hear!!!
As Joe says get the OEM replacement unit. When I replaced mine the worst terminal to get off was the one underneath the engine support (ground)...Also, worth it to take extra time to clean all of the mounting points/terminals thoroughly. Since your old cables are about 18+ years now you may see higher voltage output from the alternator due to the new cables. I did.
moooosestang
Member
I replaced the positive cable and moved my battery to the trunk, lol! It was one of the most satisfying mods i've done to the car and now i know how to make my own battery cables. Like someone else said don't use those screw down cable connectors. those are junk. you need a crimp on connector and a crimping tool. I bought the cheap hammer kind from amazon. Works great with a 5lb sledge. you basically fuse the copper together through brute force. So statisfying! I cut the stock alternator cable and cable going to the fuse box and added new copper lugs to both. i completely removed the starter cable and ran a 1awg cable to the starter from my distribution block on the firewall. That way i have 1awg from the battery all the way to the starter. 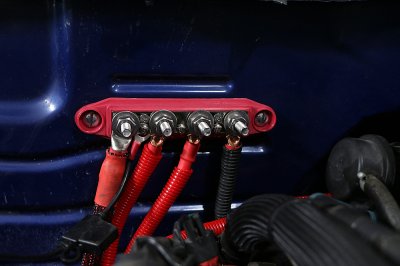

Zach Baumann
Member
That looks so clean. I might have to do that too.
moooosestang
Member
My firewall distribution block? They sell them on amazon for pretty cheap. it also has a cover that goes over it so you don't accidentally touch it with a wrench. There's a lot of different ways to do this. I will make a separate post outlining what i did and what i used. I'm thinking about moving the stock coolant overflow tank to where the battery was at.That looks so clean. I might have to do that too.
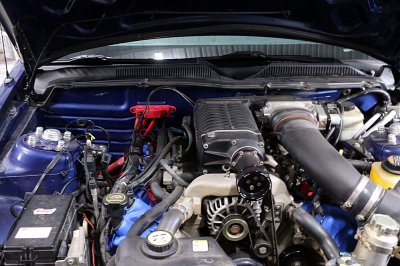
I'm thinking about moving the stock coolant overflow tank to where the battery was at.View attachment 85309
I'm thinking a Moroso or Canton intercooler tank would by better than the coolant tank. But that's me.
moooosestang
Member
I considered it, but i don't track the car and i have the AFCO dual pass heat exchanger all ready so there's more volume. Figured i'd just be adding more weight with more coolant. I had to replace the plastic whipple tank recently because it split at the seam so i got the canton aluminum replacement tank for a 03 cobra. Plus the hassle of extending the lines or replacing them all didn't appeal to me. I'm trying to reduce weight or move weight behind the front tires as much as possible. Plus the stock coolant overflow looks like butt hanging off the fan.I'm thinking a Moroso or Canton intercooler tank would by better than the coolant tank. But that's me.
Similar threads
- Replies
- 15
- Views
- 1K
- Replies
- 9
- Views
- 3K
Support us!
Support Us - Become A Supporting Member Today!
Click Here For Details


