UCA bushings and bolts needed to complete job

crjackson

Member
Joined
Nov 28, 2015
Posts
609
Reaction score
308
Location
Midgard
Just to followup with @GlassTop09
I did the diff bushing (at Ford), this got rid of at least 75% of the noise I was hearing. I’ve yet to take her on an extended drive to gauge if it’s enough or not. It very well may be.

I now have a NEW clunk I’m uncomfortable with (mostly because I don’t yet know the source). It sounds like a loose fastener more than anything else. I’m hoping the adjuster locknut(s) may have loosened during the bushing install.

I’ll go over everything myself in a few days to see what I find. It may simply be that the front poly is now more easily heard, and I just started noticing it. As long as everything is actually tight, I can live with it for the time being.
 

GlassTop09

Senior Member
Joined
May 24, 2019
Posts
1,145
Reaction score
526
Location
Farmington, NM
Just to followup with @GlassTop09
I did the diff bushing (at Ford), this got rid of at least 75% of the noise I was hearing. I’ve yet to take her on an extended drive to gauge if it’s enough or not. It very well may be.

I now have a NEW clunk I’m uncomfortable with (mostly because I don’t yet know the source). It sounds like a loose fastener more than anything else. I’m hoping the adjuster locknut(s) may have loosened during the bushing install.

I’ll go over everything myself in a few days to see what I find. It may simply be that the front poly is now more easily heard, and I just started noticing it. As long as everything is actually tight, I can live with it for the time being.
Ok, good deal.
Now you have a good baseline on this to go off of going forward. I'll assume that you installed a BR3Z-5A638-B UCA diff bushing (11-14 Base\GT, 11-12 GT500), correct? If so, then you're just under the DR3Z-5A638-A UCA diff bushing (13-14 GT500) that I have installed in rubber durometer stiffness, so I think you'll be good as far as deflection control goes as well.

The softest 1 durometer-wise is the 5R3Z-5A638-DA UCA diff bushing (05-10 Base\GT & 07-10 GT500), which is why I won't recommend using it as a replacement when the other 2 later MY OEM parts will fit & are much better improvements\choices that will perform better while still keeping the NVH transfer rate under check.
 

crjackson

Member
Joined
Nov 28, 2015
Posts
609
Reaction score
308
Location
Midgard
I'll assume that you installed a BR3Z-5A638-B UCA diff bushing
Correct - Totally eliminated gear-whine, and almost all clunks (except the new on mentioned above).

Still some followup work to do (double-checking fastener & jam-nut torque, and road-trip testing).

BTW - How do YOU deal with the 350 ft.lb bolt under the seat? My torque wrench’s (3 of them) only go to 250 ft.lbs. I can’t seem to even find a torque wrench locally that goes that high. I guess going to 250, then hitting it with my impact for about 1/4 turn will suffice?
 

GriffX

Member
Joined
Sep 28, 2017
Posts
536
Reaction score
183
BTW - How do YOU deal with the 350 ft.lb bolt under the seat? My torque wrench’s (3 of them) only go to 250 ft.lbs. I can’t seem to even find a torque wrench locally that goes that high. I guess going to 250, then hitting it with my impact for about 1/4 turn will suffice?

I'm facing the same problem, but I guess this is too much.
Some weeks ago I had a M12 bolt, 50 Nm + 90°. A newer spec said 140 Nm for the same bolt.
I think 250 + 1/8 is going around 350?

I think I will use a luggage scale and a breaker bar and try to pull ~40 kg in some distance, which I will calculate.
 

GlassTop09

Senior Member
Joined
May 24, 2019
Posts
1,145
Reaction score
526
Location
Farmington, NM
BTW - How do YOU deal with the 350 ft.lb bolt under the seat? My torque wrench’s (3 of them) only go to 250 ft.lbs. I can’t seem to even find a torque wrench locally that goes that high. I guess going to 250, then hitting it with my impact for about 1/4 turn will suffice?
On 05-10 S197 (mine is '09), this UCA front bracket lug chassis bolt calls for 129 ft-lbs TQ spec........not 350 ft-lbs. I've looked at this w\ a level of suspicion as the chassis is the same, the overall OEM UCA arm design\construction is essentially the same & all other bolt TQ specs are the same except for this front UCA bracket chassis lug bolt......but this front UCA bracket chassis lug & lug bolt for 11-14 is larger (24mm hex) than the same for 05-10 (21mm hex) so I think this is why the higher TQ spec for it.

TBH, if I were in your shoes, I'd do what you're thinking to do except I'd use a long breaker bar instead of an impact to slowly add the extra 1\4 turn TQ rotation.........if I'd try to tighten it past 250 ft-lbs period, that is.

But you gotta go w\ what you got.......I don't think you'll break it in either case.

From what you've posted concerning the NVH improvement, I think you'll be happy with it now.
 
Last edited:

GlassTop09

Senior Member
Joined
May 24, 2019
Posts
1,145
Reaction score
526
Location
Farmington, NM
Do I remember correctly that whiteline has rubber like bushings on the LCA/UCA of the rear axle?
I see that Whiteline has redesigned their adj UCA assembly from their earlier design (early design used a solid arm w\ the yellow front poly bushing w\ an eccentric built into the UCA mounting bracket to set DS pinion angle) to the more common UCA turnbuckle arm adjuster design (looks like a copy of the Steeda adj UCA arm design) but I like the front UCA bushing design (synthetic elastomer w\ the pinhole voiding they used to allow this bushing to articulate w\ the rear axle movement w\o binding up in the mount) of this piece a lot better so IMHO, this looks like the go-to replacement aftermarket adj UCA assembly to get for the majority of users who still cruise on the streets as well as the track.

If I can find\get a replacement accordion dust boot from Dana\Spicer to fix my Ford Performance 1-piece DS (only item bad on it), I will definitely look into getting 1 of these to install w\ it.........after testing my FP 1-piece DS under the Roush 3rd Link UCA assembly I already have installed & finding the DS vibrating due to excessive U-joint angle deflection.
 

crjackson

Member
Joined
Nov 28, 2015
Posts
609
Reaction score
308
Location
Midgard
Well, I hope you get the thing and post your opinion on the piece. It might be worth the trouble.
 

GlassTop09

Senior Member
Joined
May 24, 2019
Posts
1,145
Reaction score
526
Location
Farmington, NM
I was hoping this one would work. Easy find, but a different number than shown in the shop manual page. It says it’s for an Explorer 8.8” SRA.
FORD ROTUNDA OTC TOOL 205-509 AXLE BUSHING REMOVER INSTALLER SET
View attachment 89162
View attachment 89163
FYI...............
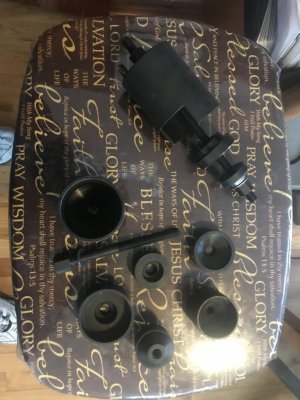
Just for grins & giggles, here is a picture of the specific Ford Rotunda tool labeled in the FWM (also made by OTC for Ford) that was designed to R&R the UCA axle bushing on the Ford 7.5"\8.8" rear SRA axles using the 3-link suspension (05-14 Mustang):
IMG_0147.JPGWhen I bought it back in 2019, I found out that this specific complete tool package consisted of more bits than what was shown in the FWM (I took those part #'s to my local Ford dealership so they could source the tool) so this tool package can be used on several other MY's of Ford vehicle models suspension bushings.........why it cost what it did at the time. Only way I could get it thru my local Ford dealership (they don't sell Ford's Rotunda tools to the public, they did this for me as a favor......was friends w\ 1 of the parts counter guys & a friend w\ the general shop manager so was well known there......got it at their cost......they bought it thru the Ford dealership's account then sold it to me to "recoup" the dealership. 1 of them "I know a guy" things......). OTC couldn't sell this either under their name as this tooling is branded as part of Ford's Rotunda line of tooling, at least that is what I read on it at the time......is why I went thru the Ford dealership to acquire it.

This tool is what makes changing these out while axle is still under the car a very simple & easy affair. This stuff is very solidly built........you'll fold in\collapse the bushing before you even begin to put much of a stress on the tool pieces........also found that out 1st hand before figuring out to SLOWLY increase the load (along w\ a little hammer "metal warming" action on the axle housing bushing socket) to allow the outer shell to break free from the rust jacking between the outer shell and the axle housing socket when removing the old bushing\outer bushing shell. Installation is a snap once the new bushing is properly aligned in the installation socket & axle housing.......just crank on it until it bottoms out, you're done.
 

Support us!

Support Us - Become A Supporting Member Today!

Click Here For Details

Sponsor Links

Banner image
Back
Top