Vorshlag Build Thread - 67 Mustang Pro Touring/Track Car

Vorshlag-Fair

Official Site Vendor
Official Vendor
Joined
Nov 12, 2010
Posts
1,592
Reaction score
107
Location
Dallas, TX
Project Kickoff - November 3rd, 2019: We get a lot of customers asking us to tackle their "big project" builds, and sadly we don't have the time or room to take all of these on. Prior commitments and a finite amount of manpower limit what we can take on as new builds or significant projects. In the last few years we have been turning down more and more requests, but when this one came across my desk it was a hard one to turn down.


Many classic domestic muscle car owners want to do "show car" things, which doesn't really pique my interest. Sure, this car looks good but the owner Adam wanted to take an already track prepped car to the next level. He had followed some of our other Pro Touring builds and wanted to do similar things to this 1967 Mustang Coupe. Some of that Ricky Bobby theory "I wanna go fast!" Also posted on these forums:

BRING IT BY FOR A LOOK

We talked a bit about his car in 2018, but we kept telling him we were too backed up and couldn't even look at the car until sometime in 2019. Adam kept checking in - persistence is key here - and we kept nicely pushing back. We can't see it until "sometime in the Fall" I told him early in the year. We needed a day to look at it in person, as there is only so much we can see from photographs and email. Not to sound snobbish, but we have to see a car in person to see if its worth the time, effort, and cost of a build up that we feel is to our standards - and to see if the customer has the budget to do what we feel is necessary for track worthiness.


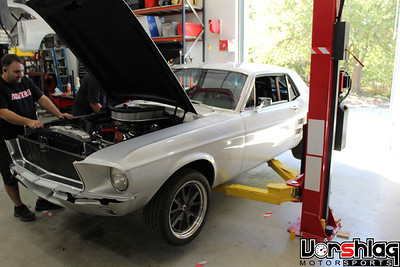
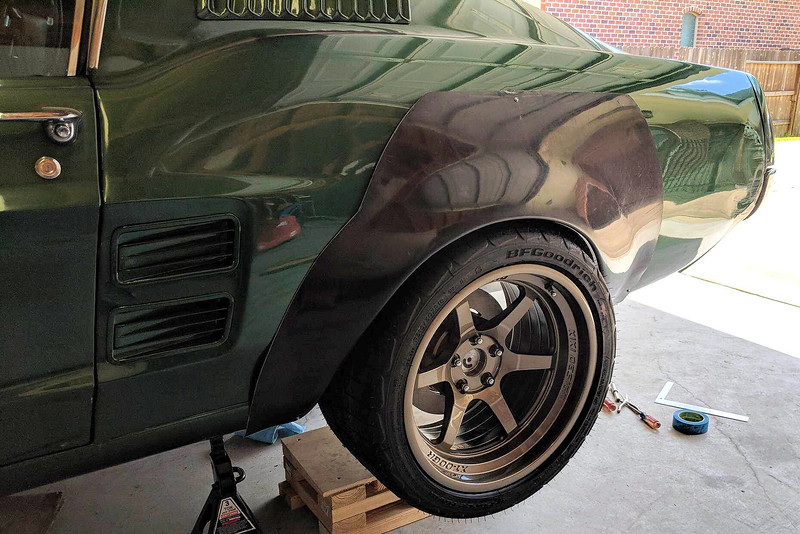
We had some projects wrap up and cars leave so in late October 2019 we had him bring the car by for a quick look. It wasn't running well, and the exhaust and a fender were removed, so I was a little worried at first sight.


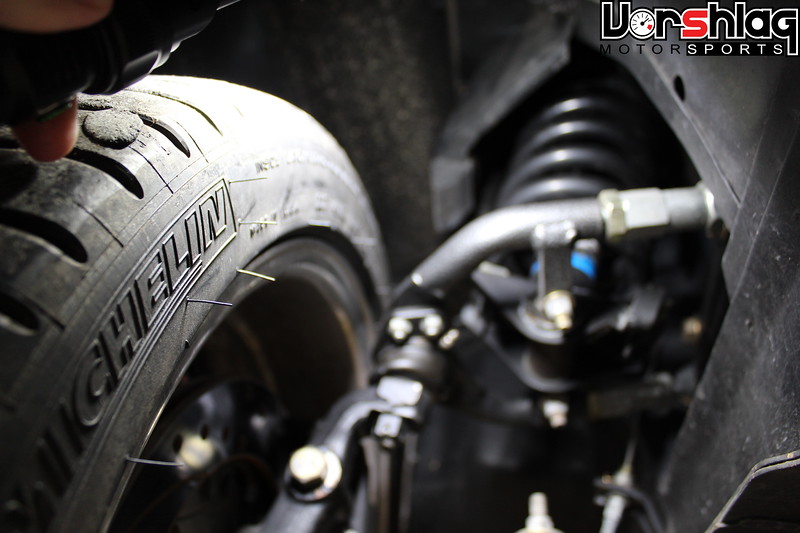
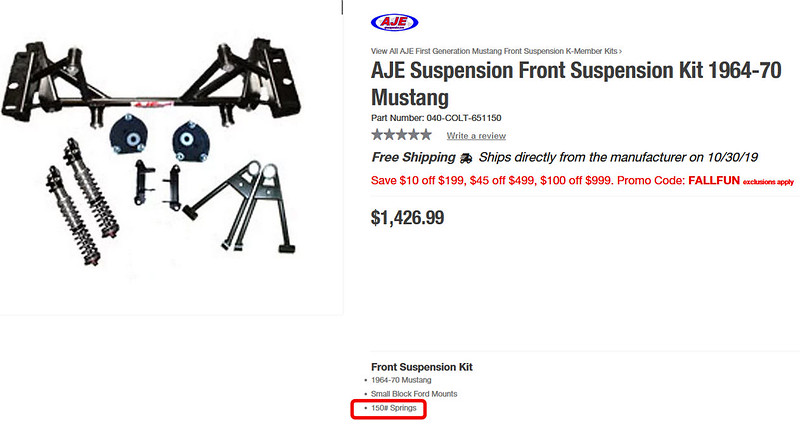
We could see right away that the car has been tracked (notice the flat spot on the tire above right), but it has real potential. Some Total Control Products front control arms, Bilstein shocks, but still the original front geometry for the most part. Knowing what we do, improvements could be made here.


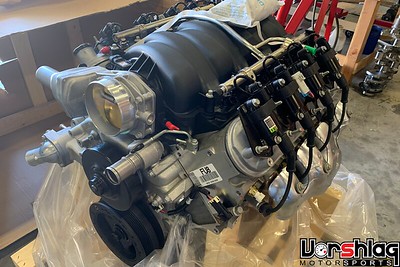
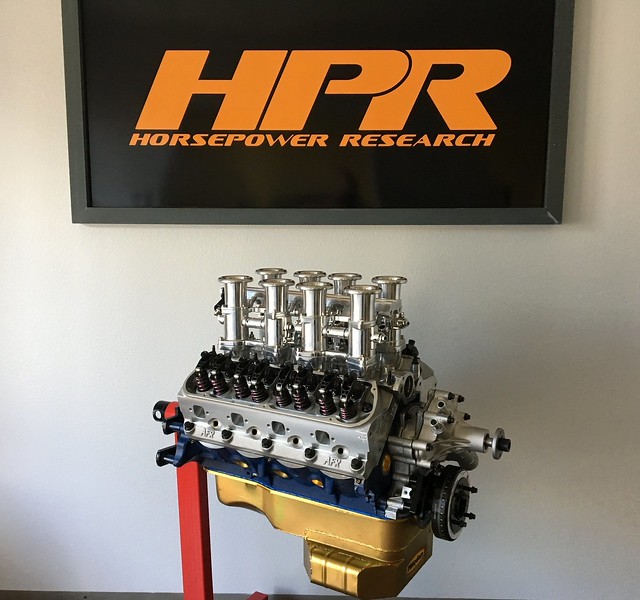
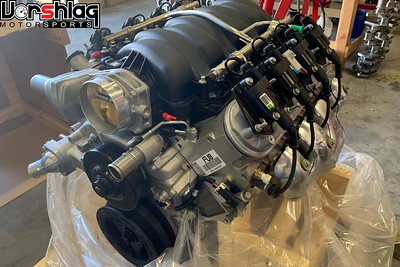
Underhood was a '85-93 era Mustang 5.0L HO engine, with a carb and some mid length headers. A Griffin aluminum radiator, a cowl induction hood and the owner built air box, some other bits. The customer wanted more power, and more importantly, he was willing to listen "to our suggestions" for how to get there the easiest way possible. #TriggerWarning


Inside were a pair of Corbeau fixed back seats, a 4-point roll bar, racing style steering wheel, and the remote shifter for a T5 5-speed, which had a hydraulic TOB. Not bad, could always be improved.


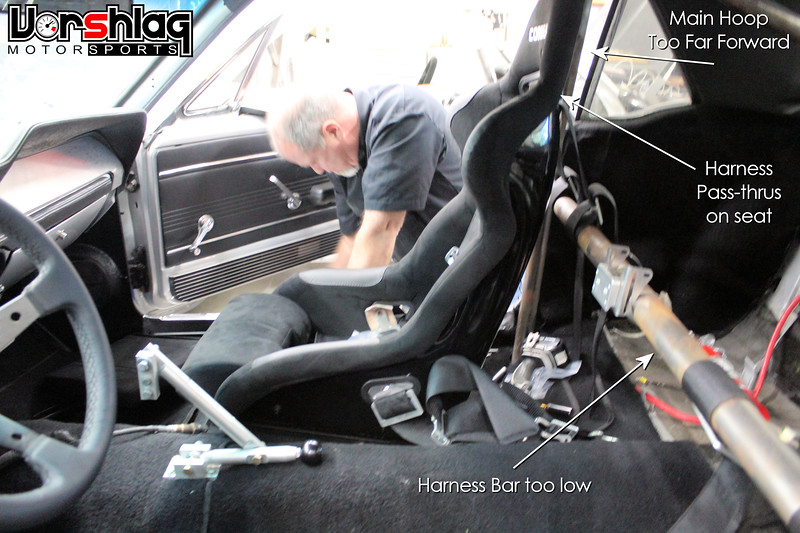
The gauges were done well, as were some other aspects. The 4-point roll bar could use some work, and Adam really wanted a full roll cage, for added safety.

continued below
 

Vorshlag-Fair

Official Site Vendor
Official Vendor
Joined
Nov 12, 2010
Posts
1,592
Reaction score
107
Location
Dallas, TX
continued from above


For once, we were pleasantly surprised by the condition of a car that someone dropped off, and unlike other instances, we did NOT ask him to load it up and leave (that happens more than you'd think)


After about a 90 minute discussion with Adam in the shop - showing him features from other cars inside we could adapt to his car - he left and we got to work on a more detailed evaluation and some estimates.

TAKING A CLOSER LOOK & NUMBERS

At this stage we have not committed to anything other than taking a closer look at the car, then making some upgrade suggestions (powertrain, braking, safety), putting together some price estimates, and then seeing where it goes from here.

IMG_4149-S.jpg


A number of potential projects stall out here, after we've spent a couple dozen hours taking pictures and measurements, doing research on the parts in place as well as an upgrade path, and putting together estimates.


Once we had the car on the lift we could see some things we liked, and some things we didn't. The Wilwood brand of brakes always gives me the shivers, as do the small spindles we noticed on the front. The brakes, front wheel bearings and the front spindle design were going to be questionable if we added a lot more tire width - which we always try to do if lap times are of even the slightest import. This customer had modern Boss302 and GT350 Mustangs in the past, so we had a target we needed to beat.


I've owned a couple of 1965-73 "classic" Mustangs but they were way before I started Vorshlag.

continued below
 

Vorshlag-Fair

Official Site Vendor
Official Vendor
Joined
Nov 12, 2010
Posts
1,592
Reaction score
107
Location
Dallas, TX
continued from above

On my 69 Mustang we changed the entire front suspension, added a modern rack and pinion, so when he said it had a Woodward rack conversion I held some hope... right until I saw the actual installation. The front crossmember was simple gone - it gets removed in this brand's version of a rack conversion. Yikes, yikes, yikes... to be track worthy in my eyes, all of this had to go.


Out back I breathed a sigh of relief. The "Street or Track" brand Watts Link + 3-link rear suspension conversion was a big step up from the leaf springs, so I felt we wouldn't need to "burn budget" back here. A modern style 3 link is the best way to manage a solid axle RWD chassis, and the Currie 9" rear looked beefy - it should easily withstand the modern V8 power we want to install.


This style of "chaiss mounted Watts" axle clamps can be problematic (we've seen them slip - a lot) but we can mitigate that. The axle side control arm mounts might get some additional welding, but overall it looked like a nice setup with some inverted Bilstein monotubes.


The radiator was upgrade but the front grill opening is limited by the radiator support on these cars - which is setup for a narrow radiator and blocks off about 1/2 of the engine bay opening for airflow. For the modest horsepower targets we talked about (something north of 400 whp) this shouldn't be a limitation. We will likely add an oil cooler right where Shelby did - in the lower grill opening shown above left. The customer wants to ditch the air con and interior - which we warned him would be a negative come resell time - but he wants to keep this as a forever car, and a real cage was higher on his list than street driving.

CAN WE FIT A LOT MORE TIRE?

The tire is the ONLY thing connecting your car the track surface. Period. There is NO BIGGER improvement we can make on a track car than increasing tread width on the ground + compound. So this is often the first thing we push customers to look at, whether or not they understand or want this.


Most of the time the most room available for adding tire is inboard. On the rear we saw a little room, but the front was massively limited inboard. The car is 17x9" rear and 17x8" front tires with a 245/40ZR17 Michelin Pilot Sport (300TW) tires. While these are light years better than the tires in 1967, the diminutive size and 300 treadwear are definitely the "low hanging fruit" we can improve lap times - and fun levels - drastically.

LS-swapped-fox-track-test-S.jpg


"But I have fun sliding!" Look, I get it - skinny tires can be fun to push to the limits, but being the rolling chicane that has to constantly give point-bys to Miatas at a track day is both frustrating and nerve racking for fast drivers. Watch the video linked above of this Fox Mustang with 375 whp on 275mm tires. He is having fun because he can pick off modern ZL1 1LEs and other $50-75K pony cars on this lighter, LS powered, 275mm tire clad fun buggy. another example of "wider is faster and more fun" was my wife's '13 FR-S, which we ran for 2 years on 215mm rubber - then switched to 315mm Rival-S tires. WOW! The biggest single lap time drop (2.6 sec on 90 sec road course) in 7 different track tests there using the stock 2.0L engine. And it was FUN AF on the wider rubber. #BigTiresMatter

continued below
 

Vorshlag-Fair

Official Site Vendor
Official Vendor
Joined
Nov 12, 2010
Posts
1,592
Reaction score
107
Location
Dallas, TX
continued from above

IMG_4193-S.jpg


We cannot always "flare our way" to a 315mm tire, but it does become part of the equation. Luckily Adam already had acquired Maier carbon front fenders which have integrated flares. So we mocked those up and took some measurements to the outboard edge of the existing 245mm tire...


Not super encouraging - we might gain 1.5" of tire here, in a best case scenario. That might get us to a 275mm tire, or if we tweak every millimeter on the wheel offset maybe a 285/30/18. There are some good 200TW choices in this size - which was something the customer wanted to stick with, for longevity and fun factor. No Hoosier craziness. Which makes sense on a "fun buggy" track build, where there is no class rules to build around.


Another easy way to drop lap times - and lower consumable costs - is to lower weight. The Maier carbon flares were about a third of the weight, so that's a net drop of about 25.6 pounds when these get installed. Dropping air con, some interior bits, the pushrod engine we will use has an aluminum block (*hint*), and other changes should net some weight losses. The cage upgrade over the 4-point could negate some of that, of course.

IMG_4180-L.jpg


How will we get 315mm tires on the front? Its going to take some significant changes to the front suspension. The entire spring and shock are housed in a tower structure that is right where we want the inside of the tire to be. That's all coming out.


After significant research into various options that exist for the 1965-73 Mustang chassis we felt the costs for the parts and massive surgery required to install them did not fit our client's budget and overall goals. Instead we picked a hybrid approach - some off the shelf bits with some custom bits. All will be revealed next time, and I'm sure many won't agree with our choices.

continued below
 

Vorshlag-Fair

Official Site Vendor
Official Vendor
Joined
Nov 12, 2010
Posts
1,592
Reaction score
107
Location
Dallas, TX
continued from above

The only thing I can say is that we have confidence in the type of suspension we will use in our design, and it will net us a better spindle, hub, and brake options - with an easy, modern ABS option in there, too.


Once we finalize the front suspension we will move out back - where the 9" wide wheel has some rolled fenders to make it fit. The inboard wheel room is also tight, so we will likely "flare outwards" to fit the same tire width as we use up front. I'm hoping for a 315/30/18 Rival-S at all four corners, but 285/30/18 is the fall back number. There are surprisingly few 315mm clad classic Mustangs out there that don't have MASSIVE flares - and we want to keep the Maier carbon fenders unmolested, if possible.

72595041_746182595808978_1441690431002771456_n-L.jpg


A racer friend of mine that has a 67 fastback bought some Maier 3.25" flares for the back of his car to clear a 315/30/18 on an 18x11" wheel - my kind tire and wheel sizes!


It was the right size to clear a wheel pushed inboard as far as possible on his suspension, but he is going to go metal flare on his car and spend more money. But his measurements and pictures are some I can trust, since he's an engineer type and a real racer. We will use these same integrated flares on Adam's 67, having the bodywork and paint done to match the existing paint color.

WHAT'S NEXT?

I hope you liked this "project intro" - I've been wanting to write this and kick off this project, and after a couple of weeks of emails, estimates, and a little arm twisting - we just got sign off from the car's owner to start.


The front and rear Maier flares are shipping and and a "new front crossmember" we are using is already on order. We might not use the front flares, but in a pinch these will make a 315mm tire fit up front, too. Then the old carbed 5.0L + T5 drivetrain comes out for the last time and a mock-up drivetrain goes in, then the carbon front fenders get properly fitted for initial suspension testing.


After we install the front crossmember, we will take a lot of measurements (possibly using a CMM or 3D scanner like the one above), and design the control arms and suspension geometry in software. Then we can fabricate the control arms, add the spindles we want to use, and then mock-up a wheel and tire package to get wheels coming. Once we have the front suspension in place I will make another post, but that might take a number of weeks.

Thanks for reading,
 

Vorshlag-Fair

Official Site Vendor
Official Vendor
Joined
Nov 12, 2010
Posts
1,592
Reaction score
107
Location
Dallas, TX
Project Update for May 28th, 2020: A lot has happened with this project since we began work last November. We have the AJE tubular front crossmember installed, 18x11" wheels are on hand that fit under the stock bodywork, a 427" LS7 dry sump crate engine has been installed with a manual transmission, the Radium Engineering fuel cell is installed, and we have started work on the roll cage.

IMG_6855-S.jpg
IMG_7261-S.jpg


We have also removed the old front suspension & brakes and sold it, removed the old 302/T5 drivetrain and sold it, installed composite doors, fixed the floors, designed and built new front suspension, and installed modern Brembo brakes / hubs / spindles from an S197 Mustang.

IMG_8310-S.jpg
IMG_8682-S.jpg


We did much of this work this Spring while we were semi-shut down, with our crew working about half their hours to create a bit of social distancing, and already spread pretty thin on a number of ongoing projects. But we have great progress, and you can see that in the update below.

PICK FRONT CROSSMEMBER + SUSPENSION DESIGN

I talked about front suspension options last time, after we looked at a lot of "modern" replacement front crossmembers / suspensions / brakes, and felt that for this build we needed something... a little different. While it would have been fun to spend $20-30K on some of the really fancy Corvette based front "suspension in a box" kits, they just didn't fit this car's budget or needs. This is to be a track car, not a show car. There are no "Design and Engineering" judges to impress - just looking for lower lap times, more reliability, and and superior driveability.


Our engineering group here at Vorshlag looked at all of the options and we picked the AJE tubular front crossmember made for the 1st gen Mustang. We talked to the folks at AJE and they agreed to send us one of this units but not powder coated, in case we need to move suspension pickup points and/or weld something onto their fabricated piece here. It arrived in a few weeks and the construction and welds looked great.

aje-colt65-L.jpg


This is normally paired with their SN95 Mustang spindles, their control arms, some drag type struts and top mounts, and SN95 Mustang brakes. Of course we aren't building a drag car here, and had another spindle in mind to use with a modified strut design - the 2005-14 Mustang S197 spindle. This offers more modern brake options, better hubs, and more advanced geometry.


This tubular design seems a bit lightweight compared to the OEM crossmembers we have worked with in the past on S197 and S550 Mustangs. We might add a little more steel to this AJE assembly, as we plan to put lateral grip from 315mm tires through this thing. But remember - the '67 came in here with NO lower crossmember up front, so this is already much stronger than what it had. Time to get this installed.

WAIT... FRONT STRUTS?

Yes, we are converting this car to have a modern version of a McPherson Strut front suspension. This will replace a front suspension system designed in the early 1960s that packages very poorly and has pretty poor geometry. I am sure some of you are rolling your eyes, but remember - strut cars don't necessarily suck. We have sold thousands of high end strut and shock setups for a variety of cars that have won thousands upon thousands of races.


If you think we are going to make this car somehow slower with this "lowly strut suspension", you haven't been paying attention to race results. This '67 will will have the same struts / brakes / ABS / spindles as our 2011 GT above, which did pretty well in NASA, Optima, and other competition arenas - along with hundreds of other track focused S197s we have built or supplied. The '67 will also have 315mm tires, but be one thousand pounds lighter than our 2011 GT, and it will have more power.

REMOVE EXISTING DRIVETRAIN

This work started November 14th, 2019. The car "drove" into the shop with a running, carbed "late model" 5.0L HO engine from a 1985-93 Mustang. It had a T5 Z-spec 5 speed behind it with a hydraulic master/TOB conversion driving the Ford 9" built by Currie. The exhaust was off when it got here, however, and it was having some tuning issues, so I didn't get to drive before we tore it down - but the owner had done a number of track events with this built engine and T5 trans before.


The brake balance was so poor on track (made up of all Wilwood bits) that it turn the tires into "squares" every time he tried to use the brakes hard on track (he tracked a late model GT350 before this car). Ideally I would have liked to have driven the car beforehand, maybe put in some baseline laps at MSR or put it on a chassis dyno for a baseline power number. After building / owning / tuning / driving a number of engines and cars from the Fox Mustang era, and looking at the parts list, I suspect it made around 275-325 whp. That range seems low by today's standards, but that's a somewhat lofty number for a '85-93 5.0L with a cam and heads. A T5 won't live long with much more than that, as many people know, so the upper 325 whp number is probably opimistic.


Brad and Evan removed everything ahead of the rear axle in the drivetrain. Fluids were drained, we scarified a chicken to the Ford Gods, and began the "travesty" of yet another LS swap. Driveshaft out, then it was time to dig into the MSD, distributor, and all of the rest that would never go back into this car.


Care was taken to not damage any paint, existing chassis wiring, or any of the parts we were removing. Our customer is not on the Book of Face so we were taking pictures of the drivetrain to help him sell it - to help fund the work here.


The owner was chasing some exhaust leak issues, but Brad found the leak, at the header. The composite cowl hood was removed before we began and will not be going back onto this car, as the extra height is not needed with an LS engine. A flat composite hood will do just fine.


After a little work we had the drivetrain out and intact, ready to live life in another Ford car some day. Engine bay looked pretty cleared out at this point, but we needed to keep going.


One of the more industrious Mustang parts hustlers in Texas - who had bought a nasty Fox Mustang chassis from me before - came and got all of this drivetrain as well as all of the suspension / brake / bodywork shown below.

REMOVE SUSPENSION, PREP FOR STRUT CONVERSION

During the same week as the drivetrain work above happened the aftermarket front suspension and brake parts came off this car for the last time.


The "double A-arm" front suspension in the 1st gen Mustangs has an unusual layout. First, the spring sits ABOVE the upper control arm, which gobbles up a LOT of inboard wheel room up front. Then there are the two lower control arms, which includes the "Tension Control" rod. It really is a hot mess, but hey, it was designed almost 60 years ago. All of that came off, including the "spring pocket" above the control arm. We aren't going back with anything like this.


The main lateral control arm's lower mount is a wrap-around structure that forms the inner shock towers as well as the lower structure, shown above right. These were original welded bits held in place with dozens of tack welds. Ford didn't really do corrosion protection all that well back in the 1960s, but this car spent most of its life in Texas so the raw metal underneath was mostly just dusted with surface rust.

continued below
 

Vorshlag-Fair

Official Site Vendor
Official Vendor
Joined
Nov 12, 2010
Posts
1,592
Reaction score
107
Location
Dallas, TX
continued from above


Evan fought this battle for a couple of days: finding and marking spot welds, center punching them, then drilling them out. The spot weld cutter gave way to a unibit for most of this work. The inner shock tower structure that tack welds on was removed but the "strut tower" structure was left in place. If we needed the room for the LS swap we could take out some of this to make room (we didn't need to).


At this point we mocked up the AJE crossmember with some clamps. There was some fore-aft adjustment we could use on the crossmember if we needed to alter the engine placement or control arm pickup points. But those front "TC" rod mounts had to go next.


Even used more spot weld drilling and a little prybar work to get those brackets out of the way. The lower radiator support was still in good shape, too.


There was some inner shock tower "rings" that were removed (on box above right) but I missed that step. We had more work planned for the strut towers later. The welded structures were all kept to show the customer, then made their way to the scrap metal bin.


Jason, Myles and I looked at the placement of the crossmember and figured the LS engine would "tell us" if we needed to move this forward, to clear oil pans or alter the control arm placement. For now we left it where AJE intended.


Since the old front suspension was now "gone for good" our crew made some "skates" that bolted to the front frame rails. These help us roll the car around the shop between stations and tasks. We do not have an unlimited number of work bays so we juggle cars around between fab areas, 2 and 4 post lifts, and "storage" areas.


To help expedite the sale of the old suspension (and to make room in our shop) I posted the control arms, steering rack, spindles, brakes, engine and trans in January of 2020.


The same guy bought all of it plus the steel front fenders and the cowl hood, which was a nice haul of parts for him. I wasn't a huge fan of the cowl hood and the owner agreed - we will stick with a simple OEM style hood (but likely composite). The sale of all of these parts funded the build for several months, too.

ROLL CAGE, GUTTED INTERIOR, & COMPOSITE DOORS

This '67 came into our shop with a 4-point roll bar welded in place, but built around the stock interior. We were looking at possibly just repairing some of the design aspects that we felt were incorrect or less safe than they could be.


For a dual purpose street/track car, a properly designed 4-point roll bar (or "half cage") is a great alternative for track use. It gives you some rollover protection plus a solid place to to hang shoulder harnesses from, all without putting steel tubes next to your head, arms and legs - which can do more damage than good when street driving without a helmet / 6-point harness. But this one had some issues...

IMG_4855-L.jpg


The main hoop was too far forward, pushing into the seats. The horizontal harness bar was mounted too low, which is pretty obvious when you saw the seats / harnesses it came in with. This can lead to a compressed spine when the shoulder belts are pulled tight in a forward crash. The rear "downbars" are also more of a drag race style that land way back in the trunk, near the rear bumper.


The owner of this Mustang (Adam) came by in late November for a seat "fitting", and we talked about modifying his 4-point roll bar to make it safer. We looked at his existing Corbeau seats (above left) which were sitting WAY too high. Then mock up a lower mounted seat using a Sparco (above right), which gained him a lot of headroom. We also showed him where an upper door bar tube would run if we built a cage ahead of the 4-point.


I was more than OK letting this car leave here with the 4-point, if we cut out out, relocated the main hoop, raised the harness bar, added a diagonal in the main hoop, and made changes to the rear down tubes. We have done a LOT of these in dual purpose street/track cars, and I stand behind those setups as the better compromise for a car that is street driven. But in the month since we started the build on this '67, Adam got the bug to go further with the safety upgrades, and the scope creep began...


We saved him a chunk of money by not going with an expensive "front clip in a box" that he felt it could be better spent on more serious safety upgrades. Full fire system, full cage, gutted doors (that then morphed into composite doors), and a stripped interior. This was all Adam, but since he waited quite a long time to get his car in here, it was hard to say "No" to more safety.


Brad removed the seats, headliner and carpets - the flammable bits that make a street car more livable but a race car more dangerous. This car had some work done previously and the front "tar paper" insulating materials seemed new. The rears were not. Brad used heat and gentle scraping to remove the tar paper, which is no longer needed when you have the carpets removed. Read more about removing this vile stuff here.


Brad removed the same stuff from the trunk and back seat areas along with the floor mats, visors, some speakers and some other bits.


All told we removed 43.3 pounds of carpet and insulation, not counting the seats (which would go back in - or something similar to these). That might offset a chunk of the weight we will add by changing from the 4-point bar to a full 6-point roll cage.


At this point the interior was stripped, and we had cut out the 4-point roll bar. I will show more of the cage construction in a future post. Before that work began, we had to deal with the floors.

continued below
 

Vorshlag-Fair

Official Site Vendor
Official Vendor
Joined
Nov 12, 2010
Posts
1,592
Reaction score
107
Location
Dallas, TX
continued from above

LOWER SEAT HEIGHT + FLOOR REPAIRS

Not only did this car's seat brackets lack some design aspects we like, the stock floors were pretty wobbly. The stock "boxed" sheet metal step here makes a proper racing seat install impossible without a change to the floorpan. These early Mustangs have a "riser" under the seats made of boxed sheet metal. It is flimsy, too tall, and the insides were not primed, coated or painted from Ford.


Adam knew about this issue and we agreed that we should remove these "boxed" upper shelves, inspect then clean up the metal, and build a more substantial seat base structure (like our production seat base brackets we make for a number of cars). Adam liked the idea and we got to work.


After Brad cut away the upper sections the scale and rust inside was obvious. Water can come into these seat riser cavities from the 4 access holes on the bottom, and it did. Next up Brad donned some proper PPR and got to cleaning the metal, to see if we needed to patch them or if they could be saved.


Someone in this car's past has replaced parts of these floors, and they did decent work. After Brad cleaned one side we noted that the rust was merely superficial and on the top side only. Most of the dust and scale was from the underside of the upper box piece that was tossed.


Brad logged 3.6 hours removing these parts and cleaning the metal. Now it was time to treat the bare metal and convert any remaining rust to an insert substance.


In another 1.2 hours Brad had gone through the various prep stages and added this POR15 "stop rust kit". The floors are now protected from future rust, and yes, we will be welding some structure back to this area after we design the seat bracket for this car. That will happen AFTER the cage is complete and we do a test sitting

TEST FITTING WHEELS, TIRES & FLARES

One of the main reasons we took this job was because Adam was open to doing the same things we try to add to ALL of our track builds: A lot of tire, reliable LS power, modern brakes / ABS, and modern suspension. It took a little testing, lots of pictures, but we got him there. We have been doing pictures and mockups of wheels and tires from the day it rolled in here last November through May of 2020.


Conventional wisdom on 1st gen Mustangs is to add giant flares whenever you want more than about a 245mm tire. This car rolled in here with 17x8" fronts and 17x9" rears on 245 Michelins (that were square due to the imbalanced brakes). So I picked up a set of Maier Racing composite flares for the rear, and Adam already had their carbon front fenders - which already have a tiny bit of extra flare built into them. Mostly these are done for weight, which I showed last time.


We mocked up the rear flare it is is BIG. It adds nearly 2 inches to the factory lip, and with a little more wheel room utilized inboard we could easily fit 18x12" wheels and 335s. And if you have been following our builds for the past 20 years you KNOW that I am all about the "Big Tires Matter" movement.


I love it when "the tires starts with a 3" - half my best car memes are about tires! There has been no limit to our "no tire is too wide" rule, not on stock 2.0L powered FR-S, not on Miatas, not on BMWs, and for sure not on Mustangs. If you cannot get the tire up to temp, DRIVE HARDER.


For this build a 315/30/18 was targeted as the most likely tire that could fit under the front fenders - but only after we ditched the stock front suspension. This setup "has not aged well", even with aftermarket bits and pieces to correct some of the geometry flaws. The packaging just plain SUCKS.


This is as far as we got with this MOMO heritage 6 wheel in 18x11" with a 315/30/18 Hoosier mounted. The stock upper spring pocket and bump stop were in the way and it pushes the wheel outside the fenders by inches. But I knew just by looking inside that fender, way back at the beginning of this project, we could make this wheel fit. Once I had the customer convinced, we cut all of that junk out of the way...


Lo and behold - the 18x11" wheel fit EASILY inside this fender when we had it mocked up with an S197 strut, temp camber plate, and temp control arm (one of two iterations we designed and built). If we wanted to push the limits we could have fit an 18x12" up front under the stock fenders, but the 18x11" wheel and 315mm tire was a noble goal - and one that could possibly be matched out back without the add-on flares. That was an early goal...


After Myles drew up the control arm for the S197 spindle we did geometry tests and wheel tests. Steering lock, ride heights, geometry changes with suspension travel, and ground clearances were all checked. The second version of the mock-up arm dialed it all in, and we will show the complete suspension installed in another update.

LS ENGINE IN, NEW TRANS CROSSMEMBER

Around March of 2020 we had the crossmember mocked up, room for the front 18x11" wheels (see above), and it was time to test an LS engine and the manual transmission. For reasons I cannot get into yet I cannot discuss or show the transmission we are using. All will be revealed at a later date.


The AJE crossmember came with block side mounts, bushings and standoffs on the subframe for an LS engine. I was skeptical that we would end up using their mounts or engine location, but we figured we'd give it a test fit.


The block side plates are pretty basic but we made them work. The mock-up GEN III LS engine we had on hand was fitted with G8 / CTS-V accessories, minus the power steering pump. We were still unsure if we'd convert this car to electric steering at this point (we decided against that later - other things started to "scope creep" so we pulled this back).


This isn't our first LS swap and we had engine swap long tube headers on hand from 5 different kits we sell, plus a few others, to test in the '67. We had several oil pans, including this one from "Summit" that has a kick out sump, trap doors, etc. We have used this pan on two other LS swap builds lately and it should work well for road course use with an LS, along with an Accusump. We tried a mid-length header first, and it didn't fit either side.


Then we tried this 1-7/8" long tube design from another swap, and it just fell right in. My wife Amy put in the passenger side and Evan the driver's side. These long tubes fit extremely well, as did the transmission, so we stopped to lock down the AJE crossmember location. I was pretty dang happy at this point - no new custom header design would be needed! FOR THE FIRST TIME EVER we already had an LS swap long tube header that could work on a completely different chassis. This never happens.

continued below
 

Vorshlag-Fair

Official Site Vendor
Official Vendor
Joined
Nov 12, 2010
Posts
1,592
Reaction score
107
Location
Dallas, TX
continued from above

FINAL MOUNT AJE CROSSMEMBER

After the subframe was mocked up, and after positive testing and measurements with the LS engine and trans in the position set by the AJE mounts, we had a plan in place. We had test fit three LS oil pans, several intake manifolds, and fitted one of our long tube LS swap headers. The transmission we were using fit the factory shifter hole pretty well, too.


We had already adjusted the engine up and down, moved it front to back, and the only thing it did was add a lot of work - virtually no benefits. The Holley Hi Ram intake (below left) was never going to fit no matter the placement, so that tall intake was axed. And honestly it would be massive overkill for the modest 450-500 whp goal the customer had in mind. For a 2600 pound car that is going to be PLENTY of power - I suspect close to double what it came in here with.


So we left the mounts that AJE added to the subframe alone, had our front axle centerline set, and even some progress on the control arms for our custom S197 front strut / spindle / brake setup. It was time to lock down the subframe position and bolt it to the frame.


The K-member had been clamped in place for the previous tests and we had several inches of fore-aft adjustment room, but we locked it down in the position recommended by AJE. Evan marked the holes (above left) then dropped the K-member and drilled through the frame. The AJE kit comes with crush sleeves which were added and TIG welded into the frame holes (above right).


The holes / sleeves were fully welded and then sprayed with self etching primer, then the K-member was finally bolted in place. The mock up LS engine, the Summit oil pan, our long tube 1-7/8" stainless headers, and the transmission were reinstalled March 5th, 2020, right as we started to scale down hours in the shop during the lock down.


Again, apologies for the redacted images I have to use here. Getting the K-member in and the drive train installed was a good step - now we started talking about an affordable stroker 383" LS for this car, which we were putting together at HorsePower Research. We had two other track cars getting similar engines and felt it would fit the power goals, track reliability, and budget allocated to this part of the project.

CONTROL ARMS AND TRANS CROSSMEMBER BUILT

It was difficult to show the work to our customer but these images worked, and in person he could see that the transmission was appropriate for this tunnel size, the power output goals, RPM range, and both street and road course use. Again, will talk more about this when the NDA is lifted.


The crossmember is pretty basic, with a short span to support. We utilized a captured polyurethane Energy Suspension bushing which we have used on many LS swaps. The parts were designed in SolidWorks and cut on our CNC plasma table, as were the control arms shown below.


Myles and Jason worked on the control arm design based off the S197 Mustang design (2005-2014), using an S197 spindle/hub we keep on hand for design and testing purposes. Once the geometry was dialed in on the wheel testing task above, Myles ran some calculations using the OEM S197 front LCA. We bought the later S197 spindles (which upgraded from an 18mm to 19mm ball joint shaft) and Howe ball joints and threaded collars.


These ball joints are replaceable and the threaded Howe collars are more easily incorporated with a custom LCA design, and were used on the mock-up single plate designs to test geometry (above left). We talked about a tubular version but felt that a boxed, plate steel design would be more robust and accurately repeatable for the mirrored side-to-side design.


This later version had some round windows that we would later fill in with tubing to make the boxed structure stronger. Myles poured some hours into this design and the fabrication work.


We don't do "weld pr0n" around here, because most of that Instagram welding isn't practical, and it isn't always the right way to do ti. You can look at all of our builds and won't see any pics of "stacking dimes" - because that is better left to ego posting. Proper cleaning, the right rod, adequate shield gas flow, accurate heat, and the right penetration are what we shoot for here.


Above left you can see the tubing sections being added to the holes, for strength. Lots of tedious work went into these boxed Lower Control Arms. The control arm mounts were tubular sleeves made to fit within the AJE subframe, and to work with Whiteline bushings we ordered to fit the OD and ID needed.


Having the sleeved mounts aligned was critical, so a couple of welding fixtures were machined to fit the ID of the tubing as well as set the spacing to mach the crossmember. We will keep these on hand, along with our CAD designs, in case we ever have a need to make these LCAs again.


The rounded ends at the ball joint mount were "boxed" in with a final piece of steel. All of the parts were CNC cut but that doesn't make the welding and prep work any easier. After both arms were fully welded the Howe ball joints with S197 stubs were fitted with the rubber boots. No distortion and they threaded right in.


This might seem like an excess number of pictures for Lower Control Arms, but these are critical to this entire build and we built them in a new way - for us. They came out very strong, rigid, and relatively light weight. They will allow us to use a modern S197 spindle / hub / brake / ABS with a cost effective tubular crossmember from AJE - that had LS motor mounts built in.


I took the LCAs and trans crossmember to have them powder coated, which wrapped up that portion of the fab work. This brought the build into early April 2020, and I will show more of these parts in a future post.

continued below
 

Vorshlag-Fair

Official Site Vendor
Official Vendor
Joined
Nov 12, 2010
Posts
1,592
Reaction score
107
Location
Dallas, TX
continued from above

COMPOSITE DOORS

The dreaded Scope Creep started to happen here. When this '67 Mustang project came in it was still a "street car that could occasionally do track events". It had a 4-point roll bar, full interior, and working air con. As the project progressed the owner quickly re-focused his already listed safety goals to match the increased performance we were adding. To mate the power output of the LS7 the safety goals went up to match. Instead of a reconfigured 4-point roll bar it was time for a proper roll cage, and by then the car became a dedicated track car "that can be driven on the street".


After the cage had begun we talked about door bar options - a simple "X" that allows for an interior door panel, or a more roomy NASCAR style door bar, as shown above. After seeing the difference in person, and noting the lateral room gained when we push the bars out to the outer skin of the door, Adam wanted to go ahead and use NASCAR style door bars. That means ditching the door panels, the door windows, and the interior.


We asked him several times if he was SURE that's what he wanted - because going this route shrinks the number of people willing to buy any car when it is completed. Caged race cars are harder to sell than street cars with some tasteful mods. But as you can see by the other mods that have been added as we went along, this has turned into a more serious track build. And the door bars will add a lot of side impact protection and extra room for both the driver and passenger.


Adding safety usually means adding WEIGHT - which is always the enemy of speed. The OEM steel doors are always heavy when chock full of crash beams, window mechanisms, glass, and speakers. These were no different at 76.0 pounds each. So when he asked for NASCAR door bars, the need for OEM door impact protection went away - so I suggested these cost effective composite doors from VFN.


These fiberglass doors were purchased and weighed in at a paltry 14.5 pounds - and that's before we clearance them for the cage's door bars. This weight savings will be about a 123 pound drop, which should offset the weight gain of the full cage over the 4-point (and then some).


We have used VFN body parts before and they fall in at the more affordable end of the spectrum of quality, lightweight composites. Way better than cheap import stuff, but not quite Motorsports Dry Carbon level. Evan checked then marked the mounting holes (dimpled in the mold) and drilled them for the door hinges. We will use the OEM hinges without the return springs. Evan made some templates from these hinge mount holes, then Myles CNC cut some backing steel plates for "doublers" that go on the inside of the door structure.


Evan then tack welded nuts to these plates, which are riveted to the door structure. Makes installation and removal a breeze and strengthens the part of the door that sees the highest loads - the hinge points.


A little time was spent "fitting" the doors, but with aftermarket composite front fenders and composite doors from another company, they don't "play nice together". As is the case with some composite parts, both the Maier Racing composite fenders and VFN doors are made a little "long" so you can trim them to fit. We are not a body shop, so I will deliver the chassis to our painter (as soon as the suspension is done enough to let it roll into my trailer) and have him adjust all of the panels on the front of the car, from the doors forward.

IMG_6936-L.jpg


The body shop can trim the doors and fenders to have a better fit so we can open/close the doors. Until then we will either have the doors -or- the front fenders on, depending on what we are doing. You won't see them both installed from here until they are properly fitted.

continued below
 

Vorshlag-Fair

Official Site Vendor
Official Vendor
Joined
Nov 12, 2010
Posts
1,592
Reaction score
107
Location
Dallas, TX
continued from above

LS7 CRATE ENGINE + TRANS INSTALLED


As we were wrapping up one of the first in a series of "affordable" LS road race engines at HPR, we had a good grasp on the price and output numbers. This was to be a cathedral port, aluminum block, 383" LS stroker, wet sump road race engine - I gave the pricing to give Adam. I had one of these being built for my LS550 project and we could see a 450-550 whp power range depending on the cam, intake, and some other aspects.


This would take more than 2 months to build, due to the backlog of engines in process at HPR, plus some added delays due to Covid-19. This 383" long block would still need: intake manifold, fuel rail, injectors, throttle body, ignition coils, the Summit road race oil pan we talked about, water pump, pulley, flywheel and clutch - but it was still a very good package price. It was until he went and found these GM crate LS7 dry sump 525 hp 2015 Z/28 spec engines on "Coronavirus Sale" at $10,900...?! I researched this deal, which seemed unbelievable, but it was true.


I couldn't get the HPR 383 LS6 down to that price level after I added in all of the extras that the crate engines come with, not to mention this has the LS7 dry sump oil pan, extended snout crank, and 2 stage oil pump. Just the bare LS7 block alone costs $3800 - GM must have needed some quick cash to slash these LS7s down to this price! These are the later 2015 spec so they have improved titanium rods, better valves, a bigger oil pan, and several other updates. We're not going to touch the engines internals or cam, and will even use the included flywheel and clutch. Saves time and money and adds displacement. And he can just tell the Ford Faithful it is a 427" V8... they can think its an "FE" series Ford Big block if they want, as long as he doesn't open the hood.


Of course getting a complete, dressed crate engine will save time on this build. After we unloaded the engine from the crate, Evan stripped off the intake and coils, so we don't damage them when installing the engine into the car. Brad and Evan put the long block and bellhousing in without drama using our engine tilter and engine hoist.


I was a little worried that the 2015 Z/28 oil pan might have some clearance issues but that was not the case - fit by a large margin. These LS7 dry sump engines still have a lower oil sump, so we can't lower this any more than we could our mock-up engine. Evan reinstalled the intake and coils with the engine back in the car for the last time before it fires up.


After testing the TOB engagement & input shaft depth, the transmission was fitted, as were the hydraulic Throw Out Bearing slave line and remote bleeder, with a quick connect on the pressure line. Had the pressure line made to fit the hydraulic clutch master cylinder Adam had installed for his T5 before. We then installed a new starter. This thing is ready to plumb, wire and fire!


We still have work to do - with the engine and aluminum radiator in place we can route things like the Cold Air Intake, pick a filter, and find a place for the dry sump settling tank. We have discussed the EFI system and digital dash options with the customer and that is on order, so it could be running in a matter of weeks.

WHAT'S NEXT?

I had a whole section on the fuel cell, but I will show that next time. It is a beautiful piece of engineering, with an internal surge tank. That was all assembled and mounted last week.


We also have the 18x11" Forgestar F14 Super Deep wheels on hand already. A bunch of new parts have arrived for the front suspension: S197 spindles, front hubs with ARP studs, the custom control arms we built, the 14" diameter 4 piston Brembo brakes, and the MCS TT2 doubles arrive later today. The custom camber plate & welded on strut top design are wrapping up as well.


This week we have made some good progress on the cage, and we were test fitting seats with Myles (5'11") showing how much head room we gained to the upper door bars with the lower seat mounting. This post is already running long so I'm going to call that good until next time - should have another tech filled post showing more progress on this car soon.

Thanks for reading,

Terry @ Vorshlag
 

tjm73

of Omicron Persei 8
S197 Team Member
Joined
Jun 9, 2010
Posts
12,092
Reaction score
1,638
Location
Rush, NY
I love everything about this car! Except the LS. I mean I get why you use it, but that doesn't make me like it.
 

MrBhp

Senior Member
Joined
Sep 12, 2013
Posts
1,255
Reaction score
1,038
I feel the same about the LS, BUT I totally agree with using one for a customer car. If you aren't building it yourself, best bang for buck is going to be the LS, everytime. I go rabid when I see one of these swaps, but the dollars don't lie. I can build either engine, at the same HP level, for about the same money. But I have 40 years of R&D with Ford small blocks. Most folks don't have that luxury, and will most likely rely on a shop that can sell the LS cheaper. I personally would rather build it myself, it's very gratifying. I've never had much respect for folks that buy horsepower off the shelf.

Anyway, I like this build. I think the owner has made some good decisions with it.
 

Norm Peterson

corner barstool sitter
Joined
Feb 5, 2011
Posts
3,615
Reaction score
316
Location
RIP - You will be missed
I love everything about this car! Except the LS. I mean I get why you use it, but that doesn't make me like it.
I think you have to look at this swap with an eye toward what traditional hotrodding used to be like, rather than as a Mustang that's getting a whole bunch of mods.

More than a few 1930's Fords lost their flathead engines to a variety of OHV engines from other car mfrs during the 1950's.

Only this particular hot rod is also going to be pretty damn good when the road goes in a direction other than straight.


Terry - I have to wonder whether your customer has read up on Ron S's 1966 "Muttstang" yet.


Norm
 
Last edited:

tjm73

of Omicron Persei 8
S197 Team Member
Joined
Jun 9, 2010
Posts
12,092
Reaction score
1,638
Location
Rush, NY
Again I understand why the LS is used. They are phenomenal engines and dollar for dollar smart money spent. I just personally could not do it.

And you saying Terry confused me for a moment as that is also my name....LOL!!!
 

Vorshlag-Fair

Official Site Vendor
Official Vendor
Joined
Nov 12, 2010
Posts
1,592
Reaction score
107
Location
Dallas, TX
So a Ford engine was always a possibility for this build, it would just cost more money for no benefit other than "it has the right brand" on the valve cover. Erik Koenig from HPR (my business partner there) has built hundreds of Small Block Fords over the years and is something of a "Ford" guy himself. And yes, we could have built a 427" stroker Windsor for a little more money... but it would have an IRON BLOCK. This was a 8.5" deck height 363" they built last year. We get the occasional small block Ford and they are building a wicked FE big block right now, but LS engine builds outnumber those 50:1 at the HPR shop.

61951395_1317199385097515_5737014209288339456_o-L.jpg


Does an iron block matter much on a road course car? Well, yes. That's where the factory aluminum LS block excels - these are super common, and you drop 80-100 pounds on a factory aluminum engine vs factory iron blocks, all without the painful price tag.

IMG_8683-S.jpg
IMG_8684-S.jpg


The OEM LS7 block alone normally costs $3800, but Adam found this crate LS7 for $10,500 delivered / complete, and that included: water pump, oil pan, dry sump oil pump, coils, valve covers, flywheel, clutch / PP, sensors, injectors, fuel rail and on and on. It was an impossible deal to ignore.

IMG_6711-L.jpg


Adding an aftermarket aluminum block option to any SBF adds +$4000 to the cost of the engine. Go check the good aluminum race blocks for almost any V8, you're gonna spend $4000-5000, and even then they often need a lot of added machine work or special parts. Some of the brands of aftermarket blocks are a mess, too.

IMG_1823-S.jpg
HPR-468-LS7-S.jpg


The RHS aluminum LS race block I'm holding above left isn't much heavier than the stock LS, but it has some features that are very nice, as most aftermarket blocks do. We can seal off the top end and use a dedicated suction stage on a dry sump to keep oil from splashing down on the spinning crank. They are thicker castings and always make more vacuum in the crankcase with a dry sump, too. This particular one has a raised cam location which we are using to make a "bigger than 468 cubic inch" LS with the stock deck height. And taller deck height versions cost no extra, and we use those on the HPR 527" small block LS. But 90% of our 468" LS engines use a sleeved OEM aluminum block, as it saves thousands of dollars, and for most folks they won't notice a difference.

Thanks,
 

Sky Render

Stig's Retarded Cousin
S197 Team Member
Joined
Feb 24, 2011
Posts
9,463
Reaction score
357
Location
NW of Baltimore, MD
Radium makes beautiful parts. I've got a coolant aeration tank from them, and it's a work of art. Their fuel cells are even more gorgeous.
 

Adam B

Junior Member
Joined
Jun 7, 2020
Posts
7
Reaction score
9
I think you have to look at this swap with an eye toward what traditional hotrodding used to be like, rather than as a Mustang that's getting a whole bunch of mods.

More than a few 1930's Fords lost their flathead engines to a variety of OHV engines from other car mfrs during the 1950's.

Only this particular hot rod is also going to be pretty damn good when the road goes in a direction other than straight.


Terry - I have to wonder whether your customer has read up on Ron S's 1966 "Muttstang" yet.


Norm

I'm new to the forum and the owner of this 1967 mustang. I'd like to see Ron's 1966 Mustang.

Thanks,

Adam
 

Norm Peterson

corner barstool sitter
Joined
Feb 5, 2011
Posts
3,615
Reaction score
316
Location
RIP - You will be missed
Welcome aboard, Adam.

Here's the best picture I have handy.

Muttstang at Motorstate.jpg

There's a huge thread about the car here, which snagged an Optima invite a few years back. Ron is clearly not your average owner/DIY'er.


Norm
 

Support us!

Support Us - Become A Supporting Member Today!

Click Here For Details

Sponsor Links

Banner image
Back
Top