Vorshlag 2018 Mustang GT + S550 Development Thread

Vorshlag-Fair

Official Site Vendor
Official Vendor
Joined
Nov 12, 2010
Posts
1,592
Reaction score
107
Location
Dallas, TX
continued from above

P8250811-S.jpg
DSC_8687-S.jpg


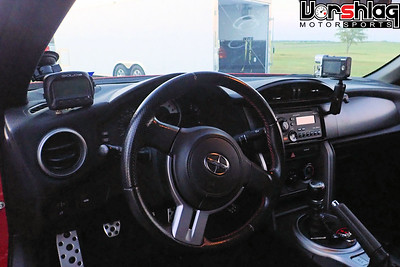
Mounting it close to the windshield is tricky, but we built a special RAM mount on the FR-S where it can sit "right side up", above left. This is normally where we have Amy's cell phone holder, for street use in that car, and we swap in this vidcam for track events. We just added that type of mount to the Mustang and the video is complete garbage - too far from the glass? Don't know.


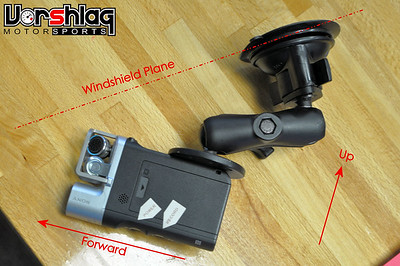
I will show some of this video from Optima @ NCM next time taken with this new "right-side up" dash mount, but it was not very good. When using this vidcam with a suction cup mount and running the camera "upside down" means I have to flip the video and re-render before I can bring it into Race Render, to merge it with data. Then it goes back for a 3rd round of edits and another render in my video editing software once the data is overlaid. Real time killer... I usually spend 90 minutes to make a 3-5 minute in-car video. It didn't help that I had a dead CPU fan for almost a year, which crippled rendering times (just fixed that - and my PC is 5x faster rendering)

roll-bar-camera-mount-S.jpg
DSC_0313-S.jpg


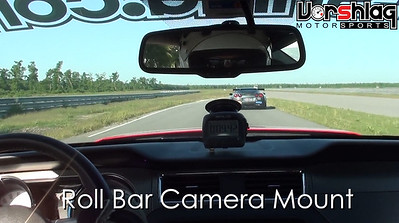
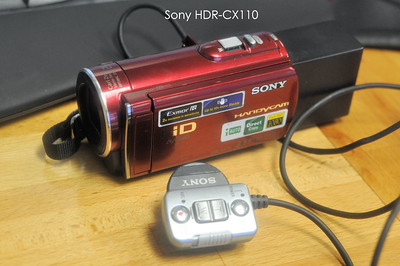
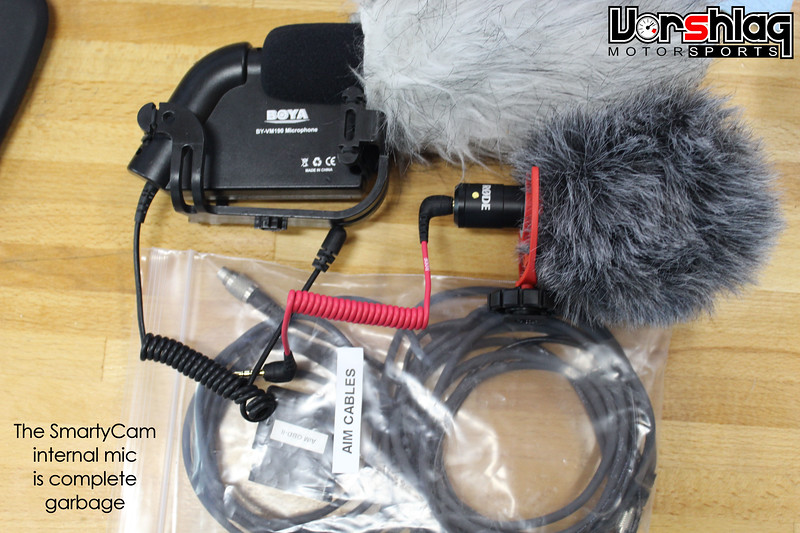
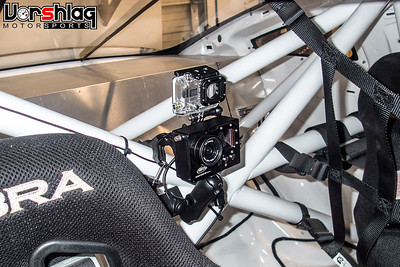
I've also wanted to get back to a "roll bar mount" camera location using a "narrow" Field of View lens. My previous Sony vidcam (2012-2016) worked pretty well, and even had a nice wired remote (with indicators for on/off, recording, etc), with a narrow FOV and a real adjustable lens. The quality from that 7+ year old 1080P vidcam started to look pretty dated, and the lack of a external mic was a real killer. Now that the 2018 Mustang has a roll bar (like we ran in our 2011 GT) it is time to install the I/O Port vidcam mount behind the driver, get a modern vidcam with a narrow FOV lens, and finally be able to see what the idiot driver is doing as well as a good view out the front.

SC_1918-L.jpg


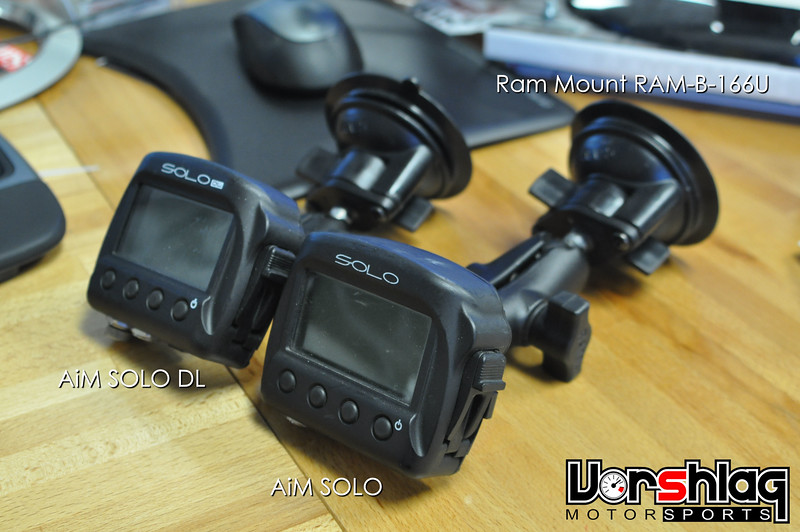
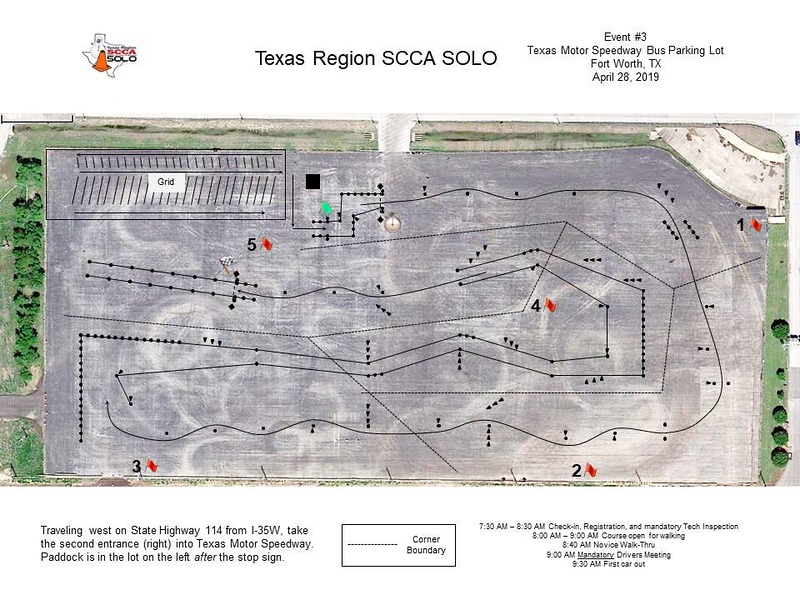
If you have been following my build threads for the past 8+ years you will have seen that I don't drive on track without my AiM Solo. I have two of these units, the $399 SOLO (my loaner/spare) and the $799 SOLO DL (which can read data via OBDII or CAN). There are newer units called the SOLO 2 & SOLO2 DL, but they don't have a lot of new features (and they shipped with a few bugs). Again, merging the captured data to the video is a bit of a pain in the ass, and its something that gobbles up time after every event. I've also never data logged any autocross runs (until recently), but I knew it was possible with the AiM SOLO and a custom course setup for the day (walking the course to "set" the GPS points for a separate start and finish).

B61G1970_2-S.jpg
P1180110%20%282%29-S.jpg


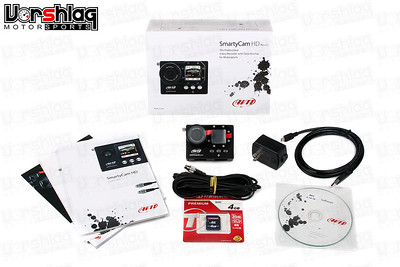
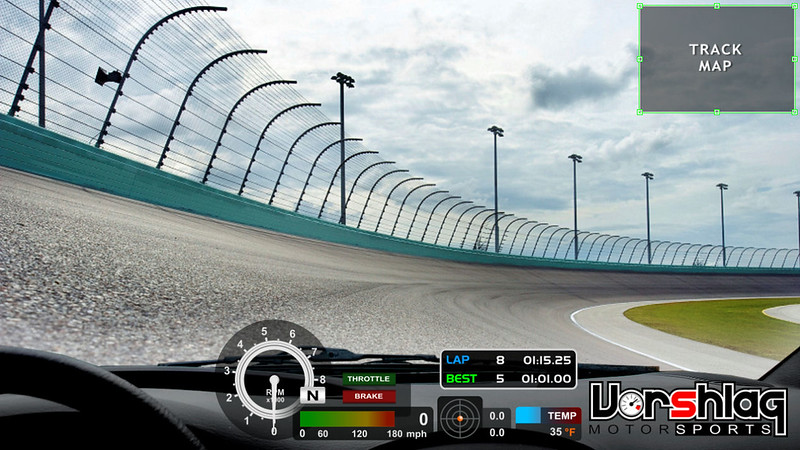
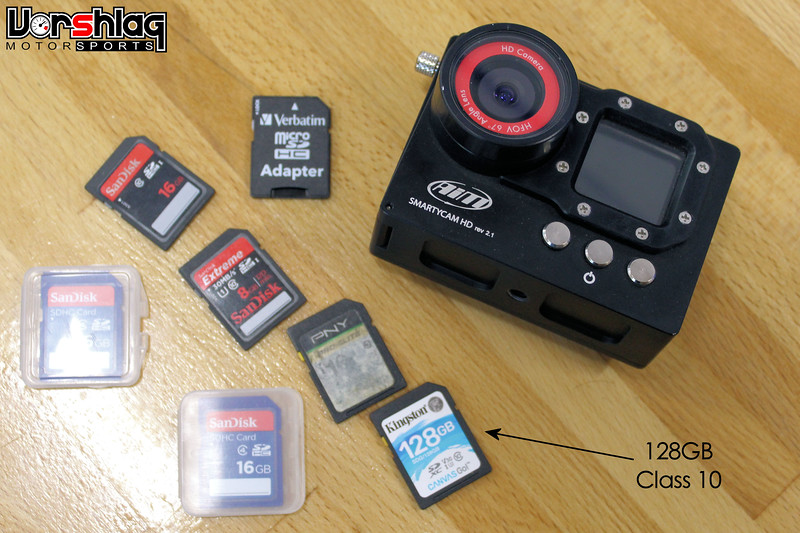
The obvious answer to all of these issues - if you ask anyone online - is the AiM SMartyCam HD. This $1000 camera can "talk" to the AiM SOLO (as well as AiM's other data logging digital dashes) and merges data and video real time. It also auto-starts and auto-stops, well according to the literature. We have sold and installed a number of these for customers, so I figured it was finally time to test this on the Mustang.

aim_smartycam_hd_solo_dl-L.jpg


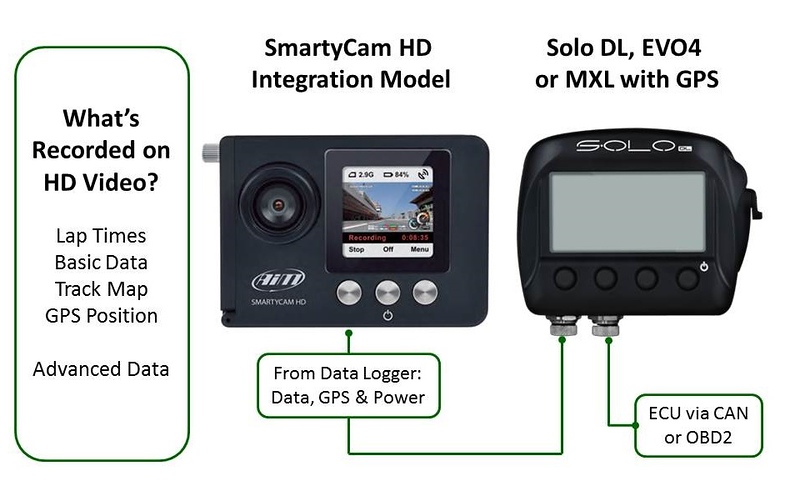
Crucially, I have never personally setup/used/tested one of these SmartyCams with an AiM or digital dash. This is how these two devices are supposed to be connected together and to the car. I have the OBDII/CAN wiring cable, and the SmartyCam came with the 5 pin to 7 pin AiM cable needed to connect to the SOLO DL. So now I need to learn to use these two devices for future videos - how hard can it be?

continued below
 

Vorshlag-Fair

Official Site Vendor
Official Vendor
Joined
Nov 12, 2010
Posts
1,592
Reaction score
107
Location
Dallas, TX
continued from above

I thought I knew the array of AiM software that was needed, but I was wrong. There is Race Studio 2 and Race Studio 3, SmartyManager, Race Studio Analysis, GPS Manager, plus some software I have used just for AiM firmware updates. Over the years AiM has killed off some of this software, but they never really remove it from their website, and still have YouTube videos up that show how to use them. One of these was SmartyManager - something that crashes immediately when you use it on Windows 10 with an SD card connected (that is configured with the SmartyCam). After a few hours with I got it to work, but it was pretty limited, and the auto start/stop had major issues when tested at an event.

smartymanager2-L.jpg

Don't use the SmartyManager software - it is obsolete junk!

After using the out-of-the-box SmartyCam config setup at an event (an autocross you will read about below), I worked on the setup of a "custom data overlay" for the merged data. You do this by using the SD card associated with the SmartyCam. After fumbling around looking at a bunch of dated videos from AiM, I finally figured it out (trial and error). Connect the formatted SD card (not the SmartyCam itself) to your computer, then run their Race Studio 3 software.

smartycam-setup-rs3-L.jpg


Once you are in the right software package (RS3), and it recognizes you have a SmartyCam formatted SD card connected, then you can create the data overlay, move the data readouts around, add a logo, etc. The auto start/stop bits are setup in menus on the SmartyCam, which I am still learning how to use. Of course I setup all sorts of things and almost none of it shows up when I use the unit.

IMG_2879-L.jpg


Crucial tip here - these AiM video cameras usually come with a 4GB SD card. Throw that card away, as it will fill up in less than 60 minutes of use (ask me how I know). The SmartyCam ver 2.1 supports up to a 128GB SD card, so buy a Class10 or better (how fast it can write) name brand card. $25-30 will get you a good one. That 128GB card should hold 32 hours of video + data, so you won't fill it up in 3 track sessions like I did. The camera won't tell you its full, of course, it just won't record anything.

IMG_2880-L.jpg


Using the on-board SmartyCam mic is a mistake - its hot garbage. I had to buy a special $80 cable from AiM to use a remote mic ($30), which is the same 5 to 7 pin cable as before but with an external 3.5mm mic pig-tailed off of it. This lets me use a dedicated external mic placed where I want it. The on-board mic on the SmartyCam is total TRASH - as you will see in my videos from COTA below. Of course when I went to test that it didn't work - no audio whatsoever. And if the configuration of the SmartyCam isn't just perfect, and you have the Solo DL data logger connected to the camera, the DL won't log ANY data.

Can you sense some frustration here? Yes, I have lost video and data from a number of events testing out the $1000 AiM SmartyCam. The video I managed to get had garbled or no audio, and usually no data, or started at the wrong time, or ended early. At best - when it all works like it should - you will see 720P video. That's 10 years or more out of date, yet this is their latest, greatest, $1000 camera. Somehow many people do manage to make this work - I probably need someone who has gone through these painful lessons to come fix all of the weird config issues I am having.


For the past 2 years I have only had the generic "OBDII data" from our 2018 Mustang. This is limited in scope, slow to transmit (data lags about a second, sometimes more), drops comms often (OBDII data seems to go away and come back several times per lap). AiM has to create a CAN protocol for each ECU, and while the S197 units had a CAN proocol, the S550 did not until very recently. During some online frustration rants in the previous weeks, someone informed me that there is a new CAN protocol for the 2015 Mustang, finally. This adds 8 more data channels (4 TPMS + 4 wheel speed sensors), and hopefully using CAN now all 15 channels are faster and more reliable than OBDII. I will configure that and try this at a future event.


I will keep working with these AiM software & hardware gizmos at future events and hopefully I will be able to get better videos with data overlays that are easier to edit, without all of the extra time spent merging data/video, or the other limitations. The idea of an auto starting / stopping camera that logs data and overlays it in real time is appealing, just have to work through a lot of hardware and software teething pains. Out of the box it is a bit of a mess, and at best we will have lower rez (720P) video, which does not thrill me. And before anyone says, "Maybe its you, homeslice!", you might be right.

SCCA AUTO-X, TMS BUS LOT, APRIL 28, 2019

We loaded up for another autocross, but this time at Texas Motor Speedway's "Bus Lot", which is a smooth, flat, sealed asphalt lot in excellent condition in front of the Texas Motor Speedway tri-oval NASCAR track. We got there at around 7 am, stopped at Buc-cee's to get breakfast and fuel, planning on running the Mustang a low on fuel as a test (1/4 tank). We drove through some rain on the way to this event, and we thought that was all of it.

Video and Picture Gallery: https://vorshlag.smugmug.com/Racing-...CA-TMS-042819/
course-map-tms-042819-L.jpg

Got the car unloaded, then teched, then it rained for about half an hour straight. Yuck. This sealed asphalt site is very slick in the wet, but I've autocrossed ~20 times here in the wet and always do well in this stuff. Normally, though, it rains briefly then dries out before some heats run - and luckily it dried out right as we went to grid for fir first heat.


Amy and I drove the Mustang together in the 15 cars in CAM-C, which ran in the first heat of four. This meant we ran first, worked third, and could leave during the fourth heat if we wanted. During the 2nd heat we went to lunch across the highway, and lately there are a lot of great places to eat that cropped up.


And you might have gathered from the course map, the course was very busy with some extremely tight turn-arounds once again. Luckily in the past 18 years I've run every manner of course layout here, so this course looked somewhat familiar. The speed we could hit on some straights was more than 68mph, as I was riding the rev limiter in 2nd gear on my first run. I started up-shifting (short shifting) to 3rd gear in one section, and it was worth the time to up- then down-shift.

The 4.09 rear gearing with the 2018-up MT82-D4 trans gear combine to be less than perfect for autocross, but damn if it ripped out of the tight corners well. It does works very well on a road course, so I'm not going to complain. As you will see in a future post the 4.09s work REALLY well for shorter course (like Optima autox + speed stop).

continued below
 

Vorshlag-Fair

Official Site Vendor
Official Vendor
Joined
Nov 12, 2010
Posts
1,592
Reaction score
107
Location
Dallas, TX
continued from above

The ambient temps were low when we started, in the mid 60°F range, but the sun was out so by the end of the first heat it was 82°F. The track surface temps climbed rapidly, and I felt like the grip on the RE-71Rs fell off on my last couple of runs. With 2 driver's running almost back to back over a total of 10 runs, we should have probably sprayed the tires to cool them on those last couple of runs. Too hot to touch. Still not sure we made the right call to "let em get hot". Hell, I just don't have enough autocross seat time in the last 3 years to know exactly what these Bridgestones "like" on a heavy car like this. Most folks let em just boil.


We started the tires at 28 psi cold then bled them down to 30 psi hot - which felt fine, but might not be the ideal settings. We really need to do a proper autocross test day to learn what these RE-71Rs work best at on this car for low speed events.


As you can sort of see in the video linked above, 2nd gear was almost ideal everywhere here. I used the out-of-the-box SmartyCam setup with the AiM SOLO DL connected, using a custom start-stop track location I set for this course. The problem was the auto-start delay on the SmartyCam must have been 20+ seconds long, so the first HALF of the run didn't record (on all 10 runs). The data overlays were also super crude, with the default overlay settings, and the audio was the on-board mid, which is junk. I was still learning a lot at this point.


Our alignment settings of -3.5° Front /-2.2° Rear camber and 1/8" toe out Front and 1/4" toe-in Rear felt GREAT. The stiff road course spring and shock settings worked fine as well - didn't touch a knob, just kept tire pressure stable at 30 psi. The handling overall was REALLY good - the turn in was super fast, car liked to rotate, and I had ZERO complaints. I hope we can replicate this "feel" in any autocross car we ever build again, wow! Acceleration, braking, slaloms were just spot on. Absolute driving perfection.


I have always liked running at the TMS Bus low, with its clean, smooth surface. Even after running here so many times before, it has been a while, so it was nice seeing some of the "rust" come off my autocross skills. From pictures I can see that I was putting the car an inch or so off the base of most cones, still with 2 of my 5 runs getting cone penalties for a bit too aggressive placement. My 3rd run was my quickest, and I won the class only by a tenth - with virtually the same folks that ran CAM-C at the previous event. The tires really felt greasy by run 4 and 5, and I really should have sprayed the tires. I don't know how much I could have found in the car, as it really felt hooked up on the first 3 runs.


Amy was less than a 1/2 second off my times, which made her super happy


Amy pulled off a quick 5th run and moved into 5th place overall once again, but this time only a half second back from 1st. She felt REALLY good to be that close to me after only running this car twice in this setup, ever, and she was still fighting seating & visibility issues. Her PAX factored times would have won the local Women's class by over a second, if she had run it, but she was having fun co-driving in the open class.

IMG_1375-S.jpg
IMG_1347-S.jpg


This yellow 2001 "SN95" Mustang GT had a pair of hot shoe drivers who came down from the Oklahoma Region and took 2nd (and 11th) place by only a tenth. This car looked and sounded like properly built CAM-C car, likely weighing close to the class minimum limit of 3300 pounds without driver (our car is about 350+ pounds over that weight). Matt Lucas took 3rd and his co-driver Tim took 9th - in the orange 2012 Boss302 that beat us last time. Would feel better if we were a bit farther ahead than only a tenth, but this class is brutal locally, so I was happy with the 1st and 5th we pulled off. Again, a half second covered the top 5 finish positions.

results-L.jpg


After our run heat we drove the Mustang to lunch and filled up the gas tank for the next track event. The fuel level was down to 1/4 tank after our combined 10 runs, but it never fuel starved. The fuel sloshing in this saddle tank in a parking lot is nothing like a long sustained left-hander on a road course, especially with Hoosiers. That's where we need to be at least 3/4 full to prevent fuel starvation.

continued below
 

Vorshlag-Fair

Official Site Vendor
Official Vendor
Joined
Nov 12, 2010
Posts
1,592
Reaction score
107
Location
Dallas, TX
continued from above


Weather was great after the rain left and dried up and the event ran very smoothly, with very few reruns or DNFs among the 157 entrants making runs. One of the best run autocross events I can ever remember. Normally we stick around after the last heat for awards with the rest of the competitors, but it was a long week with some wacky weather - since the sun was out, we had yard work to tackle back on our property.

ADDING AEROCATCH LATCHES

The carbon hood from Anderson Composites has worked well with the OEM latch for a bit now, just always makes me nervous having a composite hood held in place with a stock latch. We usually add two positive locking, visible latches on all composite hoods we install and after some "cowl flutter" I noted at one track day, we decided to add a pair of Aerocatch brand hood latches to our 2018 GT.

aerocatch-GT4-S550-S.jpg
aerocatch-pins-350S-S.jpg


This is where the factory 302S race cars place them - out on the edges, but about a foot back from the leading edge. I think they were trying to keep the pins on the leading edge of the sheet metal upper frame horn sections. When we looked at the carbon reinforced composite radiator support we found what we felt was a better location, farther forward and easier to mount the pins at.


Evan installed some pointed marking pins inside some reinforced holes we wanted to use for the hood latch pins, which were then transferred to the underside of the carbon fiber hood.


Once this pin location was marked the underside opening could be cut in the hood. This isn't super critical, not like the upper surface hole, and was cut out with a pneumatic body saw.


Then the pin adjusted to point at the top layer of the carbon hood, the oval shape could then be laid out and cut. We like to cut the top opening with 2 hole saws then connect them to form the shape, but some like to free-hand cut this with a jig saw or body saw. We always smooth the edges and then drill the holes for the top flange to mount (we never use the flush, bottom mount version).

continued below
 

Vorshlag-Fair

Official Site Vendor
Official Vendor
Joined
Nov 12, 2010
Posts
1,592
Reaction score
107
Location
Dallas, TX
continued from above


With the upper openings cut and the latches fitted, the lower pins were installed. These almost never point "straight up" - the pins need to be clocked correctly, usually bent to line up perpendicularly with the hood surface (which is not flat). Using this factory hole at the radiator bracket hole allowed us to install the pins without drilling the radiator support, which makes this easier to "un-do" when we go to sell this car (to be announced soon).


We kept the stock hood "double latch" in place, just to be triple sure the hood never comes open at speed. This makes it a 3 step process to open the hood - you open the Aerocatch latches, then pop the hood latch, then release the secondary safety latch.


The Aerocatch latch opening in the lower carbon skin is right where the hood prop rod mounts on the driver's side, so Evan drilled and slotted a mating hole a couple of inches to the left. We don't use gas strut lift kits on composite hoods, as I have had one of those fail when the hood was open into the wind - cost me a windshield and hood.

HOOD BUFFETING FIX

As I mentioned, some of my in-car videos show some serious hood flutter at the cowl on this carbon hood. I showed to former Ford / S550 Mustang engineer Marco Garcia when he stopped by the shop - he suggested that we still have some pressure build-up under the hood, yes, even with the massive "GT500" sized vent opening.


We might not be helping things with so many changes - the PP1 and PP2 undertray bits, removing the electric grill louvers, and adding the vented GT5 hood. There is a lot of weird aero pathways going on under this car. Marco's suggestion - remove the rear cowl plastics at the back of the engine bay (see above left). These help seal the opening at the back of the hood to the windshield and cowl.

IMG_1478-L.jpg


So we did. And at the next event - viola! - the hood flutter was gone. Looks a little funky with the hood up, but I'm not worried about car shows. Well... maybe I should have been (Optima event foreshadowing!)
wink.png


continued below
 

Vorshlag-Fair

Official Site Vendor
Official Vendor
Joined
Nov 12, 2010
Posts
1,592
Reaction score
107
Location
Dallas, TX
continued from above

QUICK RELEASE FIRE BOTTLE ADDED

As I have mentioned before HPDE and Time Trial generally have fairly low safety and fire suppression thresholds to enter. 3-point belt + a helmet, and some groups have some minimal clothing and shoe requirements. You don't even need a hand-held fire bottle in most series. Wheel to Wheel road racing, however, almost always requires a dedicated fire system with nozzles - pointed at driver, engine and other potential fire sources.


Even with a full fire system on a W2W car, we often add a hand-held bottle in an easy-to-reach location, like the S197 Mustang race car above. This way if you have a tiny fire in the pits, or a simple grass fire when pulled off track, you don't "blow" the dedicated system putting out something that a 2.5 pound fire bottle could have easily extinguished. We also put these little fire bottles in HPDE and TT cars, and it was long past time to add a fire bottle to our 2018 GT...


I ordered the same Drake quick-release bracket and a Halon replacement (Halotron) 2.5 pound fire bottle we have used dozens of times. Brad then fabricated a bracket to fit in the stock lower seat holes for the passenger side. Yes, we are making this with an eye to producing more for an easy bolt-in setup for a number of cars.


This mounts cleanly with the OEM seat or even our new S550 production seat mount bracket, which also uses the front seat mounting holes. I can reach over, pull the red pin and the fire bottle swings out quickly and cleanly. Its also out of the way of the passenger's feet. A minimum fire standard for a car tracked as often as we do, I'd say.

WHAT'S NEXT?

That's a lot to read in one sitting, so I am pushing the May NASA @ COTA event coverage until next time. We have done FIVE track events since this update now and more coming in August. Now that our forum is back up and working I can catch up on these posts. Plenty of events,upgrades, and news in the pipeline to cover next time.


We still have a busy competition and test calendar as we try to cram in as much testing and development in 2019, before we announce what we are doing in 2020 with this car. Do we keep racing it in a class at 300 pounds overweight, with tires that are too narrow for the weight (but we don't want to cut the fenders) in TT2 for 2020? Or is it time to build a dedicated S550 race car (or another chassis altogether - or a C8?) for next year? Tune in next time to see!

Until next time!
 

Vorshlag-Fair

Official Site Vendor
Official Vendor
Joined
Nov 12, 2010
Posts
1,592
Reaction score
107
Location
Dallas, TX
Project Update for August 30th, 2019: The last update got cut short since we were so far behind in updates due to the 3 month forum outage. There are six more track and test events that we have done in our 2018 Mustang GT we have done since that post, as well as some new parts we have been testing.


Going to try and cover as much ground as possible in this post. We also have a new S550 chassis entering the shop, which we are already building for the 2020 season...


Yes, its a front hit rolling chassis. I will explain why we bought it and what we are going to do. Let's get started!

NASA AT COTA, MAY 4-5, 2019

This annual NASA event at Circuit of the Americas is always fun, but this particular weekend was pretty far from the perfect outing I had hoped we would see this year.


First I was a little bummed as we had to move to TT2, where we are 300 pounds overweight, or 47 whp under the limit, however you want to look at it. Its a shame as we would have dominated TT3 class both days, even on street tires. Still doing our "street tires on Saturday / R compounds on Sunday" testing for NASA weekends. Just cannot get back to TT3 without cutting the car or swapping in a different engine (could this be hints for things to come?) It is what it is.

IMG_2812-S.jpg


The drive down Friday afternoon was rough. Hellish drive in traffic and heavy rains all the way down. The Friday test-and-tune day was wet all day, a total a wash, so I'm glad we didn't enter that. We lost count of how many crashed cars, car-b-ques, and wreckers we saw on the "3 hour drive" from Dallas, that took 5.5 hours.

IMG_2807-S.jpg
IMG_2810-S.jpg


It stopped raining by 6 pm when we finally got there, we unloaded the car and put it inside our garage, while very dark clouds were rolling in. We got out of there just before the skies OPENED UP. It rained for so long and hard that evening that the tunnels flooded and people inside the track got stuck there for many hours. Was hoping the forecast would clean up for Saturday.

SATURDAY


Saturday morning, and its been raining all night, so the track is still wet. TT goes out first at 8 am, totally wet. I tried to start towards the front of the field but of course I had issues trying to get the AiM Solo to talk to the SmartyCam and fought with it during the entire out lap (see below left).

continued below
 

Vorshlag-Fair

Official Site Vendor
Official Vendor
Joined
Nov 12, 2010
Posts
1,592
Reaction score
107
Location
Dallas, TX
continued from above

Never did come on, so I was "flying blind". I hate driving on track with no CLUE how the lap times look. I live and die by my predictive lap timer. It was also wet enough to put up a spray in a lot of places (below right).


That first session was a mess - I let several cars go by on the out lap while I fidgeted with the AiM, then fought to re-pass these same cars in the later wet laps. The Video is unwatchable, as the AiM Solo and AiM SmartyCam were not playing well together. I stayed out longer than normal trying to get a clear lap, just kept getting blocked by formula cars and TTU cars, lap after lap.


After a lap and a half of passing cars and then filling the mirrors of some Corvettes, a gaggle of TTU cars finally pointed me by (above left). That was bad enough, then I got stuck behind a Elan DP-2 prototype that was on a leisurely Sunday drive in the corners, and he had juuuust enough grunt on the straights to block me from passing (he later ran a 2:20 laps in the dry on Sunday). This went on for an entire lap and a half, super frustrating, and I finally just made a pass braking on the inside of T1 just enough to get past him, then built a gap and pulled away in the esses. On street tires, in a 3800 pound car, with no aero. By then the diff fluid temps were pegged at 250°F again. I had made most of a clean lap, but finally gave up in traffic frustration and came in.


Turns out I had the 3rd quickest time of the session at 2:38.114, even with crazy traffic. The SmartyCam video is nearly unwatchable, the audio is a train wreck, and the lap counter and most of the data overlays never worked. I'm already sick of the SmartyCam, but we will try it again another weekend.

Felt good gridding P3, but the wet conditions masked some setup issues. I went out in session 2 and it was dry, but the car handled something awful. Worst it has ever felt! Pushed like mad on corner entry, loose as hell on corner exit. I was pulling my hair out, driving sideways a lot, but at least the AiM was finally displaying my times - which were CRAP. Ran a 2:33.0, which is slow even with the "street tire handicap" (we've run 2:28s here on A7s last year at Nationals, in TT3, with less power). Fell down to P7 on the grid.


I came into the garage and started checking things like shock settings, tire pressures, wiggled this and that... Spent an hour chasing a whole lot of nothing. Noticed the windshield had picked up a HUGE crack from a rock, probably when following some traffic in the wet session. "Great".


I went out in session 3 and found a little time, but now I'm down to P12 on grid. Everyone else is finding huge amounts of time so I'm going backwards. The car has never handled this badly, never had this wicked of a front end push. Its just killing the front tires so I don't stay out more than a few laps. Come in and change shock settings, looking for anything.


Went out in session 4, hot as hell, last session of the day. Still a total mess to drive, and while I got marginally quicker at a 2:32.0, I fell down the grid again further to 17th overall. What in hell is going on??? The front tires took some visible damage on the outer shoulders by the end of the day, and I've fallen from 2nd in TT2 class down to 7th out of 9. SEVENTH. My worst class finish in 2 years of driving this car.

continued below
 

Vorshlag-Fair

Official Site Vendor
Official Vendor
Joined
Nov 12, 2010
Posts
1,592
Reaction score
107
Location
Dallas, TX
continued from above

I spent an hour at the end of the day, car back up on jack stands, wheels off, checking everything I can see or torque on the suspension. All day my friend and fellow TT2 competitor Paul Costas kept telling me "string the car", meaning check the alignment. What I described to him sounded like an alignment issue, but we set this car up, so I had no reason to doubt it.


I finally broke out the toe plates after we had swapped on the R7s for Sunday and promptly found the issue. Front toe was set 1/8" total toe in, instead of 1/8" toe out. So that 1/4" in toe error caused all of this hell. Wish I would have checked this earlier!! We always keep these $50 toe plates in the trailer - next time I will bring them into the garage with me! Stupid, stupid, stupid mistake.

SUNDAY

The weather was perfect on Sunday morning, and I was hoping we would be a LOT quicker with the alignment fix and switch to Hoosiers. Now for most of the 200TW -> Hoosier R7 testing this year the switch to R compounds was worth no more than 1 second. Problem was I was gridded way down in 17th position, which would mean I had a lot of slower cars ahead of me IF the alignment tweak fixed the handling AND the R7 Hoosiers worked at least as well as the A7s did last year in TT3.


I went out and immediately knew we had fixed the handling problem, and the R7s were switching on quickly. The temps were perfect but I had to fight through traffic, and passed 7 cars ahead of me in this session. That means I never got a clear lap, but I knew this 2:27.385 lap would help me grid better next time - moving me up to P10 on grid. Already 1 second faster than my previous best here at COTA - handling 100% better!


Of course during the out lap of Sunday TT session 1 is when the SmartyCam filled up the 4GB SD card it comes with, which will hold less than 45 minutes of video (like I said last time - you need to buy a 128 GB SD card for a SmartyCam). So we had zero video or data logging for Sunday. The damn thing doesn't beep at you or warn you - it still turns on (if it has power) and the lap timer still works, just stores zero video or data. Frustrating.... ran my quickest lap ever at COTA and I have zero video of it.


Even with the temps rising, TT session 2 looked to be even better, due to the big move up the grid. Now I won't have as many cars to pass, so maybe I can find more time. I still had some traffic on that first hot lap and slowed to a 2:28.248, making a pass, but seeing clearer track ahead. Kept pushing and found a 2:27.266 on hot lap 2, still getting a bit stuck, but at least quicker than session 1 and new personal best. I kept getting around cars, seeing a clear stretch of track ahead... predictive timing was now flashing low 2:25 times, which could move me as high as P3 or P4 in class, which would be great.


As I cross Start/Finish on hot lap 2, I see this Super Unlimited class Lamborghini Huracan with giant aero bombing down the front straight, coming up on me from way back. He put it in 2:19 lap Saturday, so I don't know why he started behind me on grid on Sunday? Some of the W2W guys like to use TT as practice, and they don't care about grid position. The above right pic shows how close he was getting to me braking up the hill into T1, after hot lap 2. I was trying to figure out how to get this guy by me without ruining my 3rd hot lap, which was showing a 2:25.0 predictive at this point...

cota-track-map-L.jpg


I'm exiting T1, powering through 3rd and shifting into 4th gear, now in the middle of T2 at about 90 mph - when the car takes a violent, instant snap spin, like I had run though oil. Turns out I did - and unbeknownst to me, it was from my own car. Meanwhile time had slowed down for me - I was heading backwards towards the outside wall at near triple digit speeds, but at least knew enough to keep the car lined up in the direction it wanted to go, in reverse.

continued below
 

Vorshlag-Fair

Official Site Vendor
Official Vendor
Joined
Nov 12, 2010
Posts
1,592
Reaction score
107
Location
Dallas, TX
continued from above

I'm looking in the rear view mirror, trying to keep the car straight, and applying the brakes. Gently... gently... - the ABS freaks out braking hard in reverse at high speeds - steering away from the walls, got it stopped, on the apron. Whew!


Turn off the engine by pushing the "push to start" button, gather my wits. Hmm, I'm parked backwards looking at the exit of T2, not in a great spot if anyone else hits "whatever fluid" caused my spin. I saw a spritz of what looked like coolant on my windshield, tinted just a hair yellow - was this coolant from my car? (we don't have any coolant in this car - just distilled water and MoCool additive)

I tentatively fire up the engine, thinking I can drive way off on the apron and get to a safe spot or maybe one of the "cut-thrus" between the track barriers, then get on the access road, pop the hood and assess the coolant leak. No idiot lights or beeping, so I start moving along slowly at about 30 mph on the wide apron off track left, then the "low oil pressure" idiot light comes on. CRAP! CRAP! CRAP! I frantically push the "push to start" button to turn off the engine and coast to stop. I stay buckled in but I'm frantically looking for fire, and wait for the flat bed. They black flagged the session early, due to my oil spill and another issue on the other side of the track that also required a flat bed.


After making the "tow of shame" back to the paddock, I went to the TT driver's meeting, apologized for the black flagged session. Everybody thought the worst - engine blew up, car crashed, etc. Had to calm people down, just an oil leak. First mechanical I've had in 5 years, and the first time in 33 years I've ever shut down a session. I was pissed, embarrassed, pissed some more - but I guess it was bound to happen eventually. We are meticulous about pre-track prep but must have missed something. There was hardly any oil spray in the engine bay, and we couldn't tell where the leak came from. Whatever it was we didn't have any spares to fix what broke, and the engine bay was quite drippy, so we pulled it into the trailer with the winch...


After we finished loading the car I still had an HPDE1 student to work with, then did some check rides. It was pretty crappy hanging around all day, hot as hell, with a non-running car in the trailer that had two more seconds left in it. Ugh.


At least our results moved up from 7th out of 9 on Saturday to 5th out of 9 in TT2 on Sunday, but I was not satisfied with the times from either day, for obvious reasons. This heavy street car has no business gunning for the front of TT2, with 8 out of 9 entrants running full aero and Hoosiers both days, but it still rankled me being mid-pack.


This frustrating weekend added the oil leak as the icing on the cake. I was trying to stay positive, but with the SmartyCam and AiM issues, the heavy rain followed by major heat and humidity, then chasing the alignment goof on Saturday that cost me any chance of getting a good time on street tires here. Just writing this report 3 months later reminded me how terrible this event went - but I'm all about sharing the good and the bad. The NASA crew did a fine job, and I'm only mad at myself. We were coming back in June with SCCA TT so I would bring street tires and try again.

continued below
 

Vorshlag-Fair

Official Site Vendor
Official Vendor
Joined
Nov 12, 2010
Posts
1,592
Reaction score
107
Location
Dallas, TX
continued from above

REPAIRS AFTER COTA INCIDENT

After unloading the car and pushing it into the shop, we got the car on the lift. There was plenty of oil evidence underneath but not much oil left in the 8 quart plastic oil pan. The oil residue led us quickly to the oil filter sandwich plate, which had cut an O-ring.


Why this happened took some investigation. See, this is a prototype oil cooler setup we made from parts originally built to fit the 2015-17 GT. We had to make new oil lines and route them in a new way to the front mounted heat exchanger.


There is a lot crap in the way down there, but the lines were too close to the Whiteline front swaybar. As the swaybar articulated it "pushed" on one of the oil lines. This rocking back-and-forth transferred to the sandwich plate and sawed through the O-ring. You can see the new oil line routing above, with a section of fire sleeve added over the portions near the sandwich plate. This helps keep them together and we added a P-clamp to one section to keep it away from the swaybar. Part of the joy of trying new things, using prototype part setups.


3 months later there have been no other incidents with the sandwich plate. We check this before each event, too. If its not "tight", if it can rock at all, it will get realigned and tweaked further. A new oil filter and 9 quarts of Motul 5W50 ester based oil was installed. Engine fired up, ran fine.


The Mustang was thoroughly washed, and pressure washed underhood and underneath. All traces of oil were removed - which was no small task.

IMG_1472-L.jpg


The other thing that we needed to "fix" after this event were the front brake cooling hoses. These 4" high temp hoses do fine in the heat, they just get in the way of the 305 or 315mm tires we run, which like to smash them at full turning lock. Don't really see that on track but we do in the paddock and pits. We replace these two times a year, but we had a guest stopping by soon who had a new idea...

continued below
 

Vorshlag-Fair

Official Site Vendor
Official Vendor
Joined
Nov 12, 2010
Posts
1,592
Reaction score
107
Location
Dallas, TX
continued from above

BRAKE COOLING METHOD + TRACK TEST

After seeing these 4" brake duct hoses smashed to bits and getting a bit frustrated, a certain engineer (Marco) stopped by reiterating some advice he gave me 2 years ago - get rid of the dang hoses. This time we will show some work we have been doing for the past few months - a solution to cool front brakes without giant ducted hoses.


Long term readers here will know that we have built, tested, and perfected a number of brake cooling solutions on the S550, at least for the 15" Performance Pack brake rotors that can even be cooled (the wacky inverted hat 14" rotors cannot). Our S550 brake cooling backing plates work great for the 15" PP brakes as well as the 380mm Powerbrake kit we are running now. We make inlet ducts for the 2018-19 front end and have more in the works.

IMG_0541-S.jpg
IMG_0542-S.jpg


The inlet duct at the front of the bumper cover provides high pressure air that pushes through high temp 4" diameter corrugated hoses into the brake backing plate. This air then goes around the bearing and is pumped through the vented rotor, cooling the brake rotor/pad/etc.


We used this on the 15" PP1 brakes (above left) and again with our Powerbrake 380mm brakes (above right) for the past year and a half - and they worked great. Vorshlag has sold a good number of these brake cooling kits to folks with S550s and have had no complaints. We will continue to make and sell these even after we introduce this new brake cooling design.


They worked extremely well with the 305mm street tire setup, which is about an 11.5" wide tire. When we went to the 315mm Hoosiers, things started to get complicated. This "315" is 12.5" wide even mounted to a little 11" wide wheel (they work better on a 12" wide wheel, but then the fender poke becomes enormous)

IMG_1543-L.jpg


Not many people run this 315mm Hoosier, as it doesn't really fit under the fenders without compromises. The obvious problem is evidenced above. Once we started running that 12.5" wide Hoosier tire up front, pushing them inboard as tight to the strut as we can get, there is no room for the brake cooling hoses. This tire is just touching the frame at full steering lock - something that is hard to avoid when you autocross the car, or hell, even driving in the paddock at a race track. Maybe we should have added steering rack limiters, but I didn't want to give up that steering angle for autocross events.

IMG_1542-L.jpg


This meant we have had to replace the front hoses about 3 times in that period, and at a certain point in their life cycle the hoses have some holes in them and don't work as well. Again, not everyone runs a 315mm Hoosier on 18x11" wheels on the front of their S550, so most folks won't see this issue.

continued below
 

Vorshlag-Fair

Official Site Vendor
Official Vendor
Joined
Nov 12, 2010
Posts
1,592
Reaction score
107
Location
Dallas, TX
continued from above


Marco suggested a new type of cooling method after we switched to the PP1 front undertray and PP2 lip: brake cooling deflectors. The added "tunnels" in the front undertray provide a path he helped engineer into the S550 for brake cooling air. I was very skeptical, as we have used brake ducting hoses pumping into the back of the rotor for decades without fail.


This is a trick the OEMs often do on certain models, as they obviously cannot add brake cooling hoses from the factory due to the situations that we have run into at full lock on super wide tires. This is also known as the "scoop and flap" method, which was introduced by Porsche in the 1980s and copied by other OEMs later. The S550 was the first time this was used on a Mustang, and then only on the PP1 brake equipped cars (there is no sense in trying to "cool" the inverted hat rotors on other models). Strangely enough the GT350 has the tunnels but they removed the flaps or "deflectors" on the lower control arm before the car went to production.

View attachment 70659

Now that we had the tunnel to feed the deflector we could test this on track. Again - I was very skeptical, but we agreed to try it. We added the "bikini" heat shield in place of our brake backing plate. This is to shield the three ball joints (at the steering tie rod and two control arm mounts) from heat radiated by the nearby rotor (which can get to over 900°F even with forced brake cooling).

Removing the full dust shield and only using the "bikini" shield leaves the back of the hub area open for cooling. The brake cooling flap bolts to the control arm and deflects the air towards the hub and inside of the rotor. Then the vanes in the rotor pumps the air through the rotor ring and removes the heat.


For our first deflector iteration (version 1) we made an aluminum deflector about 40% larger in surface area than the plastic unit used on the PP1 cars. We placed it in what we thought would be the best part of the air stream from two different cold air sources (see below), thinking that the tunnels alone might not feed enough air to the brakes. We trimmed and fitted these until they cleared our 18x11" wheels, which is the smallest diameter anyone could hope to fit over the 15" PP1 brakes.

There are cut-outs to clear the tie rod, and it bolts to one of the control arms (the forward "TC rod"). Since we have aftermarket arms there are no holes to bolt to, so Brad used some U-bolts to clamp it to the round TC arm. At full lock the deflector would get no airflow, but that is a situation you never see on track - and our hoses were crushed flat at full lock anyway.


We have long been told by aerodynamic engineers that the corrugated brake cooling hose has terrible airflow, with a boundary layer that stalls out near the surface of the inner corrugations. So a 4" diameter corrugated hose flows about the same as a 2" diameter smooth bore hose. Problem is, smooth bore hoses cannot bend, and the old school hoses needed to articulate with the steering.

continued from above
 

Vorshlag-Fair

Official Site Vendor
Official Vendor
Joined
Nov 12, 2010
Posts
1,592
Reaction score
107
Location
Dallas, TX
continued from above

I was super skeptical so we made a temporary hose from the 4" oval deflector we had on the right front. We used some smooth bore 3" diameter hose necked down from the 4" oval inlet, and at the back of the fender liner added a small 3" aluminum mandrel bend, to point air at the deflector.


On the other side we kept our proven 4" brake backing plate and inlet with a brand new 4" hose. Then we scheduled a private test at MSR to see any side-to-side differences in rotor temps, after bombing into the hot pits after a number of hot laps with no cool down.

ADDING OIL PRESSURE GAUGE + RAM MOUNT

To prevent any future mistakes where I try to start an engine that has a massive oil leak again, I ordered another one of the low cost, electronic, full sweep stepper gauges from Glowshift to monitor Oil Pressure. There is no gauge on my Mustang for this - just the idiot light.


Our S197 Boss302 3-gauge pod we have added on top of the S550 dash already had 3 gauges we needed: engine oil, trans oil, and diff oil temp gauges. So the new 0-150 psi oil pressure gauge and add-on, programmable WARNING LIGHT were added to the left of the pod, as shown. Not going to win any car shows with this setup, but we are looking for function over form here.


Brad wired this in using the wiring that came with the kit + a set of Weatherpack connectors and pins. These aren't as fancy as the Deutch connectors we use on most race car builds, but this isn't a long term race car (we have an end game in sight).


Brad also added a 1" ball RAM mount base to the right of the pod. I wanted this so I can mount my AiM Solo -or- a wide angle video camera here using RAM arms, which removes at least one suction cup windshield mount from the windshield. The plastic panel we attach everything to is cheap and easily replaced, so why not drill more holes?? This entire gauge cluster + dash piece will likely migrate to the next S550 chassis.


The pressure sensor that came with the gauge kit was inserted into the 2nd 1/8" NPT port on the Mishimoto sandwich plate. These come with plugs but we are using both of them now with sensors for oil temp and oil pressure. This sandwich plate has a thermostatic bypass for the oil cooler as well. Brad wired in the gauges to the light circuit, so that they can work at night as well.

continued below
 

Vorshlag-Fair

Official Site Vendor
Official Vendor
Joined
Nov 12, 2010
Posts
1,592
Reaction score
107
Location
Dallas, TX
continued from above

TRACK TEST, MSR-C 1.7 CCW, MAY 15, 2019

After we made our first version of the brake cooling deflector I wanted to do two track tests to verify the effectiveness. Remember - we had the traditional 4" backing plate + corrugated hose + 4" oval inlet on the LEFT FRONT wheel, and the new brake cooling "deflector" setup on the RIGHT FRONT wheel. The RF also had the smooth bore 3" hose from the 4" inlet as well as the "tunnel" from the PP1 undertray. Double airflow to the deflector, for test one.

IMG_2985-S.png


We loaded up the car and I drove out to MSR Cresson on a Thursday "member day", where I drove in 2 sessions before lunch. I arrived by 7:45 am and the weather was nearly perfect.


The front tires had taken a real beating at COTA with all of that crazy toe in, so the shoulders looked pretty rough. Yet I matched my previous best street tire times here on this well worn set of tires - while doing the various brake cooling tests.

I always drive with a lot of left foot braking, shooting for threshold stops in TT wherever I can pull it off, and in these two tests session I was in full qualifying mode, pushing 10/10ths. Lots of rear tire slip, purposefully over-driving the car, trying to make the brakes as hot as I could. With the oil cooler we can make longer full-tilt sessions like this without issues (of course the diff temps were spiking after 5-6 laps again - more on that later).


Once again I was testing the SmartyCam wired into the AiM SOLO DL which was pulling data from the CAN system. But I don't trust it - I was so paranoid after the issues at COTA that I utilized a backup AiM Solo and a backup video camera (Sony HD on the windshield). I was not going to lose this video or data - the whole point of being here on this day was to test the brake cooling.

I went out in the first test and did 5 laps with the brake cooling inlet OPEN on the RF, so it was getting cooling air from both the 4" oval and the tunnel to the deflector. The LF corner was open for both test and used the normal 4" corrugated hose and backing plate.


I drove five hot laps (with some mediocre 1:23-1:25 times in traffic) and came in to check temps... the ducted LF was 800°F and the RF was 700°F. Wait... WHAT? It was 100°F cooler on the deflector side than the ducted hose side. The car was really loose and the times were not great, but the brake temp thing had me scratching my head. I went to get fuel and covered up the inlet duct on the RF, so make the deflector only get air from the undertray tunnel. Surely this would make it lose some effectiveness. Put in fuel for 3/4 tank to try to put in some faster laps in the 2nd session. The rotors had cooled to about 230°F on both fronts (took video of that) after sitting for 10 minutes, waiting for the next session to start. So this time I was gong out on warm brakes, not ambient temp brakes like session 1.


This in-car video shows session 2 with 6 hot laps, where I was trying to push hard to get heat into the brakes. I nearly matched the best times ever on street tires for this car here with a 1:21.0 lap, even fuel starving in one section of left turns. I came into the pits after the 6th full hot lap, with no cool down lap, jumped out of the car, then took IR gun temps of the brake rotors. Best I can do without an expensive real time IR sensor rig on each corner.

The Left Front, which had our traditional 4" ducted brake cooling was 880°F. The right front, with the tunnel+3" hose feeding the Vorshlag S550 brake deflector was 780°F, once again 100°F cooler. I show the rear brake temps too, just to see what they were (they also get hot).

The SmartyCam video still has the factory default settings for the data overlay, and I've reset and checked and triple checked the programming of the SD card for the camera so many times I am losing faith. I probably need someone that knows the AiM software better to show me what I'm doing wrong - the software is just so terrible that I cannot make it work without some assistance. This is ridiculous, and we are WASTING data by using this "easier" SmartyCam slaved system. Once you tie the camera to the SOLO the data is gone.


More importantly - the scoop-and-flap brake cooling that Marco suggested worked better than our ducted cooling. No hoses to crush and replace, just too easy to install. And even with the cooling duct blocked off on the deflector side, it was still 100°F cooler. All of the airflow was from the tunnel in the PP1 undertray.


My skepticism about this brake cooling method was finally fading away, after seeing these two back to back tests first hand, but now I suspect other people won't believe me. That's fine, we will sell the ducted backing plate design. We continued to refine and test this new "scoop and flap" method for several more track events before sharing our findings here. We have revised and improved the deflector design two more times. We should have S550 options available shortly after this post is published.

continued below
 

Vorshlag-Fair

Official Site Vendor
Official Vendor
Joined
Nov 12, 2010
Posts
1,592
Reaction score
107
Location
Dallas, TX
continued from above

REAR SHOCK OFFSET LOWER T-BAR

The stock rear suspension on the S550 uses a "divorced" spring and shock, with the spring located inboard on the control arm connected to a pocket on the chassis. Big diameter, necessary to make enough spring rate on this "poor motion ratio" location. It is done for packaging reasons, platform sharing, etc. It is really to have a "coilover shock" spring mounting location on the rear suspension of most cars.


For an S550 we like to move the spring outboard and mount it onto the shock, which allows us a lot of advantages: A) this way we can have ride height adjustability without a lot of extra hardware, B) we can use a variety of spring rates and lengths using 2.25" inner diameter coilover springs, and C) the springs are much lighter than the larger but super soft OEM bits. And, we don't suffer the usual compromises we see on other cars, like the S197 that loses tire room when converted to coilover.


The key take-away is that we need MORE SPRING RATE to turn these marshmallow Mustang suspensions into something that can avoid the brake dive, body roll, and heave. Real spring rates require "real" dampers... adjustable monotubes are the best solution there. This is where we come in.


Our very first coilover install for the S550 (March of 2015, above left) utilized an Eibach lowering spring in the stock divorced spring position. It was a while before MCS moved to a coilover rear, but in the meantime we ran the Whiteline/AST coilovers (above right) starting in early 2018. These utilized an inverted shock design with the spring at the bottom of the shock. This moved the spring very close to the rear axle's CV boot.


Then in September 2018 we tested the Ohlins R&T coilovers for a few months, which uses a coilover style spring but mounted in the stock divorced spring location. Unlike the Eibach lowering spring it was easier to find stiffer rates for this setup. This removes the spring from being close to the axle/CV boot.

P9261291-S.jpg


The mounting in the actual control arm could be a challenge, as Ford changed the lower control arm casting from 2015 to sometime around 2018, as shown above.

continued below
 

Vorshlag-Fair

Official Site Vendor
Official Vendor
Joined
Nov 12, 2010
Posts
1,592
Reaction score
107
Location
Dallas, TX
continued from above

I had to cut the top of the "protrusion" off of our 2018 arms, then do a bit of grinding to make the Ohlins 2.5" ID spring adapter fit.


We show all of this in our S550 Ohlins coilover instruction gallery.


We moved to the MCS RR2 remote reservoir dampers and even more aggressive spring rates after the Ohlins R&T testing, but had some issues with shock lengths. Working with MCS on shock lengths (2" shorter bodies) as well as our new spherical upper shock mount with dual mounting heights (1.5" more stroke) gained us the bump travel we needed at a lowered ride height, and more.


That bump travel testing/shock mount design work consumed a lot of our bandwidth, but meanwhile Brad noticed some axle grease on one of the springs...

IMG_3851_1-L.jpg


Packaging gets very tight back there when you run a coilover shock setup, with the spring getting precariously close to the CV boot on the rear axles. To gain the most room any coilover rear shock setup on the S550 needs to be inverted, with the spring down lower (below the barrel of the wheel) to clear a BIG wheel and tire package, like the 18x11" and 19x11" we like to run. Of course to be run inverted, a shock has to be a monotube - a twin tube damper cannot be run upside down like this.


As we have seen, every additional 1/8" of room we can get between the CV boot and the spring is crucial. Even though the 2.25" ID coilover spring was spaced away from the CV boot, after higher speed events like COTA - where we reach 150 mph on the back straight - we noticed that the CV boot "grows" enough to tough the spring. It gets a tiny crack then spits out the grease. Oh well, we bought a $52 CV boot kit from Ford.

continued below
 

Vorshlag-Fair

Official Site Vendor
Official Vendor
Joined
Nov 12, 2010
Posts
1,592
Reaction score
107
Location
Dallas, TX
continued from above

Turns out this CV boot from Ford is so hard that it won't slip over the CV housing. Hours were wasted, heat guns and special tools and all sorts of tricks were tried.


We called a tech at a Ford dealer, familiar with the S550, and he said "Oh those never work - just buy a new axle!)"


It sounds crazy, but this is not a serviceable CV boot. And to remove the axle is not a fun job. In any case, this is an issue we chased for weeks.


We have changed both rear axles once and the need to be done again, as the CV boosts are cracked again. We have investigated and found that the Whiteline shocks used an offset lower T-bar mount (as well as a smaller diameter 50mm ID spring), which MCS now has as well.


Whiteline's unit as above left, MCS at right. Just know that if you bought some S550 MCS coilovers before mid 2019, you need to convert to the new offset T-bar - which kicks the bottom of the shock away from the spring. Its an easy change to make, and MCS has these for both the GT350/PP2 spacing and normal S550 mounting hole spacing. They have even slotted the holes to allow for additional shock offset adjustment.

76048894-978A1325-L.jpg


I hope someday that a more pliable CV boot comes out for the S550, because I have a number of used axles with just a little crack in the boots.
wink.png
And while this was a lot of writing and pictures to show what few of you might care about, we learned this the hard way (4 axle replacements!) and wanted to share this tech bit. THE CV BOOT GROWS!

SCCA TIME TRIAL, COTA, JUNE 29, 2019

I signed up for just one day of this 2 day SCCA Time Trial weekend at COTA, partly due to costs but more because I was super busy and couldn't afford a 2 day weekend + a Friday travel day away from the shop. The Texas Region SCCA TT group had never run an event here, and were only able to pull this together because the Club Racer attendance was low and they needed "numbers". I had a feeling this event might be our last chance to run this track in the red 2018 GT (I was right) and I wanted vindication for the problematic event we had in May with COTA. Just wanted to finally see a sub 2:30 lap time on street tires. Again, we've run 2:27s here on R7s, just not a strong time on streets.

Amy and I left Friday early afternoon, once again took us 5 hours to get there again (traffic on I-35 is horrible - this drive is always a beating), arriving at 7 pm. We quickly unhooked the trailer, went and had a good dinner with many of the SCCA TT folks at Javi's Tex Mex, then hit the hotel. Got to see folks we don't get to hang out with often, which was nice. That's when we saw the scheduled - which only showed 2 sessions per day for TT. While I was worried beforehand the SCCA Club Racers would get preferential treatment with respect to track time, and of course they did in a BIG way. It was also very, very hot (99F). They also told us that the track limits were super strict, which would change our lines drastically from any other group that runs here. All of the big curbs were in place.

continued below
 

Vorshlag-Fair

Official Site Vendor
Official Vendor
Joined
Nov 12, 2010
Posts
1,592
Reaction score
107
Location
Dallas, TX
continued from above

SATURDAY

There was a ridiculously early 6:30 am TT drivers meeting, then first car out was to be 8 am, with TT being the first group to take the track for the day. Really long meeting, and of the 33 cars entered, 3/4 of the people raised their hand when asked "who has never run at COTA". Yikes... this did not bode well. My heart just sunk.


Luckily they started me in P1 on the grid, knowing that I had run here 7 times before and could lead the group out, bunch them up well, before we would go green at T19 on the out lap. Kinda late to go green for what I'm used to, but it's their party, their rules. There is also limited passing with this group (only on straights with point-bys) so that could prove to be an issue. But leading the group out for this 3.41 mile circuit with only 33 cars, I should easily get 3-4 laps traffic free.

The morning TT session was the only time we would get a cool track surface, according to the forecast. The next session wasn't until after 2 pm, when it would be well into the 90's and with the sun beating down making the track surface "boiling". Again, these RE-71R tires have about 2 hard laps in them at COTA in the Texas Summer, so the first two laps in this first session were all that would matter.

I got to grid at 7:45 am, and they kept giving us repeated "5 minute" warnings with 33 engines running... waiting. Finally I took the initiative, turned off the engine, and peeling out of the car - as I was sweating profusely in my 3 layer suit in the car (I should have just turned the damned air con on.) The rest of the drivers followed suit and we all huddled in the limited shade near grid.


We finally got the go ahead, hopped in our cars, and went out on track at 8:26 am, with the sun beating down. Ambient temps showed to be 76°F when we headed out but the humidity was near 100%, so it was "unpleasant". Again, due to a forecast of high 90s later in the day and not having another session for SIX HOURS, this first session was the only one that would matter for good lap times.


I stacked up the the group while we made a brisk 50-60 mph average out lap, as instructed. It takes a while to get all of these cars out of grid but I had everyone bunched up nicely...

cota-track-map-L.jpg


Except for one goofball - who had left grid to "go get gas", wondered back over after we had left, and didn't go out on track for 5+ minutes after we left. Why grid let him out on track so late is a question I asked the grid workers later, with an elevated emphasis... And why he drove SO SLOWLY on his very late to start out lap, I also asked directly, with elevated emphasis...


Finally got the out lap done, and at T19 I turned on the speed, setting up for a fast hot Lap 1. Huge gap opened up behind me, which was fine. But as you can see in the video above, by T6 I had caught the "late to leave grid" goofball, who was on a leisurely 40mph pace lap without a care in the world. And of course he wasn't paying any attention to his mirrors, and didn't see me until I was already having to shut down my lap and riding his bumper. Of course I am fuming about losing this first hot lap for no good reason. I finally got around him at T9, but I had lost so much time that I had to back off and "reset", manage tire temps and the gap behind, and get ready for Hot Lap 2. There were waving black flags for some reason on the back straight anyway, but nothing came of that.

The same guy proceeded on his 40 mph pace for "his" whole out lap, which was smack dab in the middle of everyone else's hot lap 1 - making the entire field behind me pass him, one at a time. Complete and total newbie move. So lap 1 all got to be the "train" passing the moving apex, that you always try to avoid in Time Trial. Everyone was super pissed at this guy, who just simply could not get his brain in gear (he ended up with a 2:55 best lap time of the weekend - about 15 seconds slower than Spec Miata).

continued from above

So on this aborted first Hot lap I reset, left a huge gap behind, and drove tamely until T19, then went green again looking for a good Hot Lap 2. I come around T20, good blast down the front straight, then I start seeing black flags and then waving yellows from T4 on. Turns out another competitor had spun coming out of the slowest turn of the track (T12) on the first hot lap. Backed it into a wall. Top speed through this turn is literally 45 mph, folks. (facepalm) Since he didn't have tow hooks installed (they were in his trunk!) the track crew had to spend half an hour extracting him from the wall and towing him back on a roll back truck, so the session was shut down midway through the second lap. And that was that. My only chance of the day to get a clear track with favorable conditions was up in smoke. Bonus: the timers never even worked, so nobody got any times whatsoever.


After hanging around for SIX HOURS I finally went out again in the 2nd TT session at 2:30 pm, but by then it was 92°F degrees outside and the track surface was boiling. And for for some reason they had shuffled the grid, and dropped me down to P2, even though there were no times were in the first TT session. I had some quick guys all around me, but they weren't the typical "my fastest lap is on lap 1" hard core TT folks, you know? I feared early traffic, and my fears were well founded.

catching-relle-1-S.jpg
catching-relle-2-S.jpg


On the out lap I built a 200 yard gap ahead to the Corvette (Relle, super nice guy, and pretty quick), then I went green at T19, but he he waited until T20 to go, and I got uncomfortably close to him right before the Start/Finish on the first lap. Luckily he has a lot more power and pulled out a bit on the front straight (C6 Z06), but then I caught him in the esses on lap 1 (below).

continued below
 

Latest posts

Support us!

Support Us - Become A Supporting Member Today!

Click Here For Details

Sponsor Links

Banner image
Back
Top