Great Write up Dave , outstanding job , very clean.
When are you going to turn up the power and get to the track.
Pete
about 2 weeks and I'm getting it tuned...
Great Write up Dave , outstanding job , very clean.
When are you going to turn up the power and get to the track.
Pete
Awesome write up Dave!!! That car looks amazing...Can't wait to see what times it puts down...

well i am here to give some further info from teh outstanding job GI Joe has given. I did the tranny swap and while i am still working thru the electrical at the moment all the hardware stuff is done. I want to update this post while it is fresh.
COOLER LINES=The side of the tranny where the cooler lines hook up are indead 1/4 nipple and i did the conversion to -8AN ..The stock cooler lines on my 05 were formed aluminum links until even with the engine and then it went to a rubber hose. So i just made a tube and used two clamps per line to connect so i could use the factory cooler. i will probably be looking to change out to a aftermarket cooler since i have a non lock up setup
SHIFTER INSTALL= there are 4 bolt holding in the factory shifter and once removed it comes out easy after all the lines under the car have been removed. I made a plate the same pattern as the factory shifter and layed it in place. I went with a different shifter tha GI Joe used. I used a Pro shifter and it fits perfectly in the opening left by the factory shifter. I did not have to mod my front cup holder. I mounted it to my plate i had just made. When i placed the plate and shifter back in to see it mocked up the back bolts on the shifter rested on the floorboard and the plate did not sit flat. i decided to bolt it in without modding the floorboard since the only effect it has it tilted the shifter more forward and i do not see any ill effects of this. i bolted it down tight and tested it to see if it seemed stable and it was fine. once the car was back in the air i siliconed the gap from underneath so i would not have any "squirrels" either.
SCT CHANGES= Well my car also started off as an automatic and now it is converted. The computer doesnt have a clue what to do and if i hit the throttle it goes into protection mode or when downshifting it just turned the car off. I called SCT for the setting to disable the auto controls and here are the settings. Keep in mind these are done in the tune by your tuner. NOT A SETTING YOU CAN DO WITH YOUR TUNER IN THE FRONT YARD.
the setting i was told didnt work...once i figure out the setting i will update this post...car would not idle
I have the new tune on my SCT and will be loading it up in a couple of hours and will update the post to see if this fixes the issues i am having.
TRANNY FLUID= with a 9" converter and larger pan it took 11 qts of tranny fluid to be full.
DRIVE SHAFT= I had to shorten my driveshaft 2 inches and change out the rear flange/yoke to a 03/04 mustang one. It cost me $100 to do the shortening including balancing.
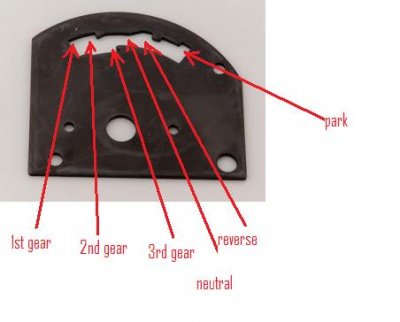
PICKING A SHIFTER=Before going out and buying a shifter make sure you know how the tranny shifts. i bought a shifter which shifted the following
p
r
n
1
2
3
and my tranny actually
p
r
n
3
2
1
this difference cost me a couple more dollars and 3 day delay so the moral of the story is know what you are getting so ya can get it done right away.
I will update as I remember what i did to make it happen.
The shifter was not mounted properly...I do not know anything about the 3 clicks..the shop had the converter install by the time i showed up.
shifter update...well GI Joe and I went two dif directions on shifters. I have no idea which is better I am just going to say what problems i ran into. Here is a pic of the shifter i went with. I am told it is a pro shifter. The black plate is a shifter plate. it controls were you stop for your dif gears.
positive= after making floor plate for shifter it fits in the opening of the factory shifter. Drilled one hole for shifter cable and wala shifter is up and running
Negative= when in the further most lower gear(ie 1st or 3rd depending on tranny) it is right up against the center console without the boot. I can shift just fine if i leave the boot, leather, and mounting base off. I have not figure out how to adjust for this so i do not have to see the shift stuff
When you guys say you should hear three clicks when installing the converter, I'm not sure what you mean. Can you elaborate on that? I have no experience with autos.
What is the result of a bad install ?If you have a lockup converter, then on all ford trannys 5r55 included, when you install the converter, you slip it onto the slined shaft...then rotate it and it will go on a little further, then again and again. As the seperate splined shafts align with the clutch plates and all inside the converter you will get 3 distinct movements ( slipped on a little further) of the converter. If you only get 2 its not on all the way....many have made this mistake...not a good mistake to make..
You will leave the converter 1/4" to 3/16" too far forward. It will still install but when you tighten the housing bolts it will often break the pump by forcing it rearward.What is the result of a bad install ?
(only two clicks)
Thanks Dave !You will leave the converter 1/4" to 3/16" too far forward. It will still install but when you tighten the housing bolts it will often break the pump by forcing it rearward.
If you ever notice when installing an auto on a ford, after its in place ( grounded home all 3 clicks) when you then mount it to the housing and then go to put the converter bolts on you have to start the bolts and it pulls the converter forward 1/4" as you tighten.
The best way to ensure success is before installing the converter, look inside the hub and make sure the final ( furthest away) disk is aligned. If its off to the side get a long tool and slide it in place. ( its like aligning 3 plates with holes in the center of them) That will ensure when the converter goes on it will seat properly.
You will know its not seated if you put the tranny in, and tighten it up and the bellhousing will pull to within 1/4" to 3/16" of the block and will stop and will not go up flush. You might confuse this with dowel pins hanging up. I always make sure they are cleaned and greased so it slips right on and if there is a problem with the converter it will be more appearant.
Thanks Dave !
Ok well I am thinking about coverting from the 5R55S to the 4R70W (if you can) can you please list the specific parts I need to do so? (going for Lentech Built 4R70W)
****oh wait I found an article from FB Performance****
http://www.fbperformance.com/page.asp?get=40&t=NoP
As a point of reference....is that Circle D out of Houston?