Foxbody

07gts197

forum member
Joined
Feb 5, 2015
Posts
1,171
Reaction score
124
Location
Naples, Fl
I have a pro 5.0 shifter with a steeda tri ax handle and its perfect. You don’t have to reach so far to get to it like the stock pro 5.0 handle.

I used to really like leather but its so much work to maintain in Florida. And when they sit in the sun you can get burned by sitting on them lol. I prefer cloth now.


Sent from my iPhone using Tapatalk
 

tjm73

of Omicron Persei 8
S197 Team Member
Joined
Jun 9, 2010
Posts
12,092
Reaction score
1,638
Location
Rush, NY
Florida?!?! Hell with the top down in Western NY on a sunny day black leather seats damn near burned you if you weren't careful. I drove many days leaning slightly forward to let air blow in behind my back until the seats cooled off enough to lean back. That car made me hate leather in the summer. LOL!!
 

Dino Dino Bambino

I have a red car
Joined
Aug 11, 2014
Posts
3,908
Reaction score
1,776
Location
Cyprus
My old '95 GT had leather seats and in the summer months, I used to place a bath towel over the driver's seat so I could sit in it without burning my ass or sweating like a pig.
I was determined never to get a car with leather seats ever again, and my '06 GT ticked all of the boxes.
 

golkhl

forum member
Joined
Feb 12, 2010
Posts
4,376
Reaction score
2,741
Location
Las Vegas, NV
That hand looks painful! But that black dash looks good! Good call on the heater core, your old one was roached.
 

tjm73

of Omicron Persei 8
S197 Team Member
Joined
Jun 9, 2010
Posts
12,092
Reaction score
1,638
Location
Rush, NY
That hand looks painful! But that black dash looks good! Good call on the heater core, your old one was roached.

It actually didn't really hurt much. It was definitely weird to have virtually no control over my hand folding up. LOL

In other news I ordered a complete seat upholstery set last night to redo my seats to match my new interior.
 
Last edited:

tjm73

of Omicron Persei 8
S197 Team Member
Joined
Jun 9, 2010
Posts
12,092
Reaction score
1,638
Location
Rush, NY
Another Update!!

So a slow week for projects on the Foxbody. I got some supplies but time and old broken things worked against me today.

I started out ready to fix my fog light wiring and button up the dash. But while starting to sort out the wiring, I found the headlight switch plug was also bad and wires were not staying it. Hindsight being what it is I should have checked it. Oh well. Guess I'll order up another pigtail.
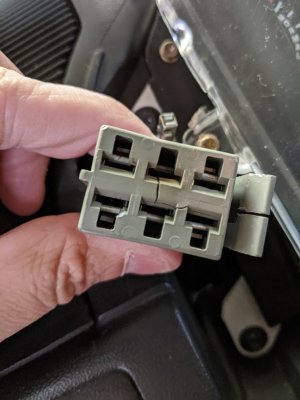
Plug.jpg

I said "I can't give up the whole day. I gotta get something done!" So I set out to put my new Anderson Ford Motorsport PowerPipe in. We let me tell you that turned into a pretty long project that I thought wouldn't take long at all.

Let's take a second and set this up from the beginning. I bought this PowerPipe knowing that my 76mm MAF might not fit. I rolled the dice figuring I could stretch the junctions. Well, the MAF didn't fit. Not only that, but the elbow into the throttle body was not even close to fitting onto the throttle body. By not even close, I mean it was a full 1/4" too small. I measure both and luckily they were a nice 3.25" outer diameter. I Amazon-ed a 90" silicone elbow for $10 bucks and when it arrived fit perfect over the MAF and the TB. Ahead of the MAF the rest of the pipe and couplers were good for fitment.

So I was sure I was good to go. I'd throw this puppy in and be done in like an hour or two. HAHAHA!!! Silly me. It ended up being almost a 4 hour job.

First I decided to check the hole to make sure the pipe would fit at all because looking at it and the pipe I wasn't so sure. But it fit. Phew!
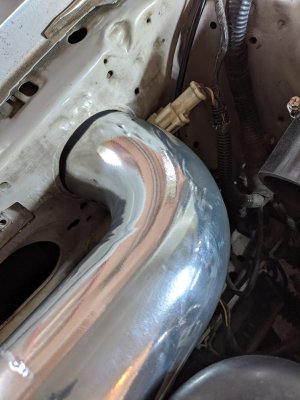
Pipe Test.jpg

So next I fought with the stupid gasket material they supplied to protect the pipe from the edge of the hole in the fender apron. After about 20 minutes I got it in all nice and professional looking. Then I went to put the pipe in. DENIED! It didn't fit. I had read it would be a hard install, but there was no way. It just was not gonna go in. All the lube on all the porn sets in So Cal wouldn't get that thing in the hole.
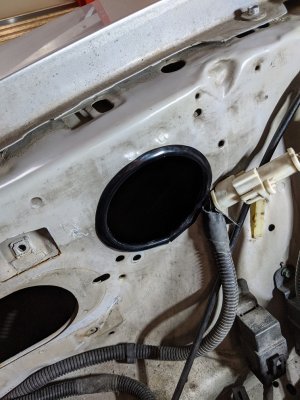
Gasket in Hole.jpg

So I broke out my calipers to see what I was actually faced with. Yup. The hole, as it was supposed to be prepped, was almost a 1/4" too small for the pipe. In fact the hole was the same size almost exactly as the inside diameter of the pipe to go it it. Shit. I went to the local hardware store and bought some tubing that was thinner wall than what was provided. I cut it, split it and put on the apron. Then I tried the pipe again. That worked like a charm. It went in. But I had to drop the alternator out of the way and unhook the upper radiator hose.
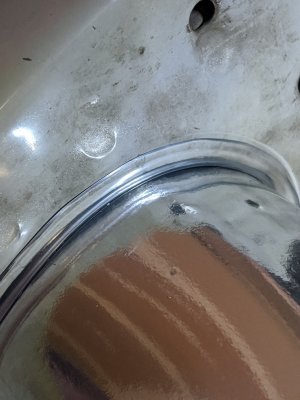
Pipe in with gasket.jpg

It was about at this time that I turned around to find my 8 year old daughter walking over to me with a hardhat on asking to help. I almost sent her away as there really wasn't much she could do, but then I thought when will I get this from her again? I'm in no hurry. So I told her she can help by getting tools and helping hold things. She got me ratchets and sockets and wrenches. She held the trouble light so I could see. She asked questions. She was my third hand. She was actually a big help. I was proud of her. I was only able to grab one pic of her helping retrieve a nut I dropped. It's the little things that can mean the most.
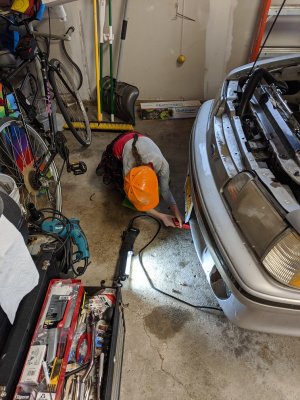
Alayna Helping.jpg

After all was said and done I was looking at this. But the silicone elbow was real close to the camber plate. Like less than a 1/16" clearance. I pulled it off and cut about a 1/4" off the elbow and gained a good enough amount of clearance.
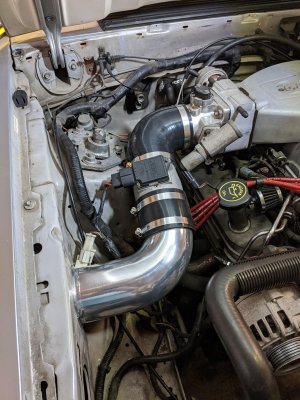
Intake.jpg

It was getting late so tomorrow I'll put the air filter on. It's a monster.
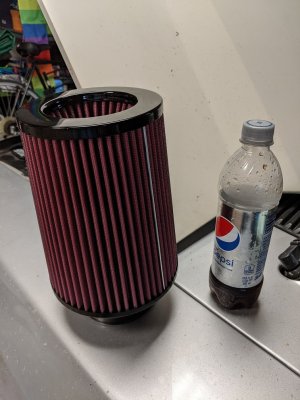
Filter.jpg

That's it for today.
 
Last edited:

tjm73

of Omicron Persei 8
S197 Team Member
Joined
Jun 9, 2010
Posts
12,092
Reaction score
1,638
Location
Rush, NY
Future update preview......

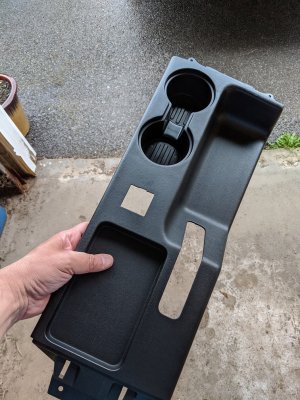
Modern console update. This will be WAY more useful than an ashtray since I've never smoked even one puff.

IMG_20200430_172147.jpg

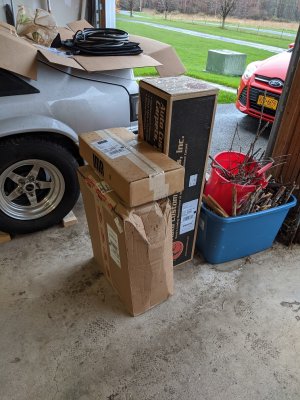
Upholstery to finish off the seats and hatch area.

IMG_20200430_163142.jpg
 
Last edited:

tjm73

of Omicron Persei 8
S197 Team Member
Joined
Jun 9, 2010
Posts
12,092
Reaction score
1,638
Location
Rush, NY
I have a pro 5.0 shifter with a steeda tri ax handle and its perfect. You don’t have to reach so far to get to it like the stock pro 5.0 handle.

I've long arms so I'm hoping the reach to the shifter is a little long.
 

07gts197

forum member
Joined
Feb 5, 2015
Posts
1,171
Reaction score
124
Location
Naples, Fl
I originally had the stock pro 5.0 shifter and it was far but not too bad. The tri ax handle was a good addition putting the shifter in a more comfortable location.


Sent from my iPhone using Tapatalk
 

Juice

forum member
Joined
Aug 24, 2017
Posts
4,622
Reaction score
1,905
Nice work there!
I run a pro 5.0 shifter, with the handle that comes with it. Love that shifter. When I was picking up mine from the bodyshop after the cobra clone work, body shop owner asked: How do you drive that thing with that shifter?? lol
For the power pipe I used wiring loom, the 1/4" or maybe 3/8". I have the UPR power pipe, plastic.
 

tjm73

of Omicron Persei 8
S197 Team Member
Joined
Jun 9, 2010
Posts
12,092
Reaction score
1,638
Location
Rush, NY
Thanks.

I've been doing some more work and should have another update soon. I'm back to work now, so updates will be even sloooooowwwwwwwwwerrrrrrrrrrr...........
 

tjm73

of Omicron Persei 8
S197 Team Member
Joined
Jun 9, 2010
Posts
12,092
Reaction score
1,638
Location
Rush, NY
I've been very slowly finishing the work on the interior. Almost done with it now. Should have a new update soon.
 

Juice

forum member
Joined
Aug 24, 2017
Posts
4,622
Reaction score
1,905
Did you get the casette holder delete or installl a tape deck? lol j/k. That console/armrest/casette holder weighs a ton.
 

tjm73

of Omicron Persei 8
S197 Team Member
Joined
Jun 9, 2010
Posts
12,092
Reaction score
1,638
Location
Rush, NY
I hate that arm rest in these cars. I got the delete piece for the car this interior came out of years ago. I have kind of long arms and every Foxbody I've driven with them I hit my elbow on the damn thing. The '90 I had when I was much younger had the delete too. MUCH better.

But I currently have a gaping hole where the radio goes. I migh tput a media head unit in it. I despise terrestrial radio. It's Sirius/XM or Pandora or my old iPod or just listen to the exhaust. I don't even want to have a CD player.
 

Juice

forum member
Joined
Aug 24, 2017
Posts
4,622
Reaction score
1,905
Ahh the memories of smashing my elbow shifting lol.
Im with you on radio. I deleted my antenna mast years ago in the 07. All the radio is there for is the amp and aux input. I stream internet radio 99% of the time. I got the radio delete and antenna deletes for my 91.
 

tjm73

of Omicron Persei 8
S197 Team Member
Joined
Jun 9, 2010
Posts
12,092
Reaction score
1,638
Location
Rush, NY
Update time! Not a lot of pictures for this one, but a few. When I last posted an update I had finished the CAI install and was headed into the interior.

I ordered a fog light harness repair pigtail for the broken fog light switch plug and after it arrived I realized I also had to get a headlight switch. So I had to order it and wait for it to also arrive. In the mean time I started to redo the upholstery.

I began by re-covering the rear seats. Surprisingly this part of the task was fairly easy and I got decent results. One thing I didn't like about the upholstery was the seating surface fabric. I found it to be akin to a cheap, coarse Cordura gym bag. But I had spent the money and plowed ahead. When I removed the ill fitting back seat bottom I found a nice big mouse nest. God damn vermin! I shop vac'd that shit up and moved on.

I accidentally separated the seat foam from one of the seat backs and had to figure out how to reattach it. Once I did that I was back on the game and had the rear seats mostly done in little more than a day.

Another thing I found that I didn't like while recovering the rear seat bottom was there was no instruction on how to put the seat belts through the seat bottom like factory. I looked online and many people just fed them up between the seat bottom and seat backs. I was having none of that BS. I studied the seat belt hole trim and decided I could get them apart if I was careful.

On the black interior seat bottom I was able to get one of the trims off without much of a fight and got a little cocky thinking this would be easy. The second one reintroduced me to reality when it broke while I was trying to get it apart. Well shit! Nobody repops these things. Nobody sells the damn things. What do I do now? I pulled the grey seat bottom out and was able to remove both of the trims from the seat without breaking them. I guess I could paint them black but the hard seat belt sheath would certainly rub the paint off eventually and repainting them again would be a royal pain in the ass. I decided to scour eBay and got lucky finding a pair of trims that were already black. I bought them for $25 bucks shipped.

When they arrived I carefully removed them from the scraps of leather seat they were cut out of. Once out I washed them with dish soap and compared them to what I had. They were different. Same basic design, but the trim was smaller as was the hole for the seat belt buckle to pass through. I decided to return to this small issue later.

I shifted gears to the front seats. I spent 4 hours just dismantling the front driver seat and removing the upholstery. Once I had the seat base de-upholstered I found a huge foam void on the side bolster and a big split in the seat bottom foam. I couldn't bring myself to put the covers on this without repairing the foam. I could try to glue the bottom but I need foam to fill the void. And not just any foam. It would need to be the same density as the existing foam. I decided to just replace the seat foam for both front seats. Well that was the plan anyway.....

Upon looking the replacement foam up I was floored when the cost of just the foam was $170 each! For fucking foam? Are they smoking the ganja mon? FUCK that. I looked at replacement seats from Corbeau and decided to eat the $400 upholstery kit and order new from seats and another rear seat upholstery kit to match the brand new front seats. I should have done that in the beginning. Guess I can chalk that up to a lesson learned.

When I ordered the seats I was told they were on back order till late June. Of course they are! I want to drive this damn car, so I completed the order and decided to jam the back seat in as is for now and install the other black seats till the ones arrive. It's all black so it's good enough for now.

Black seats matter. Too soon?

Anyway, my other pigtail had arrived so I switched gears and went to work on that. I was lamenting cutting and soldering all the connections (10 in total) when a member on another Mustang forum advised me to just de-pin the bad plug and re-pin to the new plug. Well that saved me a huge headache and was easy as pie. I made sure to label the wires and the matching location on the plug so I got them back in the correct hole.

While doing this I discovered the wires were not long enough the allow me to connect the plugs to the switches and install the dash pod. I was again thinking I would have to cut and extend the wires. Wanting to avoid this I began searching for other options and discovered I had laid the harness in the new dash in slightly the wrong place. I worked the effected wires loose and rerouted them and got back all the wire length I needed and was able to reconnect and install the dash pod. HAZZAH!!!

Once that was complete, got to work on putting the front seats back in for now. Even this didn't go smoothly. And it was due to my own screw up as usual. I had the seat tracks off and put them back on, but once the driver seat was in it didn't work right. Pull it back out. Figure out what was wrong. Fix it. Luckily it was an easy fix. Put it back in the car. Pull it back out and bend the seat brackets back to straight. Then finally put the driver seat in and bolt it down. Having learned several lessons from that fiasco I did and checked a few things on the passenger seat before putting it in the car and it went much, much smoother taking less than half as long to get done.

I'd say the interior is getting close to being truly done but there is still more to get buttoned up and the new seats are still coming later this month. I'll ad some pictures to this post tomorrow.
 

tjm73

of Omicron Persei 8
S197 Team Member
Joined
Jun 9, 2010
Posts
12,092
Reaction score
1,638
Location
Rush, NY
Update Part 2:

So several days have past when I did all this monkey humping a football shit. I was getting anxious to start this car up again and make a run around the block, but wanted to check a thing or two. So I started making a checklist and the next thing I know I have about a dozen things to do first. Checklists are frustrating and good at the same time. it's a list of what you failed to get done but it gives you a goal to work toward.

So, number one, I put a new heater core in and then found out that the hose feeding the core should have a restrictor in it. And of course it doesn't. So I ordered one. Now I'm not going to buy a new restrictor and put it in an old hose, so I also bought a pair of new hoses. Hoses are cheap. No reason not to put new ones in. Tonight I put them on. It took 2.5 hours put those GD hoses on. Good thing I don't make my living doing this kind of work. In the process I also figured out one of the previous owners installed the heater hoses that were on the car wrong. They were in-flow hooked to the out-flow and vice versa. Well only a Ford engineer would create the criss crossed bullshit setup these cars have for something so simple. Had teh hoses on and off half dozen times till it was done.

Once that was done I could move on to my next pet project. I had this hole in the apron that was once occupied by the air box. Now it was just a gaping hole to let turbulent air into the CAI air filter. That would not do. I looked at it and said I can make a filler panel.

I took a cereal box from the recycling bin and cut it up until it fit nice and covered the hole. Then I ran to Tractor Supply and bought a small sheet of aluminum since it's nice and easy to work with. I transferred the cardboard template over to the aluminum and got to making a jagged shaped shiv panel. Drilled a few holes. I held it in place and yeah, this should do the trick! I'll take it to work tomorrow and use a few tools to smooth the edges and then I can bend and paint and install this shield.

Once it's installed I can put in my coolant bottle and top off the coolant. Oh and I have about a cup of antifreeze to clean up under the car from the heater hose replacement. Clay cat litter handles that kind of work nicely.

Once that is done I can check my tire pressures, lug nuts, install the battery hold down, connect the battery and then it's time to make some noise again.

I'll come back tomorrow and add some pics to this post too.
 
Last edited:

tjm73

of Omicron Persei 8
S197 Team Member
Joined
Jun 9, 2010
Posts
12,092
Reaction score
1,638
Location
Rush, NY
Being back to work has gotten in the way of my car fixin' time!
 

Latest posts

Support us!

Support Us - Become A Supporting Member Today!

Click Here For Details

Sponsor Links

Banner image
Back
Top