Planning a Ford Racing “Aluminator” Build with associated mods over the winter

Scott

Senior Member
Joined
Nov 17, 2009
Posts
2,337
Reaction score
44
Location
King City, Ontario, Canada
Was not happy with the NAPA hoses I had to go from the Meziere out to the AFCO. I thought the bends would be to tight using these hoses.
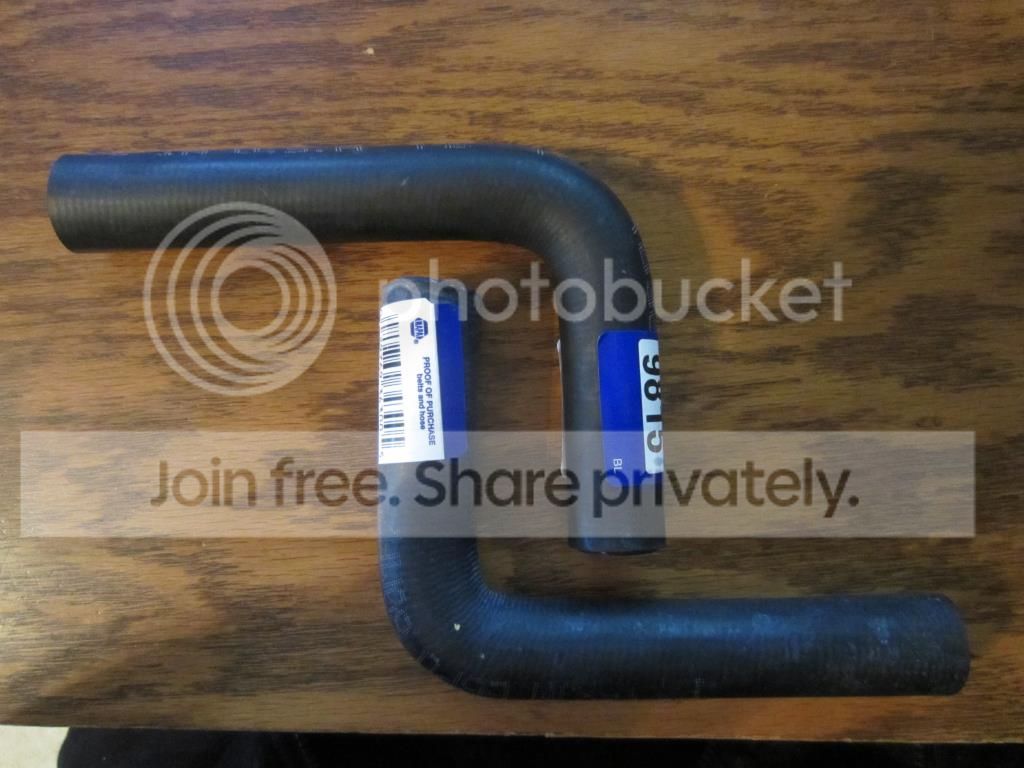


But could not locate any hoses that appeared better so I went ahead and cut the hoses down to take a look see. Turned out not to be as tight a radius as I was expecting.


Scott

Senior Member
Joined
Nov 17, 2009
Posts
2,337
Reaction score
44
Location
King City, Ontario, Canada
Finished Wiring the Halo Fogs and Headlights

Spliced and soldered the passenger side Halo Fog wires and Halo Headlight wires together using blue male 16-14 AWG connectors and applied double wall shrink tubing. It was necessary to ream the connectors a smidgen with a drill bit in order to push the wires through.


Passenger side wiring – red wire from Halo light to brown wire from parking light and black wire from Halo lights to black wire from parking light. Used red 22-18 AWG wire taps on the parking light wires.


A little electrical tape and ¼” wire warp and we are good to go.


Prepared the driver’s side Halo Fog and Halo Headlight wires in the same fashion as the passenger side.


Driver’s side wiring - red wire from Halo lights to white/red wire from parking light and black wire from Halo light to black wire from parking light.


And some wire wrap and electrical tape on the driver side.


Testing the Halos battery reconnected and parking lights turned on.


Headlights turned on.

 
Last edited:

ILW84U

Senior Member
Joined
Apr 14, 2007
Posts
1,182
Reaction score
57
Location
Edmonton, Alberta
Looks good Scott. You are being so meticulous with this build I can't believe you used wire taps for the lights. :shock:
 

Scott

Senior Member
Joined
Nov 17, 2009
Posts
2,337
Reaction score
44
Location
King City, Ontario, Canada
Thanks Rick!

Though using a tap and connector would be the quickest way to remove the headlights if it was ever necessary. The harness for the Fog Halos already have connectors in the grille area.
 

Scott

Senior Member
Joined
Nov 17, 2009
Posts
2,337
Reaction score
44
Location
King City, Ontario, Canada
FC2 Controller Install

Since the plan was to install a Fore Innovations FC2 controller behind the second VIAIR compressor I thought it would be a good idea to install the FC2 and wiring before the compressor is in the way.

I used 8 AWG wire for the power and ground and 10 AWG for the pumps. Justin Fore suggested 10 AWG was overkill (12 AWG would be fine) for Walbro GS342 pumps but I needed to buy wire and the 10 AWG was on sale for cheaper than the 12 AWG. I also picked up a pair of Weather Pack connectors for the pumps.

Controller mounted, battery, remote, ground and pump wires installed. The battery wire was routed to the trunk battery box. There is a 50 amp fuse on the positive battery wire. The ground wire was routed to the factory ground location on the driver’s side back panel. The 14 AWG remote wire is tapped into the white wire in the OEM harness side of the FPDM connector. The set screws on the FC2 Controller are 2.5mm.

FC2 and wiring


The two pump harnesses (top) running to under the back seat were attached to the OEM harness (middle). Once the return style system is up and running I will remove the GT500 harness (bottom).


Scott

Senior Member
Joined
Nov 17, 2009
Posts
2,337
Reaction score
44
Location
King City, Ontario, Canada
Need to finish up a few odds and ends to get the bumper cover back on in preparation for getting the car back on its wheels for the first time with the Air Lift suspension.

Way back in reply numbers 300 and 342 I started the install of the Raxiom Halo Fog lights. Pretty much did everything but install the ballast boxes for the fogs. The reason I didn’t install the ballast boxes before was because I could not find a location that I liked. Well too bad, got to get on with the job. So I picked the front frame rails. Installed some ¼” split loom on the wires, washed the spots, wiped the spots with alcohol and stuck the ballasts on. Not pretty but done!

Driver side.


Passenger side stuck on just above and in front of the windshield washer reservoir.


Scott

Senior Member
Joined
Nov 17, 2009
Posts
2,337
Reaction score
44
Location
King City, Ontario, Canada
Ran into a small “opportunity” today while trying to put the bumper cover on. My car has an Agent 47 brake cooling kit and with the new AFCO HE the bumper air intake on the passenger side interferes with the coolant hose from the Meziere pump to the AFCO. I knew I was not going to be able to use the ducting to the brakes but I was not expecting the small air intake scoop in the bumper cover to be in the way. Have not decided yet whether to take a grinder to the scoop or come up with some way of reworking the hose. Frankly I am leaning towards cutting the scoop since it really will be non functional without the ducting to the brakes.

From the back.


From the front looking into the air intake.


AnotherS197GT

Serial Valve Dropper
Joined
May 4, 2011
Posts
5,981
Reaction score
33
Location
USA
Why not rework the plumbing for your H/E? Move it closer towards the pump and farther from the H/E?
 

crownaviation

http://www.tudyno.com/
Joined
Oct 15, 2011
Posts
3,805
Reaction score
3
Location
Broke dafuk down
Why not rework the plumbing for your H/E? Move it closer towards the pump and farther from the H/E?

Cause I bet he would like to drive the car before hell freezes over again! lol. Scott you have the same disease I have but at least I get 4-5 months I can drive the car every year (if I stop taking it apart that is..)
 

Scott

Senior Member
Joined
Nov 17, 2009
Posts
2,337
Reaction score
44
Location
King City, Ontario, Canada
Why not rework the plumbing for your H/E? Move it closer towards the pump and farther from the H/E?

Dylan, that would be the best solution if I can get it to work. What you can't see is that the top piece of the bumper cover that attaches to the radiator support is raised about 3/8" so when it drops down to sit properly the hose will be another 3/8" higher.

Cause I bet he would like to drive the car before hell freezes over again! lol. Scott you have the same disease I have but at least I get 4-5 months I can drive the car every year (if I stop taking it apart that is..)

Right on, you will recall last year I missed most of the summer! My car is still on the break-in tune. Was hoping to get it out as soon as all the snow is melted and the rain washes the salt of the roads. Actually, I just want to get it back on the ground so I can see what it looks like with 0 air in the bags and struts!!!! lol
 
Last edited:

Scott

Senior Member
Joined
Nov 17, 2009
Posts
2,337
Reaction score
44
Location
King City, Ontario, Canada
Family had a birthday lunch for my son-in-law today, but I got out to the garage for a bit. Looked at the hose routing from the Meziere to the HE again and took a small notch out of the bottom about ¼” wide and a smidgen of the passenger side bottom edge of the cooling scoop and now the bumper cover hits fine. Bumper cover is back on, signal and parking, light bulbs back in and the inner fender panels installed already for the front wheels to go back on.
 
Last edited:

skwerl

tree hugger
Joined
Aug 6, 2011
Posts
16,348
Reaction score
1,333
Location
central Florida
Good deal, Scott. But it sounds like your condition has worsened and is now in the advanced stages. :roflmao:
 

crownaviation

http://www.tudyno.com/
Joined
Oct 15, 2011
Posts
3,805
Reaction score
3
Location
Broke dafuk down
• Ford OEM 2 Valve Steel Bodied Tensioners, F6AZ-6L266-DA Right Hand and F6AZ-6L266-CA Left Hand - Inventory
• Ford OEM Timing Cover Gaskets, 4R3Z-6020-BE, 4R3Z-6020-DB, 4R3Z-6020-EB - Inventory
• ATI, Super Damper Serpentine Series, 918039 – On Order
• ARP Harmonic Damper Bolt, 156-2501 – Inventory
• Ford OEM Crankshaft Key, FLAZ-6B316-AA – Inventory
• Ford OEM Front Oil Seal, XW4Z-6700-AA - Inventory


While securing the rear of the Crankshaft from movement the ARP Bolt part number 206-1001 was tightened to 100 ft-lbs using a 19mm 12 point socket.

Ordered the one on your list page 1 post 1 which I think is going to be too short (stock length).

You made reference to it later on post 125 and pretty sure that is the correct part number which I will order but want to verify.

I had to give up my IW 10% OD balancer with my new setup which requires the ATI...

Edit.. Appears the 206-1001 in post 125 is the correct fastener
 
Last edited:

Timmbo

Senior Member
Joined
Jan 17, 2011
Posts
2,067
Reaction score
0
Location
TN
Just hate getting teased! Don't leave us hanging lol.
 

Latest posts

Support us!

Support Us - Become A Supporting Member Today!

Click Here For Details

Back
Top