
Planning a Ford Racing “Aluminator” Build with associated mods over the winter

05stroker

Never enough power guy!
Joined
Mar 2, 2008
Posts
13,089
Reaction score
100
Location
Bullard Tx.
I don't recall needing to swap my pinion flange when I went from the stock 2 pc shaft to the Axle Exchange 1 pc.
 

Scott

Senior Member
Joined
Nov 17, 2009
Posts
2,337
Reaction score
44
Location
King City, Ontario, Canada
I don't recall needing to swap my pinion flange when I went from the stock 2 pc shaft to the Axle Exchange 1 pc.

Put my driveshaft in April 2010, then they provided a new pinion flange. I believe they used a 1350 series flange yoke. My car is an auto not sure if that made a difference. Now I understand they have an adapter that bolts directly to the current pinion flange. This is a current pic of the flange installed in 2010.


The original pinion flange for the OEM 2 piece looks like this.


05stroker

Never enough power guy!
Joined
Mar 2, 2008
Posts
13,089
Reaction score
100
Location
Bullard Tx.
Put my driveshaft in April 2010, then they provided a new pinion flange. I believe they used a 1350 series flange yoke. My car is an auto not sure if that made a difference. Now I understand they have an adapter that bolts directly to the current pinion flange. This is a current pic of the flange installed in 2010.


The original pinion flange for the OEM 2 piece looks like this.

Maybe I had the adapter setup, I don't recall. The one you have now looks like the one I am using currently with my custom DS.
 

Scott

Senior Member
Joined
Nov 17, 2009
Posts
2,337
Reaction score
44
Location
King City, Ontario, Canada
Inner Pinion Bearing Dilemma Finally Resolved!

Inner pinion bearing from the Ford Racing M-4210-B1 kit too small in the DR3Z-4010-A axle housing.


Timken M802048 also too small in the DR3Z-4010-A axle housing.


Ford 6L2Z-4625-AB is a perfect fit in the in the DR3Z-4010-A axle housing. From what I can see on the bearing the KOYO part number is KYO4190LFT (this is NOT confirmed).


Scott

Senior Member
Joined
Nov 17, 2009
Posts
2,337
Reaction score
44
Location
King City, Ontario, Canada
MAF Breakout Harness with IAT Connection

One of the other mods planned for this winter is to relocate the IAT Sensor from the MAF location to an intake runner. To work with the MAF location in my Vortech Supercharger install I modified a VMP Tuning MAF harness part number 05MAFWIAT by extending the MAF portion of the harness by 8”

VMP Harness


Extended Harness shown with 9C1Z-12A697-B (DY-1159) IAT Sensor.


Scott

Senior Member
Joined
Nov 17, 2009
Posts
2,337
Reaction score
44
Location
King City, Ontario, Canada
Housing Preparation for Gear Install

Started the preparation for the gear install today.

The new housing needed to be deburred. The next three pictures show the burrs left from the carrier cap machining.


Burrs were removed with a Dremel and 1” sanding disk.


Gasket mating surface has been cleaned up and cover bolt holes lightly touched up with ½” counter sink on a drill.


Scott

Senior Member
Joined
Nov 17, 2009
Posts
2,337
Reaction score
44
Location
King City, Ontario, Canada
Pinion Install

Applied a little gear lube to the outer pinion bearing and race and placed the bearing in the differential. Gear lube poured like Molasses in January, say what do you know it is January.


Placed the Oil Slinger on the bearing.


Added a thin layer of silicon seal to the outer edge of the Pinion Oil Seal.


And tapped the Oil Seal in pace with a Seal Driver and Rubber Mallet.


Since I am working with a new housing I am starting from scratch on the inner pinion shim thickness. I am starting with .030 shim. I took a new inner pinion bearing and made a slip on setup bearing out of it with a Dremel and 1-1/2” sanding wheel. In the final assembly I want to use a solid pinion spacer with appropriate shims rather than a crush sleeve so I assembled with a crush sleeve to be measured to determine the solid spacer and shims required.

Pinion ready for trial installation.


Pinion slipped in, pinion flange and nut installed and tightening the nut down. Once the nut was snugged up my goal was to measure the bearing preload frequently until I achieved 22 in-lbs. Recommended for new bearings is a preload of 16 – 28 in-lbs. Well my youngest daughter’s boyfriend gave a me a hand with the grunt work in tightening the nut and we went from 16 in-lbs to a whopping 32 in-lbs in the last tightening attempt. So much for measuring the crush sleeve as a reference and lucky I have a couple more crush sleeves to play with.


Used the scientific method for determining the thickness of shims required on the LH and RH sides of the carrier – ok this means I took a pile of shims that looked about right and split it in two then placed one pile on the LH and the other on the RH a few adjustments later of moving shims from one side to the other and I achieved a backlash of .009. (FRPP recommended is .008 to .012) I elected to stay at .009 as it will likely loosen somewhat.


Next up is checking the pattern.
 

Timmbo

Senior Member
Joined
Jan 17, 2011
Posts
2,067
Reaction score
0
Location
TN
Like a pro! Looking forward to seeing the tooth pattern.
 

Scott

Senior Member
Joined
Nov 17, 2009
Posts
2,337
Reaction score
44
Location
King City, Ontario, Canada
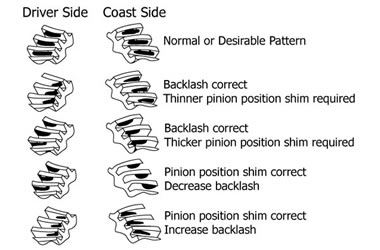
Tooth Pattern – Calling all 8.8 Experts!

First attempt with .030 shim under inner pinion bearing and a backlash of .009

EXPERTS – Do I need to increase or decrease the under pinion shim thickness?

Coast Pattern


Drive Pattern


Timmbo

Senior Member
Joined
Jan 17, 2011
Posts
2,067
Reaction score
0
Location
TN
Using a tooth contact pattern chart, what's your opinion on yours Scott?
 

Scott

Senior Member
Joined
Nov 17, 2009
Posts
2,337
Reaction score
44
Location
King City, Ontario, Canada
Using a tooth contact pattern chart, what's your opinion on yours Scott?

Tim I love it, answer a question with a question. Of course I was looking for others to express their opinion before I put a stake in the ground!

Well it looks to me that the pattern is too close to the "face" of the ring gear teeth which means the pinion is too far away from the ring gear and I need to decrease the under shim thickness. What do you say?
 

Timmbo

Senior Member
Joined
Jan 17, 2011
Posts
2,067
Reaction score
0
Location
TN
Yes I agree. Use a thinner pinion shim it looks like. This chart is pretty handy:

Slide-18.jpg
 

Timmbo

Senior Member
Joined
Jan 17, 2011
Posts
2,067
Reaction score
0
Location
TN
Scott I'd say you've got it about as good as it's gonna get!
 

07graygt

Member
Joined
Sep 3, 2012
Posts
606
Reaction score
0
You said you narrowed the rear 1". Will you still be using 15x10 race stars with stock backspace? I was thinking of going 1" but then I thought obout doing 2" so I could use a 6" back space. Have you test fitted to see if the 10" wide wheel would rub. Ideally I would like to narrow mine so I can lower the rear and not rub. Other wise I might just stick with a 275 on a 8" wheel. So many dang choice I can never make up my mind lol.
 

Scott

Senior Member
Joined
Nov 17, 2009
Posts
2,337
Reaction score
44
Location
King City, Ontario, Canada
You said you narrowed the rear 1". Will you still be using 15x10 race stars with stock backspace? I was thinking of going 1" but then I thought obout doing 2" so I could use a 6" back space. Have you test fitted to see if the 10" wide wheel would rub. Ideally I would like to narrow mine so I can lower the rear and not rub. Other wise I might just stick with a 275 on a 8" wheel. So many dang choice I can never make up my mind lol.

Frankly Drew, I am not sure it is going to fit. Race Star are 7.5" backspace. My objective was to tuck the 325/50/15's in enough to be able to air out the car. Should have enough clearance on the inside as I have already removed the jounce bumper mounts on the frame and made up plates to relocate the jounce bumpers inward to under the frame on the diff housing. If it doesn't work I am going to try 295/55/15s.

In looking at the housing you really can't go much more than an 1" without having to modify the shock mounting brackets on the diff.


07graygt

Member
Joined
Sep 3, 2012
Posts
606
Reaction score
0
Well I really hope it does work!! Thanks for doing the testing for me. It seems like I read somewhere that a guy took 2" of but from the looks from you pics I don't think it's possible. I'd be happy with a 295 though. I really like the way yours looks with the air ride too.
 

Support us!

Support Us - Become A Supporting Member Today!

Click Here For Details

Back
Top