What have you done to your mustang today?

Jwood562

Member
Joined
Dec 19, 2013
Posts
154
Reaction score
42
Yesterday, I finally found the exact replacement bolts for the ones that came with my Ford Racing/Performance driveshaft.
I've been searching for weeks, Googling, coming up with basically 2 options, factory bolts or Dorman.
The Ford Racing shaft comes with 6 new bolts, 2 black one size, and 4 Allen-head silver bolts, a different size.

Looking at some pics I had taken of the driveshaft before I installed it, I saw the Dana Spicer part number on it (who actually builds it for Ford), then Googled that, then searched on Dana's website and found the 2 part numbers that I was looking for, 128744 and 2021570.
The only place I could find the fkn things was on Summit's website, and the one I wanted 4 of was $8 each, lol.
Shipping and tax later, I'm at over $51 for 6 new bolts.
And why? Because I was an idiot when I installed it and didn't clean the threads in the rear flange before screwing in the new bolts, and I had a very hard time getting them in. Not sure they fully bottomed out, that they're fully tight.
So I'm gonna back them out, clean the threads, and replace them.

I just went through the same struggle! finding hardware for the rear of the one piece driveshaft. my search only ended up with the thread pitch and I could not find the length of the bolts. I only could find that the hex head bolts are a little longer than the socket cap bolts. luckily a search of this forum put me in touch with an awesome member @brasil who replaced his hardware. he gave me the length of the socket cap screws, I added a little length (pure guess) for the hex head screws and are confirmed the correct length by the part numbers listed above

I wasn't able to find the exact replacement parts, but I went with stronger versions of the OEM bolts. the hex cap bolt is 8.8 and my replacement is 10.9 strength and my socket cap screws are 12.9

only downside is i had to buy boxes of 10 of each style bolt, so i have extras. anyone need a set?
 
Last edited:

Gabe

Whippled Coyote
Joined
Aug 7, 2011
Posts
8,459
Reaction score
1,555
Location
NC
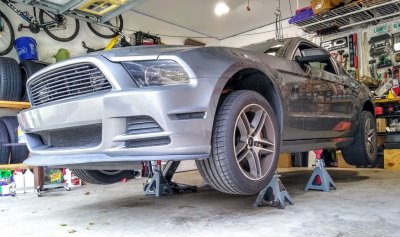
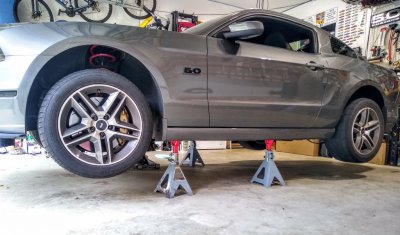
Mustang on stilts.
Love the Steeda jacking rails. Want a set for the wife's Shelby. They make lifting the car so much easier. One lift per side for each pair of jackstands.
This was because I wanted to replace the driveshaft rear bolts. They didn't go in right when I first installed them, so this time I took them out, cleaned the threads, and put new bolts in, at the right torque, "Gut-n-tight", a German torque rating that applies to everything :)

IMG_20230611_131737242_HDR~2.jpg

IMG_20230611_131807102_HDR~2.jpg
 

Mach2burnout

05 Redfire GT
Joined
May 16, 2011
Posts
4,799
Reaction score
901
Location
Central Louisiana
Mustang on stilts.
Love the Steeda jacking rails. Want a set for the wife's Shelby. They make lifting the car so much easier. One lift per side for each pair of jackstands.
This was because I wanted to replace the driveshaft rear bolts. They didn't go in right when I first installed them, so this time I took them out, cleaned the threads, and put new bolts in, at the right torque, "Gut-n-tight", a German torque rating that applies to everything :)

View attachment 87766

View attachment 87765

Been using those torque specs my whole life!


Sent from my iPhone using Tapatalk
 

GriffX

Member
Joined
Sep 28, 2017
Posts
523
Reaction score
175
My first serious girlfriend was German. According to her it meant something different. Close, but different.
Direct translation would be "gut und fest", it is a really old saying ;)
The more used saying for torquing is "nach fest kommt ab" (beyond tight comes loose, loose follows tight)
BTW, the cucumber at the Chrismas tree isn't German :)

PS: I remember a variation: "passt, sitzt, wackelt, hat Luft" (fits, fixed, wiggles, some space left) means, tight, but not too tight.
 
Last edited:

Mach2burnout

05 Redfire GT
Joined
May 16, 2011
Posts
4,799
Reaction score
901
Location
Central Louisiana
Last night I installed a 2011-14 rear upper control arm bracket and Whiteline UCA on my 2005 GT. I’ve heard they are better because of the longer UCA. Has anyone else done this? Did any modifications have to be made for the gas tank. It appears to be really a right fit, maybe even touching. Just don’t want any noise or to damage the tank down the road.


Sent from my iPhone using Tapatalk

Ok if you have an 05-09 and haven’t done this mod, you are missing out!!


Sent from my iPhone using Tapatalk
 

Mach2burnout

05 Redfire GT
Joined
May 16, 2011
Posts
4,799
Reaction score
901
Location
Central Louisiana
Tell me more.

So, the 11-14 UCA is 1” longer than the 05-09. I’m not sure which way the ‘10 falls. This sets the attachment point on the bracket 1” further forward. This don’t sound like much and really isn’t, but it’s enough to make the rear work much better and smoother.
Also, I installed the Whiteline UCA with poly front bushing. This one:

https://www.cjponyparts.com/whiteline-rear-upper-control-arm-adjustable-2011-2014/p/KTA205/

And I installed the rear upper bushing by Steeda. This one:

https://lmr.com/item/ST-5554104/mustang-rear-upper-spherical-axle-bushing-05-14

Now, before you think that all the difference was from these aftermarket parts, I also installed the same parts on my 14 a few weeks ago. The improvements on it were very noticeable! But with the longer bar and the better uca and bushing, it is an amazing change.

I have found since day one that the 05 uca was basically bound up all the time. I’ve actually pulled the inside rear wheel off the ground through corners while auto xing on the stock uca and bracket and with the BMR uca and BMR bracket. Even the stock 11-14 uca has much more movement than the 05-09.

I have a bit of experience with 3link suspensions from my old modified dirt car days. And these suspensions have to be free and have travel to work and the longer the 3rd link(uca) the better.

Sorry for the book.


Sent from my iPhone using Tapatalk
 

MrBhp

Senior Member
Joined
Sep 12, 2013
Posts
1,255
Reaction score
1,038
What does this do to pinion angle? I installed either the Whiteline or the BMR upper several years ago. Don't remember which. Also installed BMR non-adjustable lowers with relocation brackets. If I'm thinking this through properly, the adjustable lowers would be required for the longer upper to work. Is that correct? I wonder if my upper has enough adjustment to lengthen it to a better geometry. Or maybe the Whiteline piece that I have is the longer one. The car hooks very well for drag racing. But it is horrible in the curves. Very unpredictable.
 

Mach2burnout

05 Redfire GT
Joined
May 16, 2011
Posts
4,799
Reaction score
901
Location
Central Louisiana
What does this do to pinion angle? I installed either the Whiteline or the BMR upper several years ago. Don't remember which. Also installed BMR non-adjustable lowers with relocation brackets. If I'm thinking this through properly, the adjustable lowers would be required for the longer upper to work. Is that correct? I wonder if my upper has enough adjustment to lengthen it to a better geometry. Or maybe the Whiteline piece that I have is the longer one. The car hooks very well for drag racing. But it is horrible in the curves. Very unpredictable.

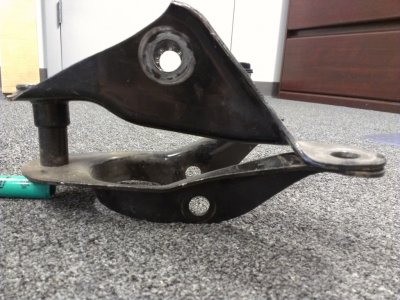
You must have the 11-14 uca bracket to use the corresponding uca. It relocates the mounting point 1” forward.
The stock 05-09 uca is 8.5” long from cl-cl of the bolt holes. The 11-14 uca is 9.5” from cl-cl of the bolt holes. The newer(longer) uca and bracket are a direct replacement for the older(shorter) version. Doesn’t change static pinion angle at all. Reduces the amount of change as the power comes on.

I know I’m not explaining this very well. I’ll try to put some info together for you.


Sent from my iPhone using Tapatalk
 

DieHarder

Senior Member
Joined
Nov 9, 2019
Posts
1,467
Reaction score
758
You must have the 11-14 uca bracket to use the corresponding uca. It relocates the mounting point 1” forward.
The stock 05-09 uca is 8.5” long from cl-cl of the bolt holes. The 11-14 uca is 9.5” from cl-cl of the bolt holes. The newer(longer) uca and bracket are a direct replacement for the older(shorter) version. Doesn’t change static pinion angle at all. Reduces the amount of change as the power comes on.

I know I’m not explaining this very well. I’ll try to put some info together for you.


Sent from my iPhone using Tapatalk

Maybe I'm missing it but this doesn't make sense. If you lengthen the UCA the pinion angle "has to change." What is your pinion angle now and what else is required to achieve the requisite -2 deg (which if I remember correctly is the requirement). So the bracket moves the rotation point so it's a direct replacement for the shorter version? Is that what's happening? Would need to see a side by side comparison. If so, how is that an improvement?
 

GriffX

Member
Joined
Sep 28, 2017
Posts
523
Reaction score
175
the lower ist the 05 UCA mount, the upper 11+. Static pinion angle is the same with the corresponding arm. I think the roll center (?) of the car is changed?

IMAG0805.jpg
 
Last edited:

Miker

Member
Joined
Sep 6, 2022
Posts
226
Reaction score
99
Location
96002
I was just looking at that bracket this morning. Do you drop the rear end out to get to the rear end upper bushing? That is the last part of the suspension that I have not replaced.
 

DieHarder

Senior Member
Joined
Nov 9, 2019
Posts
1,467
Reaction score
758
the lower ist the 05 UCA mount, the upper 11+. Static pinion angle is the same with the corresponding arm. I think the roll center (?) of the car is changed?

View attachment 87849

OK, so provided the arms meet at the same point on the diff then I agree it's probably a one-for-one replacement. I've been using a J&M UCA setup which has served me well to date. Will have to check that out if it truly improves hookup/traction/handling.
 

oldVOR

forum member
Joined
Apr 9, 2015
Posts
1,759
Reaction score
486
Location
Northern Virginia
Last night I installed a 2011-14 rear upper control arm bracket and Whiteline UCA on my 2005 GT. I’ve heard they are better because of the longer UCA. Has anyone else done this? Did any modifications have to be made for the gas tank. It appears to be really a right fit, maybe even touching. Just don’t want any noise or to damage the tank down the road.
Sent from my iPhone using Tapatalk

When I did the same swap with an '05, I gently bent the metal flange of the tank halves away from the UCA bracket just to create more clearance so there wasn't any interference between the two. There was maybe a 1/16" to start with and I rolled them to have about 1/2".
 

oldVOR

forum member
Joined
Apr 9, 2015
Posts
1,759
Reaction score
486
Location
Northern Virginia
I was just looking at that bracket this morning. Do you drop the rear end out to get to the rear end upper bushing? That is the last part of the suspension that I have not replaced.

It is much easier if you remove the rear to replace all the bits, but you can remove/replace all the parts with the axle in the vehicle if you have the right lengths of extensions AND don't get frustrated easily from having to be a contortionist in the process.
 

Gabe

Whippled Coyote
Joined
Aug 7, 2011
Posts
8,459
Reaction score
1,555
Location
NC
I was just looking at that bracket this morning. Do you drop the rear end out to get to the rear end upper bushing? That is the last part of the suspension that I have not replaced.

If you're taking about the single bushing on top of the rear diff, no you don't drop the rear end to replace it. Just let it droop. I've done the one in my wife's '08 Shelby and the one in my '13 GT.
Need to have a hole saw or other way to cut out the old rubber bushing, then a way to scrape out the rubber remnants. I used a cordless drill and a wire brush to get in from both sides, then some sandpaper to smooth it out
 

Miker

Member
Joined
Sep 6, 2022
Posts
226
Reaction score
99
Location
96002
If you're taking about the single bushing on top of the rear diff, no you don't drop the rear end to replace it. Just let it droop. I've done the one in my wife's '08 Shelby and the one in my '13 GT.
Need to have a hole saw or other way to cut out the old rubber bushing, then a way to scrape out the rubber remnants. I used a cordless drill and a wire brush to get in from both sides, then some sandpaper to smooth it out
Yes that is what I was talking about. My car is not lowered and chassis has 150 K on it. They were very easy miles for the most part. I replaced the rear LCAs with the 09 GT500 ones which are very similar to the originals. If I did replace that upper bushing I would probably stay with the stock rubber one to keep the NVH away. Is there a way to determine the health of that bushing? Is it toast with those miles or could it still be fine?
 

Gabe

Whippled Coyote
Joined
Aug 7, 2011
Posts
8,459
Reaction score
1,555
Location
NC
Yes that is what I was talking about. My car is not lowered and chassis has 150 K on it. They were very easy miles for the most part. I replaced the rear LCAs with the 09 GT500 ones which are very similar to the originals. If I did replace that upper bushing I would probably stay with the stock rubber one to keep the NVH away. Is there a way to determine the health of that bushing? Is it toast with those miles or could it still be fine?


You can get a pretty good look at the sides of that rubber just by raising the back end and letting the axle hang. Have a flashlight nearby. I used my phone camera with the flashlight on, made a movie sticking it in there, moving it slowly so it would focus. Saw the cracks clearly
 

Latest posts

Support us!

Support Us - Become A Supporting Member Today!

Click Here For Details

Sponsor Links

Banner image
Back
Top