Finally a Fox Body Owner - 1988 GT acquired!

DudeStang

Member
Joined
Apr 18, 2017
Posts
113
Reaction score
40
Location
Northern Virginia
If those are Cupronickel (and by the gold-ish colour in the photo, I believe they are), the Burst-pressure is higher than steel, and far more corrosion-resistant to boot.

I used to use steel exclusively, until I actually bent-up and flared a set of CuNi lines, about 3 years ago.....
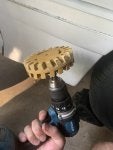
Thanks for your insight. My uncle thought that might be the case as well and suggested trying a magnet to see if it stuck. It did not but I later read that cuni doesn't always react to magnets so I'm not sure whether the lines are cuni or copper. I've come too far (lol) with the new lines and brake MC so I'm going to try and use the parts that I've picked up over the past few weeks.
 

DudeStang

Member
Joined
Apr 18, 2017
Posts
113
Reaction score
40
Location
Northern Virginia
Part 2 of my brake master cylinder saga is up on my YouTube channel:


After making the video, I managed to replace the front left brake line with the part that came in the MM kit I got a while back. I got it pretty secure on the brake/wheel side and it seems there's enough flexibility that I should be able to get it lined up with the new MC when I install it. I went ahead and ordered the proportioning valve eliminator kit from LMR. Probably won't be here until the weekend but I'm hoping I can make everything fit/work between that and the new front left brake line. Fingers crossed.
229944-367a82df3afe2e7643422b55c4225084.jpg


The molding adhesive eraser tool arrived this weekend. I definitely should have picked this thing up sooner.
229945-5b78509a6b2e302b775afbf1b5ad1768.jpg


I used it to remove some more of the adhesive from the body molding stripe area. I had largely ignored the rear bumper, which I assume will eventually need to be replaced but since I don't know if that will happen any time soon, I do at least want to clean it up and do the new red stripe soon, all around the car.

Before:
229946-039e9cab28d6af35255786356aaac912.jpg


After (like 2-3 minutes):
229947-948f6878d73f4446b1fb1ff318d285cc.jpg


My gaskets also arrived (intake manifold, EGR spacer to intake) and I already have the valve cover gaskets but I think I'd like to get the brakes done and drive the car for at least a few days before tackling the gaskets and then working on the rest of the oil leaks.
 

DudeStang

Member
Joined
Apr 18, 2017
Posts
113
Reaction score
40
Location
Northern Virginia
I recently took a "break" from working on the Fox Body to install GT500 axle backs on my 2014 GT. I had the Roush axle backs for almost six years and then was rockin' the stock mufflers the last few months while trying to sell the Roush. Well, I finally sold the Roush and picked up the GT500s. They have a nice sound and give me enough rumble to not fall asleep while driving, like the stockers, but aren't so loud and droning that I can't hear myself think. :)

Anyways, I made a video documenting the recent mistakes/foolish assumptions I made, while I patiently wait for the correct brake lines to arrive.


I am also still waiting for my Koni shocks to arrive. In the meanwhile, I am searching for (and saving for) a second set of wheels and tires in the hopes that I can get to at least one track day or autocross event before winter time.
 

DudeStang

Member
Joined
Apr 18, 2017
Posts
113
Reaction score
40
Location
Northern Virginia
My latest attempt on the brakes didn't go the way I'd like, so naturally I documented my latest round of mishaps and failures.

I went ahead and ordered the Motive power bleeder, which arrived this week. Going to visit family for a few days so I’m planning to get back to the fox and get this brake issue fixed early next week.
IMG-3162.jpg

These arrived this week too and fingers crossed that the Koni parts arrive soon. It would be nice to get the brakes sorted, install all new shocks and struts and drive the car some.
IMG-3179.jpg
 

tjm73

of Omicron Persei 8
S197 Team Member
Joined
Jun 9, 2010
Posts
12,092
Reaction score
1,638
Location
Rush, NY
The molding adhesive eraser tool arrived this weekend. I definitely should have picked this thing up sooner.
229945-5b78509a6b2e302b775afbf1b5ad1768.jpg


I used it to remove some more of the adhesive from the body molding stripe area. I had largely ignored the rear bumper, which I assume will eventually need to be replaced but since I don't know if that will happen any time soon, I do at least want to clean it up and do the new red stripe soon, all around the car.

Before:
229946-039e9cab28d6af35255786356aaac912.jpg


After (like 2-3 minutes):
229947-948f6878d73f4446b1fb1ff318d285cc.jpg

Can you elaborate on this tool? Never heard of it before. My Fox has a terrible stripe I'd like to remove. It's all broke along it's length. Looks terrible. Your pics showed up real small.
 

DudeStang

Member
Joined
Apr 18, 2017
Posts
113
Reaction score
40
Location
Northern Virginia
Can you elaborate on this tool? Never heard of it before. My Fox has a terrible stripe I'd like to remove. It's all broke along it's length. Looks terrible. Your pics showed up real small.
Not sure why the pics are showing up small. Here's what I ordered: https://lmr.com/item/LRS-400E-KIT/adhesive-removal-tool

It looks a little bit different in person but works as described. You can add it to a drill/driver and it takes off the tape/sticky material without damaging your paint. It's pretty awesome. Uploaded the pic again here as a full size image, hopefully you can see it more clearly now.
IMG-2543.jpg
 

tjm73

of Omicron Persei 8
S197 Team Member
Joined
Jun 9, 2010
Posts
12,092
Reaction score
1,638
Location
Rush, NY
Oh man that's slick. A real problem solver. I'll be buying this for sure.
 

DudeStang

Member
Joined
Apr 18, 2017
Posts
113
Reaction score
40
Location
Northern Virginia
Finally managed to finish up the brake master cylinder saga after multiple setbacks...latest video/explanations are here:


Looking forward to driving the car again for a week or two and then getting started on suspension upgrades.
 

DudeStang

Member
Joined
Apr 18, 2017
Posts
113
Reaction score
40
Location
Northern Virginia
Finally took some time to start working on the suspension this past weekend. Finished up installing the struts but still need to make time to do the rear shocks and quad shocks.

Weirdest/most time consuming part about the strut install was definitely repurposing the dust boot upper retainers.


DudeStang

Member
Joined
Apr 18, 2017
Posts
113
Reaction score
40
Location
Northern Virginia
Suspension upgrades continue....this past weekend I finished up the sway bar end links on the front and installed Koni rear shocks and Gabriel (OEM-ish) quad shocks. Love the improved feel. Car would definitely benefit from some new wheels and tires though. Hopefully coming in the not too distant future.
IMG-4162.jpg

Rear before:
IMG-4178.jpg

Rear after:
IMG-4204 (1).jpg

Latest video documenting the process with some other updates
 

DudeStang

Member
Joined
Apr 18, 2017
Posts
113
Reaction score
40
Location
Northern Virginia
Latest update on the Fox Body....I recently installed a Cervini's Ram-Air kit to go with the Cervini's Ram-Air hood (that was on the car when I bought it). It was a bit of a messy process and in retrospect, there are things I could have done smarter/differently, but it seems to be functioning as intended.
IMG-4817.jpg
IMG-4816.jpg

I made a somewhat detailed video of the installation process, since I hadn't found a tutorial/instructional video on this.
 

DudeStang

Member
Joined
Apr 18, 2017
Posts
113
Reaction score
40
Location
Northern Virginia
Some recent updates - I discovered a small fuel leak the last time I filled up the tank on the Fox Body. I recently dropped the tank and checked the fuel pump, replaced a few parts (filler neck grommet, vapor valve seal, filler pipe to trunk floor seal, filler neck to housing gasket, new tank pads).

Here's how the tank looked when I dropped it:
IMG-5792.jpg

And after a little bit of cleaning and removal of the old pads:
IMG-5908.jpg

I didn't get a pic of it with the new pads and a bit more cleaning. While I had the fuel tank out, I went ahead and flushed the differential fluid. I read from multiple accounts how bad the diff fluid smells but I was still pretty surprised. That stuff is nasty.
IMG-5927.jpg

I documented these processes in my latest video:

And a little preview of some upcoming mods/installs:
IMG-5986.jpg
 

golkhl

forum member
Joined
Feb 12, 2010
Posts
4,305
Reaction score
2,687
Location
Las Vegas, NV
Nice work DudeStang! I am also getting ready to do the rear suspension on my 94 Cobra, and the rear brakes, and most likely the parking brake cables....

It never ends!
 

DudeStang

Member
Joined
Apr 18, 2017
Posts
113
Reaction score
40
Location
Northern Virginia
Nice work DudeStang! I am also getting ready to do the rear suspension on my 94 Cobra, and the rear brakes, and most likely the parking brake cables....

It never ends!
Thanks! You aren't kidding. Every time I think I've accomplished something major....it's on to the next big thing.
 

DudeStang

Member
Joined
Apr 18, 2017
Posts
113
Reaction score
40
Location
Northern Virginia
Latest video is up, documenting the installation of the OEM-style upper control arms and getting the fuel tank re-installed.


IMG-6041.jpg IMG-6040.jpg IMG-6096.jpg

My latest install, over this past weekend, was the lower control arms...which took a lot longer than I originally anticipated. Video on that coming soon.
 

DudeStang

Member
Joined
Apr 18, 2017
Posts
113
Reaction score
40
Location
Northern Virginia
I just finished editing and uploading my video on the lower control arm installation process, which took me the better part of last weekend. My facial expression in the thumbnail photo reflects my naive optimism prior to the installation process.


I've now replaced front lower control arms on my 2014 Mustang, rear LCA relocation brackets on the 2014, rear lower control arms on the Fox, and upper control arms on the Fox. The rear LCAs on the Fox were definitely the worst installation to date. If I ever have to replace the front control arms, I seriously might consider paying someone else to do it, lol.
 

DudeStang

Member
Joined
Apr 18, 2017
Posts
113
Reaction score
40
Location
Northern Virginia
Coming along nicely Dude!
Thank you!

Picked up a set of cheap wheels for the Fox over the weekend. 16x8 Pony wheels. Not my first choice but I do prefer a factory-ish look and the deal was too good to pass up. $80 for all four wheels. At first I thought they needed a bit more work but upon closer investigation, they are in pretty good shape aside from the center caps. One wheel has a little bit of curb rash but other than that and the caps, they are fine.
IMG-6657.jpg IMG-6661.jpg

The guy I bought them from was pretty cool and also an owner of his first Fox that he had purchased this year. His black 93 (I think) GT was in excellent shape.

IMG-6658.jpg

We talked for a bit before he had to take off. He told me the Fox was his daily driver and he had even taken it camping recently. As someone who took my own 2014 GT camping recently, I appreciated that Mustang utilization.
IMG-53172.jpg

I picked up some tape, primer, and paint to see if I can get the center caps sorted. Worst case, I'll just order a new set of caps for all four wheels.
 

Latest posts

Support us!

Support Us - Become A Supporting Member Today!

Click Here For Details

Sponsor Links

Banner image
Back
Top