Wire Tuck Thread

Dark_horse

forum member
Joined
Jan 28, 2011
Posts
1,441
Reaction score
6
Location
KC MO
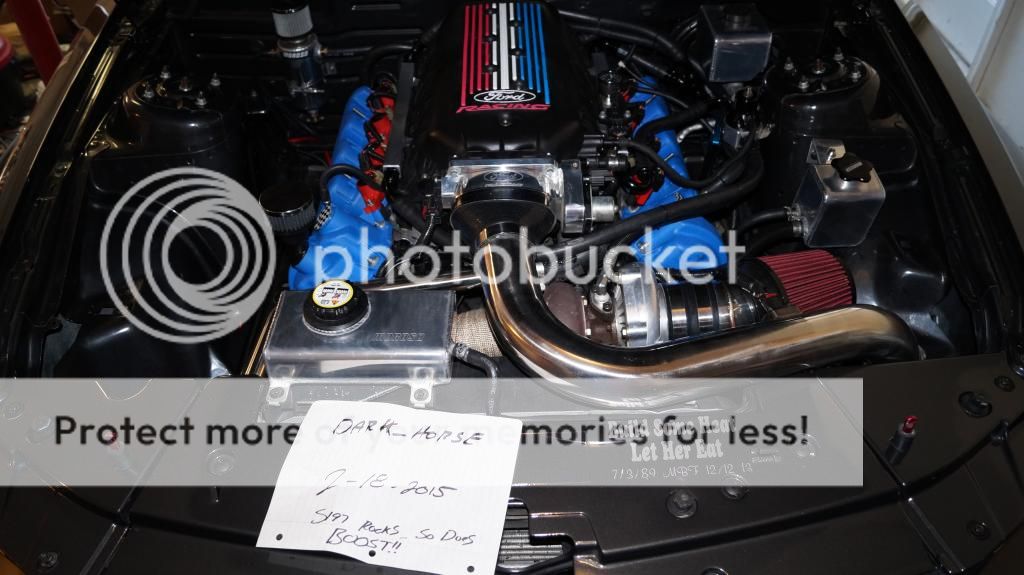
Finished up mine last week... Getting ready for a complete tear down that include hole filling and repaint or may just vinyl wrap it Black...
 

Jason

forum member
Joined
Oct 18, 2009
Posts
661
Reaction score
4
Location
Fort Riley, KS
For all you tech gurus, I have a quick question someone might be willing to answer. Does anyone know the standard square terminal our cars use. I'm going to order a large quantity when doing my project, starting in the next week or two. When doing the wire harnesses that need to be shortened I'm going to use these instead of splicing. That way it will be as clean as possible. Here are examples of several types. Just wondering if someone by chance had a part number or website I can order the exact terminals I need.

http://www.ebay.com/itm/Kent-Moore-Terminal-Repair-Kit-Lear-J-38125-Tray-17-/371258457226
 

one eyed willy

Pizzle fo shizzle
Joined
Jul 1, 2008
Posts
7,533
Reaction score
23
Location
Lakeland FL
For all you tech gurus, I have a quick question someone might be willing to answer. Does anyone know the standard square terminal our cars use. I'm going to order a large quantity when doing my project, starting in the next week or two. When doing the wire harnesses that need to be shortened I'm going to use these instead of splicing. That way it will be as clean as possible. Here are examples of several types. Just wondering if someone by chance had a part number or website I can order the exact terminals I need.

http://www.ebay.com/itm/Kent-Moore-Terminal-Repair-Kit-Lear-J-38125-Tray-17-/371258457226


Just FYI, almost no connections get shortened, they get extended.
 

Jason

forum member
Joined
Oct 18, 2009
Posts
661
Reaction score
4
Location
Fort Riley, KS
I know most of them are. I'm going to be putting the fuse box behind the glove box so I was referring specifically to the big bundle running from underneath the dash all the way to the fuse box. I was also going to just start making wire harnesses with this terminal so when I get ready to extend wires i could just repin the connector and only have to splice at one point instead of two.
 

one eyed willy

Pizzle fo shizzle
Joined
Jul 1, 2008
Posts
7,533
Reaction score
23
Location
Lakeland FL
I know most of them are. I'm going to be putting the fuse box behind the glove box so I was referring specifically to the big bundle running from underneath the dash all the way to the fuse box. I was also going to just start making wire harnesses with this terminal so when I get ready to extend wires i could just repin the connector and only have to splice at one point instead of two.

Just speaking from experience, I would not cut any wires you don't have to. I just coiled all those wires up under the dash, plenty of room and the less wires cut the better. Make sure you do only 1 wire at a time also, that way there is no way to get anything crossed up, takes more time but will give you a 100% chance of not mixing anything up, once you start de-pinning things they can get crossed pretty easy. I de-pinned a few things that I could, but most of mine are extended, soldered, liquid taped and heat shrinked. 2+ years with no issues. Just some FYI.
 

Jason

forum member
Joined
Oct 18, 2009
Posts
661
Reaction score
4
Location
Fort Riley, KS
Definitely something to consider. Thanks for the advice. Today I'm taking all the body panels off so I can get a better look and start planning everything out. Also to add to a parts list. I have surgery next week so 6 weeks off of work will give me plenty of time for the project. I just have to give myself a couple weeks to recover.
 

richman

WTF!!! AGAIN AMERICA?
Joined
Jul 29, 2010
Posts
478
Reaction score
5
Location
Michigan
Well..it's finally above 0 so I'm getting back to work.. Phrase of the year!....one wire at a time.
 

Jason

forum member
Joined
Oct 18, 2009
Posts
661
Reaction score
4
Location
Fort Riley, KS
No pictures yet, I pulled everything apart and I'm getting my ideas and the rest of my parts list down. Have the BEC mounted securely in the glove box and the PCM in the fender. I just had surgery on my knee 2 days ago so I have to put a halt on my project. Good thing is I have 6 weeks off of work so as soon as I can heal up a bit, its on.

Quick question though. After reading multiple threads I have a pretty good idea this way is correct but I like to check my work. I am using this a fused distribution block shown below. Now, i just want to verify that I am using the addiquit wire gauges and fuses. I have 0 gauge wire going from my battery in the trunk to this distribution block that will be in my fender. I will have 6 gauge wire going to the alternator with a 125amp fuse in the distribution block to replace the built in fuse in the original alternator wire. 8 gauge wire will go to the BEC in the glove box with 150amp fuse and 6 gauge wire will go to the starter with 150amp fuse. The 4th spot in the distribution block will have a 8 gauge wire with a 100amp fuse going to a separate fuse block shown below. This will power my intercooler fans and HID ballasts.

Did I do that right? lol

Distribution block is a 1/0 gauge to four 4-8 gauge wires
11025831_915630351791760_4025680113543117186_n.jpg


11041763_915630635125065_4671510251248467343_n.jpg
 
Last edited:

one eyed willy

Pizzle fo shizzle
Joined
Jul 1, 2008
Posts
7,533
Reaction score
23
Location
Lakeland FL
^ sounds good, pretty similar to what I did, but I needed two of the fused distribution blocks, one has spares for aftermarket future stuff.
 

BeachMonkey100

forum member
Joined
Oct 6, 2013
Posts
1,092
Reaction score
2
Location
Myrtle Beach, SC
What exact fuses are needed? I plan to run either 1 or 0 gauge from the battery to the front. I have about 25ft of 4 gauge I will use for the alternator, bec, and starter coming off the distribution block. Currently I have in my hands 2 150amp fuses. Just need to know exactly how low or high I need fuse wise without guessing or wasting fuses lol
 

one eyed willy

Pizzle fo shizzle
Joined
Jul 1, 2008
Posts
7,533
Reaction score
23
Location
Lakeland FL
I put a 150 amp circuit breaker at the battery , I bought one for the alternator but have not put it on yet.
 

BeachMonkey100

forum member
Joined
Oct 6, 2013
Posts
1,092
Reaction score
2
Location
Myrtle Beach, SC
Well I have two inline fuse holders. I thought 150 at the battery would be satisfactory until thinking about it more. Really I need one on each wire after the distribution block, no?
 

Jason

forum member
Joined
Oct 18, 2009
Posts
661
Reaction score
4
Location
Fort Riley, KS
It's good to be cautious. That's what I am doing with the distribution block that I have pictured above. It holds an inline fuse from the 0 gauge wire to each outgoing wire. As one eyed willy stated, for future projects, I have a 8 gauge wire going to that distribution block to a fuse holder (pictured in my last post) that will power other components closer to the front and be a junction for whatever I might add on later. This way I don't have a ton of wires running around everywhere for all my add ons.

Before starting this tuck I just had a circuit breaker in the back like he stated and no other fuses. The 0 gauge battery wire went to the BEC which I basically used as a distribution point for everything else. Never had any problems. The OEM alternator wire already has a fusible link in the wire (not sure about its amp rating). The fuse at my new distribution block will act as its replacement.
 
Last edited:

JoshK

Modder AKA Fuel
Joined
Nov 18, 2010
Posts
6,118
Reaction score
24
Location
Nebraska
Has anyone found a way to leave the AC but redo the routing of the hard lines?
 

one eyed willy

Pizzle fo shizzle
Joined
Jul 1, 2008
Posts
7,533
Reaction score
23
Location
Lakeland FL
Has anyone found a way to leave the AC but redo the routing of the hard lines?

You would need to get someone to remake your lines. There was a guy who did his, converted mostly over to flex able lines and AN fittings. I can't remember his screen name, he totaled out his car only a few days after it was back on the road , 1badhrse or something like that.

Found it,post #492 starts the A/C stuff, more at #601

http://www.s197forum.com/forum/showthread.php?t=27381
 
Last edited:

richman

WTF!!! AGAIN AMERICA?
Joined
Jul 29, 2010
Posts
478
Reaction score
5
Location
Michigan
Quick question for those of you who mounted ecm inside front passengr fender..did you just shove the extra harness inside firewall or did u cut to length?
 

Jason

forum member
Joined
Oct 18, 2009
Posts
661
Reaction score
4
Location
Fort Riley, KS
I pulled it all inside, coiled it up above the bar that runs behind the dash.

+1. After his advice earlier plus actually getting under there and looking, once you get everything tucked up in there it looks just as good and doesn't leave as much of a bundled mess as you might think. Plenty of room on the right side of the glove box and above the air bag. I only had to do that to the harness that runs from the ecm to the fuse box. The harness that runs from the ecm to the motor I put in the firewall as you can see in the pics below. Using that method I only had about 3 inches left on 85% of the wires.


Making progress. All the wires left in the second pic need lengthened. Just need to do that, do the front light harness, run all the bigger wires to the fuse box, alternator, and starter then loom everything up. I figure I have another week or two working at a moderate pace. The bracket above the glove box that I used for the fuse box is a little crooked than I would have liked. Considering I was reusing a bracket not meant for that purpose, I was upside down in a confined area, and I can't bend my knee because it's in a brace, I'd say it's good enough.

11045454_921276687893793_8480772866234349481_n.jpg

10923441_921271014561027_4652068192361023362_n.jpg

11063492_921270971227698_3871322130541909188_n.jpg

11061719_921270947894367_3753827841192341194_n.jpg

19684_921276601227135_4875999120884190102_n.jpg

10933763_921390404549088_2486614323796144246_n.jpg

11015928_921390424549086_5754831262008652219_n.jpg

11052880_921390437882418_6087362305051307202_n.jpg

11076274_921390457882416_5094053112379007513_n.jpg
 
Last edited:

Jason

forum member
Joined
Oct 18, 2009
Posts
661
Reaction score
4
Location
Fort Riley, KS
I do have a quick question. The wire I have pictured has these strands coming out. I assume it's shielding and it goes to a ground wire, second picture. I havnt gotten under my engine to see where it goes yet. It has no insulation though. Can anyone tell me what it is and if I can just cut it out? Basically cut it where it comes out of each of the wire, throw some heat shrink around it and call it good? If not has anyone lengthened it? I assume all I would have to do is use regular, lets say 14 gauge wire and solder/ heat shrink, to lengthen?

I'm pretty sure this question has been asked before but I couldn't find it.

11027508_921400491214746_2744607584162197468_n.jpg

10361456_921400507881411_9133473873330898208_n.jpg
 
Last edited:

Latest posts

Support us!

Support Us - Become A Supporting Member Today!

Click Here For Details

Sponsor Links

Banner image
Back
Top