
You are using an out of date browser. It may not display this or other websites correctly.
You should upgrade or use an alternative browser.
You should upgrade or use an alternative browser.
Wire Tuck Thread
- Thread starter W3bb3r04
- Start date


Thanks Scott!Looks great James!
Looks great James!
Gotta agree. I'm not normally a fan of the braided lines but it works for your car. The partial tuck just adds a finished quality.
Thanks Jaye! Lito is working on my tune, but crazy me didn't realized I'd need a lap topGotta agree. I'm not normally a fan of the braided lines but it works for your car. The partial tuck just adds a finished quality.
 , so I'm borrowing one today from my niece. to finish the remote tune....
PLee
Member
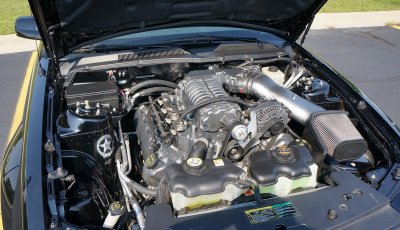
Thought I'd contribute my wire tuck results as well. Crappy sun-glared picture, but hopefully the idea comes across. DOB manifold & 200a alternator, and a few other tricks in there. Switches by the firewall control H/E fan, I/C pump, and primary rad fan.

Attachments
W3bb3r04
Slow 3v Member
Looks great man!
Sent from my HTC6435LVW using Tapatalk 4
Sent from my HTC6435LVW using Tapatalk 4
obxdude018
Member
Thought I'd contribute my wire tuck results as well. Crappy sun-glared picture, but hopefully the idea comes across. DOB manifold & 200a alternator, and a few other tricks in there. Switches by the firewall control H/E fan, I/C pump, and primary rad fan.
Hell yeah, DOB ftw, I just pulled my a/c stuff out and I would really love to tackle the wire tuck. That would clear so much space underneath the hood and make it look awesome.
Thought I'd contribute my wire tuck results as well. Crappy sun-glared picture, but hopefully the idea comes across. DOB manifold & 200a alternator, and a few other tricks in there. Switches by the firewall control H/E fan, I/C pump, and primary rad fan.
Very nice! The Vortech doesn't allow me the option of seeing all the engine like the twin screws, would love to have a twin screw,but Vortech will have to do for now!
Thought I'd contribute my wire tuck results as well. Crappy sun-glared picture, but hopefully the idea comes across. DOB manifold & 200a alternator, and a few other tricks in there. Switches by the firewall control H/E fan, I/C pump, and primary rad fan.
Man that looks amazing. I like the painted DOB manifold and the Whipple also. What type paint and process did you use?
UltraKla$$ic
PERENNIAL WAXXER

PLee
Member
Lol thanks guys! Its no big deal, just a little paint and patience.
Thanks! It's actually a stock GT500 Eaton; I wish it were a Whipple! Or a '13 TVS lol... maybe one day. Paint was nothing special at all- just removed as many fasteners as I could, scuffed everything very well w/ a Scotch Brite pad, use some self-etching primer, and high-temp gray metallic that closely matches the gray accents on the rest of the car. There are specific aluminum paint prep chemicals out there, but I didn't use any of them for this project.
Man that looks amazing. I like the painted DOB manifold and the Whipple also. What type paint and process did you use?<!-- / message --><!-- sig -->
Thanks! It's actually a stock GT500 Eaton; I wish it were a Whipple! Or a '13 TVS lol... maybe one day. Paint was nothing special at all- just removed as many fasteners as I could, scuffed everything very well w/ a Scotch Brite pad, use some self-etching primer, and high-temp gray metallic that closely matches the gray accents on the rest of the car. There are specific aluminum paint prep chemicals out there, but I didn't use any of them for this project.
obxdude018
Member
Lol thanks guys! Its no big deal, just a little paint and patience.
Thanks! It's actually a stock GT500 Eaton; I wish it were a Whipple! Or a '13 TVS lol... maybe one day. Paint was nothing special at all- just removed as many fasteners as I could, scuffed everything very well w/ a Scotch Brite pad, use some self-etching primer, and high-temp gray metallic that closely matches the gray accents on the rest of the car. There are specific aluminum paint prep chemicals out there, but I didn't use any of them for this project.
I should of done that with my DOB manifold. Maybe in the next few weeks, I'll pull the blower off and paint that black or red to match the engine.
LAStang1234
----------DSL----------
What type of solder should I use? 60/40 lead/tin? Diameter?
Thinner the solder 60/40/22 dia the easier it will be to wrap the solder around the wire, I've found that to large of a solder, causes the solder to drip/ run off, but the thinner solder seems to flow in between the strains of wire better, which gives the solder & wire a better joint.What type of solder should I use? 60/40 lead/tin? Diameter?
here's an example of solder flowing in the strains of wire, notice how it's not just on top of the wire,but in between the strains.

LAStang1234
----------DSL----------
Thank you sir! Exactly what I needed to know.
Thank you sir! Exactly what I needed to know.
No problem, glad I was able to help.
2L8IWON
Member
This is AWESOME! Any other ideas or tips for success?
06Torch
Senior Member
This is AWESOME! Any other ideas or tips for success?
Did you see all this?
Gerardo
I just wrapped mine up not that long ago. My suggestions:
-TAKE YOUR TIME. This is not for the faint of heart.
-Have a plan for where you want to mount the fuseblock and pcm FIRST. i.e.- plan your harness routing ahead of time. I mounted my fuse block where the battery was. Had to open some holes up under it to get the harnesses through w/ their huge connectors.
-You do not need to unwrap all of the harnesses. Some you can leave alone, as you can (depending on where you mount stuff) end up w/ more factory harness than you need. Others you can get away w/ only unwrapping a portion of the harness.
-Unwrap/extend only one harness at a time.
-Extend only one wire at a time. This helps eliminate the possibility of screwing up. Knowing where your harness's destination is will help you know how much wire to add.
-Buy lots of electrical tape, shrink tube (w/ the adhesive inside), solder, and/or butt connectors. NOT the cheesy red or blue ones you get at the auto parts store. I recommend the nice non-shielded connectors that you shrink tube w/ adhesive lined tube, for a good seal. Like these:

-DO NOT SKIMP on your electrical supplies. There is NOTHING worse than chasing electrical gremlins, and the few pennies you'll save on cheap butt connectors, electrical tape, etc. just isn't worth it.
-You will need 20awg, 18awg, up to I believe 14awg, if memory serves me right.
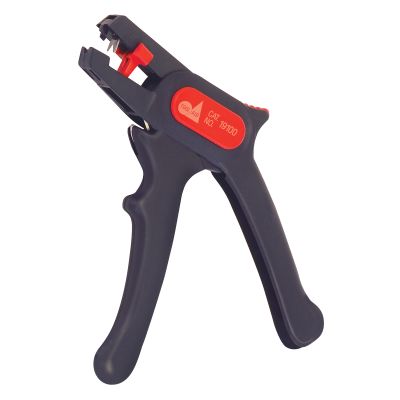
-Get good wire strippers. This style is popular, but the clamps that hold the wire in place actually break the wire jacket, so I DON'T recommend using them:

I LOVE the ones below. I have wired at least 5-6 complete FULL hot rods (front to back) with these. They DO NOT cut the wire jacket when stripping. Worth every penny, I promise.
http://www.matcotools.com/catalog/product/WCS191/WIRE-STRIPPER-RECESSED-AREAS/
-Last but not least- be OVER protective of your wiring. I can't tell you how many times I've seen wires running unprotected along sharp edges of metal. When you unwrap a harness, save the plastic loom. A lot of it you can reuse to help protect the wires. If you're passing a wire through metal, be sure you put a grommet or some sort of edge protection on it. Consider every chafe point or edge to be something that can cause a short or FIRE, and protect against it. If you're not sure, protect it anyway. Why risk it?
rcm90
Senior Member
What would be a rough estimate on how much wire you guys are using when doing the tuck?
GallopingFord
I'm Cam - Mr. Indecisive
RJ, badass writeup. I am seriously considering to do this on the Bullitt this winter when I pull the fenders and hood to be repainted and redo a lot of the car.
I am looking for Battery relocation kits, but am not sure which to choose... anyone have suggestions? I want one with a plastic box, no aluminum.
I am looking for Battery relocation kits, but am not sure which to choose... anyone have suggestions? I want one with a plastic box, no aluminum.
Similar threads
- Replies
- 0
- Views
- 280
- Replies
- 4
- Views
- 172
Support us!
Support Us - Become A Supporting Member Today!
Click Here For Details