Front Suspension Help Needed

Miker

Member
Joined
Sep 6, 2022
Posts
269
Reaction score
123
Location
96002
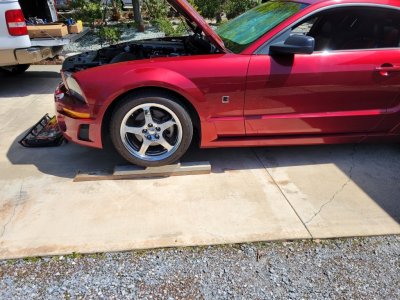
So I am going to tackle the front today. I am thinking the first thing I am going to do is somehow mark the position of the LCAs before jacking up the car. Hopefully I can reach under there with some paint or chalk and mark the arm and the mount. I can then transfer the mark on the lca to the new one. This so I can torque the new arm down while the car is on the jacks. Has anyone else tried this? Sound feasible? Also here are the torque specs I found for the front end. Is the Strut Upper Mount the center nut on top that you can see from under the hood? That is listed at 46lbs and I am wondering if the shaft will spin when I try and torque it.

Torque specs for front Suspension
(Nm = Newton Meters ft/lbs = Foot Pounds in/lbs. = Inch pounds)
Brake Caliper Bracket Bolts: 133 Nm - 98 ft/lbs.
Dust Shield Bolts: 20 Nm - 15 ft/lbs.
Wheel Spindle Pinch Nut: 103 Nm - 76 ft/lbs.
Lower Control Arm Bolt (front): 175 Nm - 129 ft/lbs.
Lower Control Arm Bolt (Rear): 175 Nm - 129 ft/lbs.
Heat Shield Bolts: 10 Nm - 89 in/lbs.
Brake Line Bracket Bolt: 20 Nm - 15 ft/lbs.
Strut Upper Mount: 62 Nm - 46 ft/lbs.
Strut to Spindle Bolts: 200 Nm - 148 ft/lbs.
Strut to Body Nuts: 35 Nm - 26 ft/lbs.
Wheel Hub Retainer Nut: 300 Nm - 221 ft/lbs.
Stabilizer Bar Bracket Nuts: 70 Nm - 52 ft/lbs.
Anti-lock Brake Sensor Bolt: 6 Nm - 53 in/lbs.
Outer Tie-Rod Ends: 80 Nm - 59 ft/lbs.
Steering Gear Mounting Bolts: 115 Nm - 85 ft/lbs.
 

DieHarder

Senior Member
Joined
Nov 9, 2019
Posts
1,543
Reaction score
837
So I am going to tackle the front today. I am thinking the first thing I am going to do is somehow mark the position of the LCAs before jacking up the car. Hopefully I can reach under there with some paint or chalk and mark the arm and the mount. I can then transfer the mark on the lca to the new one. This so I can torque the new arm down while the car is on the jacks. Has anyone else tried this? Sound feasible? Also here are the torque specs I found for the front end. Is the Strut Upper Mount the center nut on top that you can see from under the hood? That is listed at 46lbs and I am wondering if the shaft will spin when I try and torque it.

Torque specs for front Suspension
(Nm = Newton Meters ft/lbs = Foot Pounds in/lbs. = Inch pounds)
Brake Caliper Bracket Bolts: 133 Nm - 98 ft/lbs.
Dust Shield Bolts: 20 Nm - 15 ft/lbs.
Wheel Spindle Pinch Nut: 103 Nm - 76 ft/lbs.
Lower Control Arm Bolt (front): 175 Nm - 129 ft/lbs.
Lower Control Arm Bolt (Rear): 175 Nm - 129 ft/lbs.
Heat Shield Bolts: 10 Nm - 89 in/lbs.
Brake Line Bracket Bolt: 20 Nm - 15 ft/lbs.
Strut Upper Mount: 62 Nm - 46 ft/lbs.
Strut to Spindle Bolts: 200 Nm - 148 ft/lbs.
Strut to Body Nuts: 35 Nm - 26 ft/lbs.
Wheel Hub Retainer Nut: 300 Nm - 221 ft/lbs.
Stabilizer Bar Bracket Nuts: 70 Nm - 52 ft/lbs.
Anti-lock Brake Sensor Bolt: 6 Nm - 53 in/lbs.
Outer Tie-Rod Ends: 80 Nm - 59 ft/lbs.
Steering Gear Mounting Bolts: 115 Nm - 85 ft/lbs.

Torquing down Front LCA's while compressed isn't necessary. That's only needed on the rear with stock LCA's. Otherwise, also not needed. I've done three sets on two different cars. Changed out stock for aftermarket and never looked back. As far as the strut mount goes you don't need to touch it unless you're changing out springs. Else, leave it alone. There are three nuts that hold the upper strut mount in place in the strut tower. The center nut holds the strut mount and spring in place. Don't touch it (for obvious safety reasons) unless you compress the spring first to take tension off of it. (Which requires you to take the entire assembly out of the car first). Highly recommend you Watch some YouTube videos first before tackling this job.
 

Samos3

Member
Joined
Feb 27, 2022
Posts
294
Reaction score
163
Location
St. Louis
I did my front struts/springs/mounts as a unit. Much easier than individual pieces.

I read too many stories about the upper mounts failing or falling apart, so I just went ahead and replaced them with the GT500 items.
 

Miker

Member
Joined
Sep 6, 2022
Posts
269
Reaction score
123
Location
96002
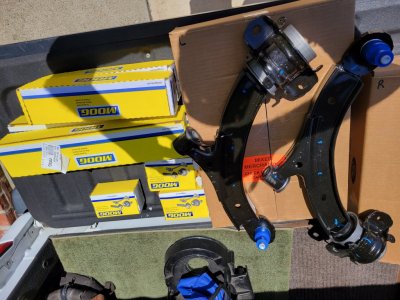
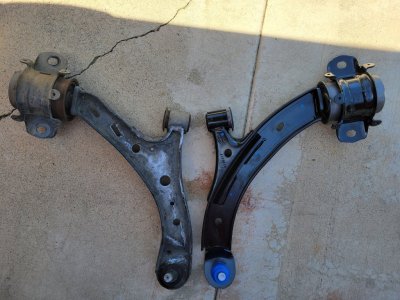
Well my plan for marking the LCAs position was a no go as the differences between the stock and GT500 arms is massive. I ended up measuring from the frame to a center point of the arm laterally and then from the frame to that point horizontally. Just figuring that out took a lot of time. As it turns out that measurement was very close to where the arm wanted to sit when the rear mount was snugged down. So DieHarder might have something there. Any way the way I understand it is unless you have the front and rear LCAs close to ride height the bushing is going to have unneeded twisting of the bushing. I am way to anal to not take the extra time to get it right.
1.jpg 2.jpg
 

Miker

Member
Joined
Sep 6, 2022
Posts
269
Reaction score
123
Location
96002
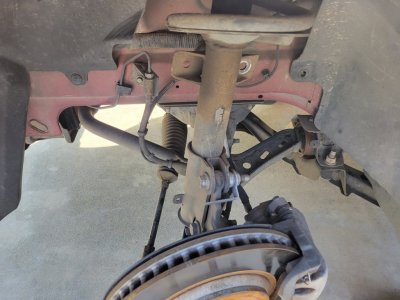
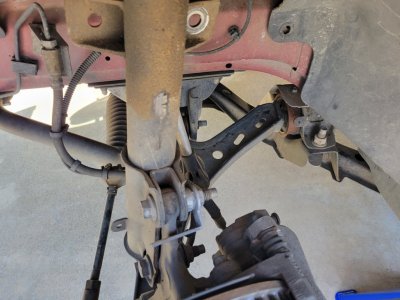
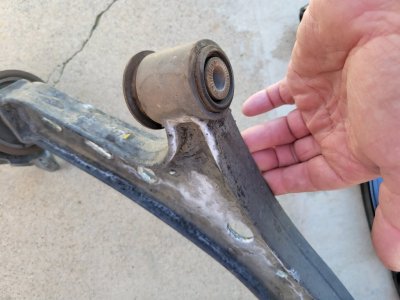
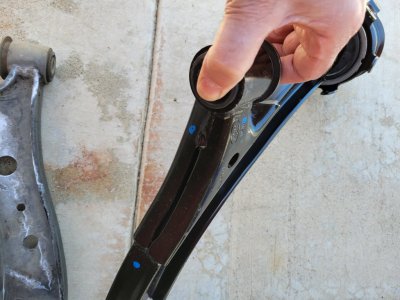
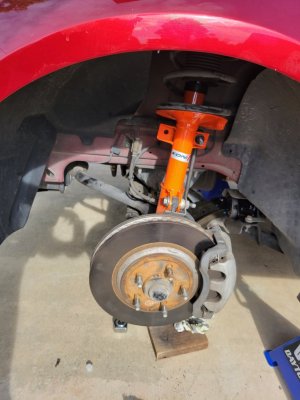
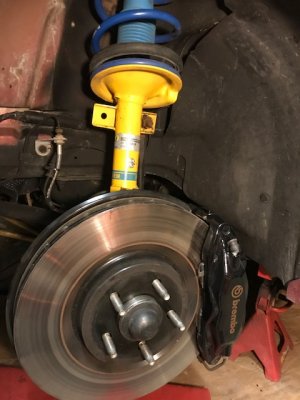
I first removed the speed sensor and its push connector to the strut. Then the brake line bracket to the strut. Hammered the tie rod mount a few times and then the stud and it popped free. Counted the turns to remove at 21 1/4 turns. Then removed the boot and the inner tie rod. Pulled the sway bar end link and then pulled the strut. That made it much easier to get to the rear LCA mount bolts. Pulled the spring and moved it, the dust cover, and the bumper over to the Koni STR-T. Installed the GT500 top mount and then reinstalled it loosely in the car. With the rear LCA bolts already out and the tie rods removed I had full access to the front LCA bolt. I lifted the hub assembly off the ball joint and hung it off the strut with 1 bolt and the help of a cord tied to the spring. I removed the front LCA bolt and pulled the LCA from the car. You can really see how much stouter than the stock LCA the GT500 is.
4.jpg 5.jpg 6.jpg 8.jpg 9.jpg
 
Last edited:

Miker

Member
Joined
Sep 6, 2022
Posts
269
Reaction score
123
Location
96002
Installed the new LCA with the rear bolts flipped and torqued it down in the position as was measured while the weight was on the car. Then I removed the hub from the strut and slid it on to the ball joint and slid its bolt through. Then I could flex the LCA down enough to line up the hub to strut bolts. Reinstalled the new Moog end link. I had to jack up the other side slightly to get it to line up. Reinstalled the speed sensor and the brake line mount. Then I torqued the upper strut to body mounts and the final torque on the strut to cap. Then installed the new Moog inner tie rod and boot. Then the outer Moog tie rod end and spun it the same number of turns it took to remove the stocker. Installed it to the hub and torqued it down. All bolts were cleaned off with a wire wheel in a die grinder. Used blue Loctite on the LCA, strut to hub, inner tie rod, ball joint pinch bolt, sway bar end links, and the speed sensor bolt. The Moog inner tie rods came with Loctite already applied. I had already pumped some grease into the sway bar links before installing. So the last thing I did was pump a few into the outer tie rod and reinstalled the tires.
The procedure was the same for both sides other than the sway bar end links. I had to pull the second to line up the first and then jack up the first LCA slightly to align the second. I did use some anti seize on the outer tie rod threads.7.jpg 10.jpg
 
Last edited:

Miker

Member
Joined
Sep 6, 2022
Posts
269
Reaction score
123
Location
96002
I have an appointment to get it aligned next week but I still took it for a test drive. I was amazed. All the banging and clanking was gone and the steering was much tighter. It felt like a new car. Didn't want (well I did but I didn't) to drive it too much. The steering wheel was probably an inch off but the car went dead straight. Can't wait to feel the difference in corners with the new parts.
I will say that the outer tie rods were shot as were the ball joints. You could reposition them with a slight touch of a finger. The inners were floppy as well. I'm sure the LCA bushings were shot too. And the heat shields from the stock arms transferred over perfectly. I zipped them out with a 3/8ths impact and zipped them right back into the GT500 LCAs. The upper strut mounts were shot as well although the bearings didn't fall out. I think the only parts that weren't original were the sway bar end links. They were loose but nothing like the outer tie rods. Also they had an aluminum shaft with plastic ends. Maybe they were but it seems Ford wouldn't use something that light weight.
I guess this is testimony to the fact that the 1st owner I got it from was pretty easy on it as it has 150K on the chassis.
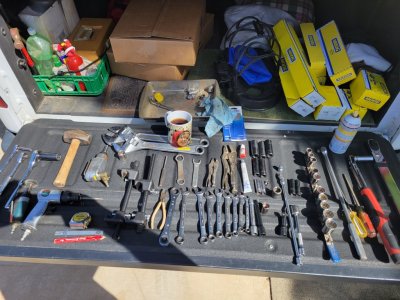
In the end I would say it was a pretty straight forward job and as long as you have the tools it's not that bad.
I did notice that the pads have about an 1/8 inch of material left so I will be ordering some pads for it. There is no pulsing or vibration during braking so just a light scuffing and cleaning for the rotors.
 
Last edited:

Jwood562

Member
Joined
Dec 19, 2013
Posts
159
Reaction score
42
wow, just read the whole thread. awesome work OP and great help from all members. I learned a few things along the way.
 

DieHarder

Senior Member
Joined
Nov 9, 2019
Posts
1,543
Reaction score
837
I have an appointment to get it aligned next week but I still took it for a test drive. I was amazed. All the banging and clanking was gone and the steering was much tighter. It felt like a new car. Didn't want (well I did but I didn't) to drive it too much. The steering wheel was probably an inch off but the car went dead straight. Can't wait to feel the difference in corners with the new parts.
I will say that the outer tie rods were shot as were the ball joints. You could reposition them with a slight touch of a finger. The inners were floppy as well. I'm sure the LCA bushings were shot too. And the heat shields from the stock arms transferred over perfectly. I zipped them out with a 3/8ths impact and zipped them right back into the GT500 LCAs. The upper strut mounts were shot as well although the bearings didn't fall out. I think the only parts that weren't original were the sway bar end links. They were loose but nothing like the outer tie rods. Also they had an aluminum shaft with plastic ends. Maybe they were but it seems Ford wouldn't use something that light weight.
I guess this is testimony to the fact that the 1st owner I got it from was pretty easy on it as it has 150K on the chassis.
In the end I would say it was a pretty straight forward job and as long as you have the tools it's not that bad.
I did notice that the pads have about an 1/8 inch of material left so I will be ordering some pads for it. There is no pulsing or vibration during braking so just a light scuffing and cleaning for the rotors.

Good work. Next upgrade I would recommend is changing out the front brake calipers/disk/pads for reman GT500 Brembo's. You'll be glad you did. Only around $500 for everything.

IMG_1473.jpg
 

Samos3

Member
Joined
Feb 27, 2022
Posts
294
Reaction score
163
Location
St. Louis
Those LCAs look like mine. So much beefier than stock!
I think your going to like the whole setup once aligned and you can play.
When I last got tires I went with a 255 Michelin tire all around. Just slightly wider and acts like a rim protector for my wheels.
 

Sammy70

Junior Member
Joined
Feb 16, 2021
Posts
18
Reaction score
2
Good work. Next upgrade I would recommend is changing out the front brake calipers/disk/pads for reman GT500 Brembo's. You'll be glad you did. Only around $500 for everything.

Those calipers won't fit inside stock 17" wheels will they?

Probably at least 18" at minimum?
 

JC SSP

Senior Member
Joined
Nov 8, 2022
Posts
1,303
Reaction score
616
Location
FL
Yeah, I have asked this before and the consensus is 18"+ for front Brembo's to clear and even then it depends on the rim. You would be safer with a 19" rim.
 

Miker

Member
Joined
Sep 6, 2022
Posts
269
Reaction score
123
Location
96002
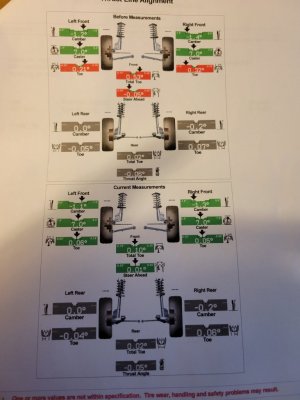
So I got the car aligned today. The shop statement was that;
"Front camber at low end (min adjustment, see readings.")
"Struts would need modification for more positive camber."
"Customer advise on tire wear."

So here are their numbers measured before adjustment and after. Is there an issue? I am thinking this has to be within spec as there are no provisions for adjustment with the factory parts. And I doubt Ford was concerned enough to modify struts before delivery.

a123.jpg
 
Last edited:

JC SSP

Senior Member
Joined
Nov 8, 2022
Posts
1,303
Reaction score
616
Location
FL
I always thought when it’s GREEN its within specs?

camber bolts might help?
 

Miker

Member
Joined
Sep 6, 2022
Posts
269
Reaction score
123
Location
96002
I just read this thread. Looks like my numbers are ok since the car is used for fun. I guess .7* is optimal if you are driving a lot of straight roads / highways. The way it is it handles like its on rails. I took a couple of turns on a favorite route at double the recommended speed with zero push or slide.
It isn't as planted going straight as I hoped it would be. I attribute this to the 10 inch rims and 275 tires front and back.
 

Miker

Member
Joined
Sep 6, 2022
Posts
269
Reaction score
123
Location
96002
275s are the stock tires that came with the 2005 Roush stage 1 with the 18x10 wheels. The car is not lowered but IMHO it has a perfect stance.
 

DieHarder

Senior Member
Joined
Nov 9, 2019
Posts
1,543
Reaction score
837
Is your car lowered? If so, try rotating the strut mounts 180*. Mine is lowered about an inch and rotating the struts 180 put my camber right at .07/.08 both sides. If that doesn't do it look at camber bolts or adjustable strut mounts (better). I took the inexpensive route and experienced no ill effects. Car handles great and camber is right on. I'm running 9" rims; 255/45/19's on all 4 corners and tire wear is fine.
 

Pentalab

forum member
Joined
Mar 5, 2013
Posts
5,266
Reaction score
1,149
I used steeda adjustable front strut mounts, with camber dialed to max. Aprx - 1.5 degs on both fronts. 285-40-18's on 18 x 10" wide rims. Zero wear issues on the fronts. Handling is superb.
 

Miker

Member
Joined
Sep 6, 2022
Posts
269
Reaction score
123
Location
96002
I think I am happy with the camber at -1.1 and -1.3. Time will tell I guess if the tires wear uneven.
 
Back
Top