Rear LCA experiences over the years

Unexplodedcow

Member
Joined
May 23, 2011
Posts
52
Reaction score
16
UMI called me back today, and we're going with some custom-fit chassis bushings and new ball ends at the axle end. The MM relocation brackets are going to be removed.
 

Norm Peterson

corner barstool sitter
Joined
Feb 5, 2011
Posts
3,615
Reaction score
316
Location
RIP - You will be missed
If I back the car up on ramps, and start the removal, will the axle-housing and chassis slip out of alignment so as to make instilling the new part a challenge?
Even if you chock the front tires (front and back) and at least the rear tire on the side you're working on (ditto), expect to end up with a little misalignment between the holes in the bracket and the holes through the center of the bushing or spherical joint.

Mount the chassis-side of the LCA first. and use a tapered drift pin to wiggle the axle-side pieces into alignment from one side while you install the bolt from the other. Worst case, you might have to relax the position of one of the rear wheel chocks.


Norm
 

crjackson

Member
Joined
Nov 28, 2015
Posts
609
Reaction score
308
Location
Midgard
Even if you chock the front tires (front and back) and at least the rear tire on the side you're working on (ditto), expect to end up with a little misalignment between the holes in the bracket and the holes through the center of the bushing or spherical joint.

Mount the chassis-side of the LCA first. and use a tapered drift pin to wiggle the axle-side pieces into alignment from one side while you install the bolt from the other. Worst case, you might have to relax the position of one of the rear wheel chocks.


Norm
Thanks. Exactly the advice I was looking for.
 

Unexplodedcow

Member
Joined
May 23, 2011
Posts
52
Reaction score
16
After having done the LCAs a number of times, Norm is on the money. That's the best way to align things quickly and easily.
 

Unexplodedcow

Member
Joined
May 23, 2011
Posts
52
Reaction score
16
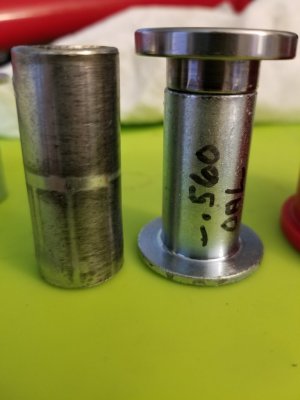
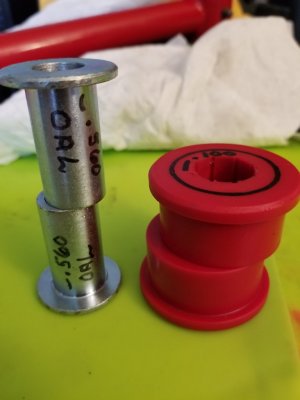
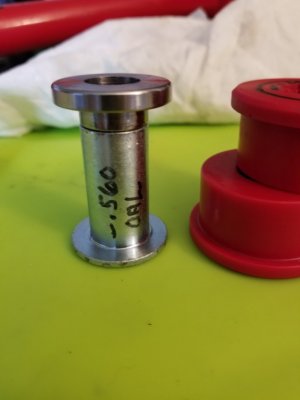
The UMI hardware arrived. New urethane bushings, and a split-sleeve setup that originates on "part 2305" from them, which is an F-body front control arm. The sleeves have a 1.25" flange and the .75" OD otherwise. ID is just under 9/16 by about 0.014".

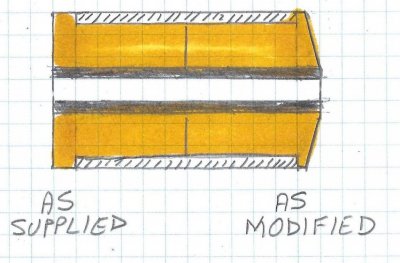
They are about 0.560" too long on both ends, and would need to be cut down, while the bushings would need a 0.1" deep countersink to fit the flange of the sleeves. The thought came that the bushing flanges are 0.2" thick, and taking 0.1" is easier, with the sleeve flange then being responsible for preventing bushing movement. I don't know if this would be useful or cause problems in the future, as the walls of the bushings would then have slight clearance against the torque box walls.
I also had a couple weld washers left over (always buy spares just in case something else goes wrong), and noticed that a stock UMI bushing sleeve and a weld washer are close to the necessary length. Ford specs 1.970" for the control arm sleeve length, with the stacked UMI sleeve / weld washer coming in at 1.985", which would allow me to knurl the ends to help prevent movement of the sleeve, though I'm not a fan of the offset load through the bolt would experience, nor the potential for torque loss through using a split-length sleeve.

The offset split, I think, would create more of a shearing force on the bolt shank, and a bending force in the middle of the bolt shank if using an even split. I don't know which would be more prone to moving under load to be honest, as I've never seen a split-sleeve design in any bushing.

With some measurements, I determined that a 4" 9/16" Grade 8 cap bolt with a thick hardened washer (.1" approximately) would allow for about 2 threads being open within the torque box itself, with the rest being covered by a flange nut. This is assuming minimal collapse, and if any happens, I'd have little wiggle room, but the amount of shank the bolt has would fully support both halves of the sleeve, whether down the middle, or offset, and should be able to withstand the OE 129 ft. lbs of torque.

I added some pictures to show what's been going on, as well as the original bushing sleeve that partially extruded through the chassis torque box, as well as collapsed some. It measures 1.875" long, or 0.1" too short to meet Ford spec. That alone would have caused problems with even application of force.

20210805_143916.jpg

20210805_143955.jpg

20210805_144101.jpg
 

Norm Peterson

corner barstool sitter
Joined
Feb 5, 2011
Posts
3,615
Reaction score
316
Location
RIP - You will be missed
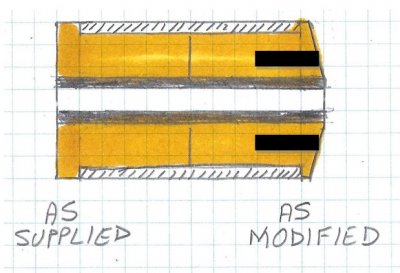
They are about 0.560" too long on both ends, and would need to be cut down, while the bushings would need a 0.1" deep countersink to fit the flange of the sleeves. The thought came that the bushing flanges are 0.2" thick, and taking 0.1" is easier, with the sleeve flange then being responsible for preventing bushing movement. I don't know if this would be useful or cause problems in the future, as the walls of the bushings would then have slight clearance against the torque box walls.
This doesn't seem to be a problem. I've been shaving (in most cases tapering and in some cases making yet another mod to the poly) off and on for over 20 years without adverse effects showing up even after 8 or more years in service.

You want every bit of clamp load going through the sleeve, that being one of Ford's design assumptions in the first place. I at least leave the sleeves a tiny bit longer, probably less than 1/32" clearance. With grease on the sleeve that's periodically renewed through zerk fittings, nothing adverse seems to happen.

Poly Bushing Mod.jpg


On a car with the triangulated 4-link (similar to the Fox/SN95), I've drilled a few holes in each end to further increase compliance against the off-axis rotation forced by either Ford's or GM's version of that particular suspension arrangement. It makes a big difference in one-wheel-bump and roll modes.

Poly Bushing Mod 2.jpg


Norm
 

GlassTop09

Senior Member
Joined
May 24, 2019
Posts
1,145
Reaction score
526
Location
Farmington, NM
Thanks. Exactly the advice I was looking for.
In addition to what Norm suggested here, you can use a cargo tie down ratchet strap to hold the rear axle in place loaded while on ramps to assist in changing out the LCA's. I've used these on mine & if you do need to readjust to center holes just reset the strap tension. I set the strap tension until the bolts come loose in the arms then pull out, drop em then install the new ones as Norm has laid out.

Just another method to use if you have the tool on hand.
 

Laga

Senior Member
Joined
Aug 10, 2019
Posts
999
Reaction score
521
Location
Chicago
In addition to what Norm suggested here, you can use a cargo tie down ratchet strap to hold the rear axle in place loaded while on ramps to assist in changing out the LCA's. I've used these on mine & if you do need to readjust to center holes just reset the strap tension. I set the strap tension until the bolts come loose in the arms then pull out, drop em then install the new ones as Norm has laid out.

Just another method to use if you have the tool on hand.
+1 on this. I had to disconnect the LCA to install my 1piece driveshaft. Used the ratchet strap to pull it back into position once it was in.
 

Unexplodedcow

Member
Joined
May 23, 2011
Posts
52
Reaction score
16
Norm - that design looks very similar to what Prothane does with their bushings, and not only makes installing easier, but you're right in that it loads the sleeve properly.

Now, a split sleeve - eh. It should transfer all load through it if aligned, but I'm still debating on a central or offset split, don't know if that even really matters.

I did get some different relocation brackets in (J&M, so similar design), and measured the bracket width - they're about 0.2" wider than the LCA rear sleeve (or roto-ball in my case), which means a hinging joint, and will cause buckling of the roto-joints again. I'm working on some 0.084" thick, hardened washers in order to take up space.

Also of note, I have a friend who works in a shop and might be able to make me custom roto-joint balls out of thicker/stronger material (we're debating on hardened 17-4 or IHCP). The idea is to make a taper wall from the outer edge down to the center, probably with a 1.0" OD at the end. I'll see if they can be made a bit longer to avoid using washers. These are the times I wish for a lathe or access to a CNC mill, but hopefully the coming weeks turn out a result.

As for the front sleeve, I realized that Prothane already had a 1" OD, 14mm ID solid sleeve in their 6-313 bushing kit. I've contacted them to possibly order some sleeves that way, as I already have the original UMI front bushings bored to accept that size (and it works nicely). It would be stronger than the split-sleeve design under any circumstance, and sends that load through the weld washers as well as some of the original sheet metal on the torque box.

Secondarily, I'm debating on putting the car back to stock ride height and saying to hell with the lowering brackets if each design is going to hinge under a clamp load - that's not how it should be designed (my opinion as a mildly experienced layman).
 

Unexplodedcow

Member
Joined
May 23, 2011
Posts
52
Reaction score
16
Update:

Went with the original idea of using some 1" OD, 9/16" ID solid sleeves (from Prothane 6-313 kit), and shaved down the bushings similar to what Norm showed. Torqued to 129 ft. lbs, used Permatex Orange thread locker on a 9/16" 4" bolt, where the shank runs the length, with only two threads left for the nut. With the extra thread length, I then torqued a hardened jam nut on to about 100 ft. lbs. The bushing rotates freely, and no compression force is running through it. The sleeve is receiving the full compression load. No grease on the faces, and it looks to be grabbing.

Next, I removed and checked the relocation brackets; both were properly torqued, and the cracked weld on the inside "spacer" laminate for the passenger side has not moved. Specifically, the weld did not crack, but didn't penetrate the metal, so it's a clean break. In the years it's sat on the car, however, it hasn't moved at all. I tried fitting the J&M relocation brackets, and they don't line up. I can fit one bolt through, but not 2 or 3, so back they go. Of note, the MM brackets really pull the axle forward, and that explains why I had to order a shorter than normal one-piece driveshaft years ago. Joy.

I removed, cleaned, and retorqued the relocation brackets to 129 ft. lbs on the nuts with orange thread-locker (I love using this stuff now - so much easier than red). It all lined up, as it did.

Next up, installing the roto-ball ends. I grabbed a ratchet strap and pulled the axle, lined up the bolt (9/16" bolt again, as it fits snugly), and pulled the axle as tight as I could without busting the strap, then added in the shim washers so the roto-balls made even contact with the brackets (they were slightly wedge-like to fit the angle). Torqued to 90 ft. lbs (beyond UMI spec).

The upper arm did not seem to have moved at all, and I hadn't noticed any clunks from it earlier.

Once that was done, I put the car back down, checked for any clunks with the parking brake engaged and the suspension loaded (rocking the car back and forth hard). No clunks.

Take it for a drive, even with gentle driving, clunks return. This is the same, repeatable pattern I have witnessed every single time. I'm going to do something I have avoided: jacking the rear up by the diff. and keeping the suspension loaded, while getting some stands and crawling under to observe if anything moved.

Likewise, the plan is to remove the sway bar and see if the clunk goes away. If it doesn't, the next step is to check and/or remove the shocks and rock it back and forth again. If it still doesn't go away, I'm left to conclude that I can't get the aftermarket arms tight enough, under any circumstance, to avoid somehow loosening and clunking.

As it stands, the clunk very clearly is coming through all 3 control arms. It can be felt on upper and lower body points pretty equally. Of further note, while driving, and despite the clunking, this time around I didn't notice any change in sound going over bumps, and the car doesn't pull one way or the other on the highway when applying the throttle. Mind you, it doesn't sound scary when driving; kind of a metal clack going over bumps, but the clunk is only when testing with the car in neutral with parking brake fully engaged to prevent the wheels from turning. With the more consistent noise, I was able to hear my left rear wheel bearing is groaning/ticking, unless it's the rear diff. that has a tooth issue. It's whined since day one, so if something is messed up, I wouldn't entirely be surprised.

Thought to post here. Very tired of this car, wish I had some help in figuring it out, or at least rocking it back and forth on the ground, while I watch from underneath. I've told myself that I'll put it back to stock and sell it if I can't fix it, and I've already passed the point of patience. It's a learning process, sure, but I've never dealt with a car that does this every single time. Why is it not clunking right after doing the work, but on driving it even a mile, clunk. Suspension? Shocks? Who knows. There's a proverbial towel that I am beyond ready to throw in.
 

pass1over

I like it LOW
Joined
Oct 9, 2011
Posts
1,528
Reaction score
243
Location
Trenton, FL
This sounds almost exactly what I've been going through with my car. I've removed and retorqued everything so many times in tired of doing it. I've just lived with the clunks going down my drive and road.
Two upper arms, two pan hard bars, three different relocation brackets, countless different types of lock washers and locking nuts, loctite, etc. Poly upper bushing on housing, poly sway bar bushings, countless greasings. I resized all the bolts so they fit tighter in the holes than the stock bolts. Usually meant going up one size to a fractional bolt instead of metric. Clunks always return.

I have steeda billet lca, and I think either a bmr or upr upper, can't remember.

Every time I think I've found the problem, it isn't it. I just keep telling my wife, when it finally breaks, ill fix it. Lol
 

Juice

forum member
Joined
Aug 24, 2017
Posts
4,622
Reaction score
1,905
Are you absolutely sure this clunk is from the control arms?

Im having trouble with the consistency of it returning.
 

pass1over

I like it LOW
Joined
Oct 9, 2011
Posts
1,528
Reaction score
243
Location
Trenton, FL
I forgot to add this last night ... I can reproduce some of the sounds while shaking the car back and forth (but only sometimes), but my wife can't do it while i'm laying under the car. So I shook it while she watched. She said it sounded like it was coming from the end of the axle tubes, like where the brakes are. I can pull out on my axle and there is a tiny amount of play and then a metallic sound, i'm assuming it's hitting the c-clip. But I don't know if this is what I'm hearing or not.

I always thought the sound was coming from the shock mounts, that's where it sounds like when I'm driving and have the rear seats folded down.

My road/driveway is really bumpy and uneven, this is where I hear it, hardly ever while driving on the road. Most of the time, after taking my car off the lift, the sound will stop for a day or two, then it will come back. I don't know what happens when I lift it to make it stop, but it's only a short reward.
 

Unexplodedcow

Member
Joined
May 23, 2011
Posts
52
Reaction score
16
Are you absolutely sure this clunk is from the control arms?

Im having trouble with the consistency of it returning.

Well, the sound is entering the car at the control arm points, and I had previously found egg-shaped torque box holes in the chassis, and a slightly enlarged one in the driver side relocation bracket. Confirmed the roto-joints had collapsed under torque load, as did the front bushing sleeve.

The front sleeve was upsized to a 1" OD, 9/16" ID piece of hardened steel, and the front bushings bored out to fit it. 3rd set of roto-joint balls from UMI, and this time using a shim washer to ensure even torque load so it doesn't collapse like two times before. I'm also still working on a custom set of balls to fit the joint. 3-4 times thicker in the neck area, and tapered, so it won't collapse under even OE torque loads.

I haven't yet checked the swaybar again, or the shock mounts in the body, but have retorqued the swaybar numerous times without change, and twice on the shock ends that bolt to the axle.
 

Unexplodedcow

Member
Joined
May 23, 2011
Posts
52
Reaction score
16
This sounds almost exactly what I've been going through with my car. I've removed and retorqued everything so many times in tired of doing it. I've just lived with the clunks going down my drive and road.
Two upper arms, two pan hard bars, three different relocation brackets, countless different types of lock washers and locking nuts, loctite, etc. Poly upper bushing on housing, poly sway bar bushings, countless greasings. I resized all the bolts so they fit tighter in the holes than the stock bolts. Usually meant going up one size to a fractional bolt instead of metric. Clunks always return.

I have steeda billet lca, and I think either a bmr or upr upper, can't remember.

Every time I think I've found the problem, it isn't it. I just keep telling my wife, when it finally breaks, ill fix it. Lol
Sounds similar to my issue with the amount of new hardware and parts. I let mine go for a while, which resulted in hogged-out holes, mostly in the chassis end, and I had to put in stepped weld-washers to fix that problem. At the time it was definitely torque loss due to things compressing, but I've basically resolved it, yet the exact same clunk remains. All that's left is the shocks.

If you back off the gas in gear, and then punch it again, do you get an almighty clack? I do. It's not like normal gear lash or shifting clunk/clack when letting the clutch out too fast. This is much, much louder, jerks the whole car. I'm still at a loss, but hopefully will be inspecting the shock mounts in the body, and removing the sway bar this weekend to see if either are causing it.

On top of it, the wife basically killed the clutch in my main car, while hers is down for a cylinder head rebuild from bent valves. This broken-car crap is getting out of hand. It's like some disease.
 

skwerl

tree hugger
Joined
Aug 6, 2011
Posts
16,197
Reaction score
1,145
Location
central Florida
Do you have an adjustable panhard bar? I had a rattle that took some time for me to find. It was the lock nut on my adjustable panhard bar. I finally found it when I had the car on a lift and was wiping down various parts to clean them.
 

Unexplodedcow

Member
Joined
May 23, 2011
Posts
52
Reaction score
16
I do, yes, and checked it a couple times to be sure it wasn't a problem. The jam nut has blue loctite on it as well as being extremely tight, and no issues from either the bushing or roto-ball ends. It has been tight and trouble-free since day 1.
 
Last edited:

Laga

Senior Member
Joined
Aug 10, 2019
Posts
999
Reaction score
521
Location
Chicago
If you back off the gas in gear, and then punch it again, do you get an almighty clack? I do. It's not like normal gear lash or shifting clunk/clack when letting the clutch out too fast.

I was getting this, only it sounded and felt just like excessive gear lash.

After reading this thread, and getting my car ready for a track day last weekend. I decided to check the torque of the LCAs. Sure enough, the passenger side had loosened up quite a bit and now all sounds and vibration is gone.
 

Unexplodedcow

Member
Joined
May 23, 2011
Posts
52
Reaction score
16
I was getting this, only it sounded and felt just like excessive gear lash.

After reading this thread, and getting my car ready for a track day last weekend. I decided to check the torque of the LCAs. Sure enough, the passenger side had loosened up quite a bit and now all sounds and vibration is gone.

Glad this thread may have helped, and I'd love to hear if they loosen up on you again.

Out of curiosity, what arms are you using? Any relocation brackets? Did the upper loosen as well? Thanks for chiming in. Maybe I can get an idea of *how* something is loosening if I get enough input from others.
 

Support us!

Support Us - Become A Supporting Member Today!

Click Here For Details

Sponsor Links

Banner image
Back
Top