What have you done to your mustang today?

DieHarder

Senior Member
Joined
Nov 9, 2019
Posts
1,479
Reaction score
762
Pulled the cowl drains after finding water in my floorboard, drains were clogged up but the actual cowl felt clear to my fingers. Ran the hose over it and it all seemed to dump out ok, thinking I just got unlucky with the crazy downpour and the clogged rubber drains.

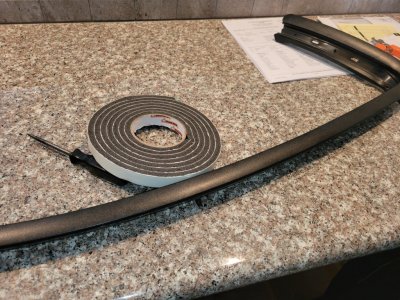
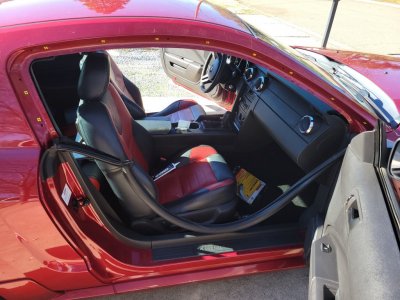
May not be your cowl drains. Found that my upper window seals had perished and were leaking. You can fix it inexpensively (purchase some 1/8 - 3/16" dense foam tape) for $20 at a hardware store or buy the orig replacement foam tape (60 - 100/side) from Ford. I tried both routes (my and my son's car). Both work. To prevent it in the first place? Get a set of stick-on drip rails... ~$100. Got a set for my son's car. No more issues.

Check this thread for the door trim seal that failed on one of my Mustangs.
https://www.s197forum.com/threads/interior-leak.129397/

https://www.s197forum.com/threads/i...hrough-my-drivers-side-floorpan.138781/page-6
 

Forty61

forum member
Joined
Nov 6, 2016
Posts
1,178
Reaction score
1,065
Location
Dallas, TX
May not be your cowl drains. Found that my upper window seals had perished and were leaking. You can fix it inexpensively (purchase some 1/8 - 3/16" dense foam tape) for $20 at a hardware store or buy the orig replacement foam tape (60 - 100/side) from Ford. I tried both routes (my and my son's car). Both work. To prevent it in the first place? Get a set of stick-on drip rails... ~$100. Got a set for my son's car. No more issues.

Check this thread for the door trim seal that failed on one of my Mustangs.
https://www.s197forum.com/threads/interior-leak.129397/

https://www.s197forum.com/threads/i...hrough-my-drivers-side-floorpan.138781/page-6

Interesting.. the drains were pretty packed with dirt but this is something I definitely need to dig into too. Thanks!
 

Mozart

Junior Member
Joined
Jun 15, 2023
Posts
5
Reaction score
3
Location
Texas
Changed my alternator,
By the way, new here and was wondering how does one go about posting a thread. I have a question regarding my fuse box.
 

Gabe

Whippled Coyote
Joined
Aug 7, 2011
Posts
8,471
Reaction score
1,570
Location
NC
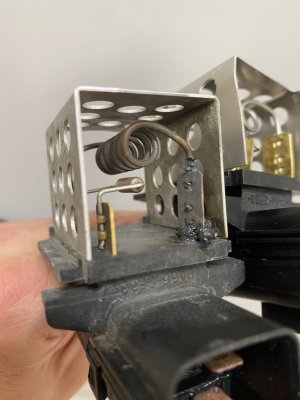
Has anyone figured out why Ford charges more for that resistor alone than an entire aftermarket fan assembly that includes a resistor?

Because there's no longer any chance it's warranty and because they can?
 

GriffX

Member
Joined
Sep 28, 2017
Posts
550
Reaction score
197
How did you notice that it is burned?
- the part looks like it was invented by Edison himself :)

Part prices at dealerships have become shocking in Germany, brake caliper (TRW) Mercedes 400€, free dealer 50€.
 

Miker

Member
Joined
Sep 6, 2022
Posts
227
Reaction score
103
Location
96002
May not be your cowl drains. Found that my upper window seals had perished and were leaking. You can fix it inexpensively (purchase some 1/8 - 3/16" dense foam tape) for $20 at a hardware store or buy the orig replacement foam tape (60 - 100/side) from Ford. I tried both routes (my and my son's car). Both work. To prevent it in the first place? Get a set of stick-on drip rails... ~$100. Got a set for my son's car. No more issues.

Check this thread for the door trim seal that failed on one of my Mustangs.
https://www.s197forum.com/threads/interior-leak.129397/

https://www.s197forum.com/threads/i...hrough-my-drivers-side-floorpan.138781/page-6
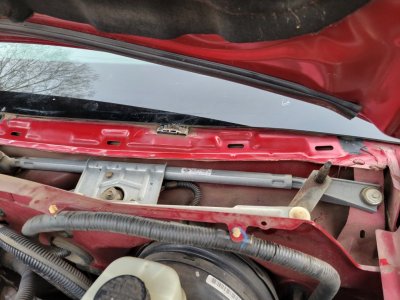
When I bought NY 2005 I found the floor to be damp. At first I thought it was the cowl drains as the cabin air filter was wet. I had to get a wiper arm puller before I could check out the drivers side. Once both covers were off I sealed up all the cowl clips.20230201_162621.jpg

This is what I used. You will have to zoom in.
20230126_131502.jpg20230126_131252.jpg

In that pic you can also see what I used to seal up the door trim. No more leaks and it really was quite easy. The Dynaflex was what I used for the cowl clips. The stupid little gaskets Ford used are going to fail not if but when.
20230126_131337.jpg

View attachment 88112

Here is the vid I watched for the door seals.
And here is a detailed write up I did for a fellow Mustang owner on another forum.
I thought I had it fixed and then the other day I had the driver seat out for some upholstery work and discovered that my back carpet on both sides was wet as well as my front. I then discovered another problem our cars have and tackled it today. It seems like a lot of work but in reality it only took me about 2 hours and I highly recommend it. It involves taking off the trim piece from the dash to the rear that runs along the headliner. 15 seconds. Then you simply pull out the rubber that the window seals against. 30 seconds. There is one push pin in the top rear corner other than that it is just stuck into the black plastic trim. That push pin stays in the rubber and just be careful when you pull it. Don't just pull on the rubber. Once you pull the rubber and that push pin simply let it hang down as there is no need to remove it any further. Then you will remove 10 t-15 torx screws and pull that trim piece from the car. There are 3 pins and once you have the 10 torx removed just pull down and the pins will stay in the trim. That will take you a few minutes. Behind that stuck to the trim you are removing is a factory gasket that you will be aghast at. Really a dumb design but easy enough to fix. You can see where the water is coming in and running behind the interior trim and getting to the floor. The gaskets from Ford would set you back over $200.00 but in the following video he shows what he used and I used the same stuff today. You will need two packages they are 3/4 wide by 5/16 thick by 10 feet long. Home Depot had lots in stock and each package was under 5 bucks. You will want to clean up the body and the trim and I 303ed the window rubber. I went for a drive and was amazed how quiet the car was at freeway speeds. Air was coming in the same way water was getting in. Most of the time was spent cleaning up the parts and making sure everything went together clean. The Frost King weather stripping is super easy to use and it only adheres to the trim piece and then seals against the body. When you have the trim piece with all the old gasket cleaned off you will want to note the position of the two forward push pins. Make sure before you attach the weather stripping that you hold it up to your car. The rear push pin is set but the 2 forward ones can move front to back as they are in a slot. Align them with there holes and then when you apply the weather stripping simply let them poke through and they will be aligned. You could even put some scotch tape over their heads once you have them lined up but I didn't and they went together perfect as I just made sure they were in the right portion of the slot. I used an awl to help them push through. Once you have the weather stripping on simply push the rear pin in and then the two front pins. They won't hold very well as the weather stripping is pretty thick but trust me it will compress. Even the package says it will compress to 1/8 inch. You will see the outline where the 10 torx screws were through the trim and simply center them on that and screw them right through the weather stripping and into there plastic nuts that stay in the car. Once all 10 are in snug them up and push the rubber window rubber back in reinstall the dash to headliner trim and you are done.
 
Last edited:

Forty61

forum member
Joined
Nov 6, 2016
Posts
1,178
Reaction score
1,065
Location
Dallas, TX
All this great advice for fixing problems and all I’m thinking to myself is “man, I wish I could just park the damn thing inside instead”.
 

Gabe

Whippled Coyote
Joined
Aug 7, 2011
Posts
8,471
Reaction score
1,570
Location
NC
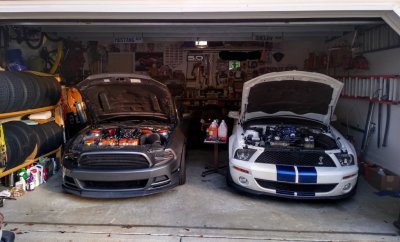
Somehow, with a toolbox, tire rack that can hold 3 sets of wheels and tires, a 14' ladder, a ride-on lawnmower, a chest freezer, and a whole bunch of other crap, I can still fit mine and my wife's Mustangs in the garage

IMG_20230707_073621.jpg
 
Last edited:

tirefriar

Junior Member
Joined
Jul 12, 2019
Posts
31
Reaction score
14
Location
So Cal
Had the windshield replaced after a rock chipped and cracked it. Installed a new OE SALEEN windshield decal. Oil change tomorrow with OE filter and oil, she's good as new.
 

GlassTop09

Senior Member
Joined
May 24, 2019
Posts
1,146
Reaction score
527
Location
Farmington, NM
Changed out the Brisk Silver XOR14YS spark plugs (don't need them......used them for knock sensor diagnosis\testing purposes while self-tuning during 1st qtr of this year due to 1 heat range colder.....had to regap them to .040" to regain combustion stabilization in all cyls......plugs weren't designed to be gapped more than .035") for a new set of NGK Iridium IX 0372 spark plugs (OE heat range w\ FineWire tech that intensifies spark energy at center electrode tips........had a set in prior......best OE heat range plug to run IMHO in 08-10 NA 4.6L V8....NIB gap set @ .044".....provide very consistent & stable combustion burn under all cylinder loading conditions) & swapped out H10 bulbs in both fog lights for H10 6000K LED replacements while I was at it.
 

Miker

Member
Joined
Sep 6, 2022
Posts
227
Reaction score
103
Location
96002
Got a great deal on a GT500 steering wheel with red stitching for my Redfire Roush. Looking for suggestions for a real leather shifter boot to replace my stocker that has seen better days.
 

Latest posts

Support us!

Support Us - Become A Supporting Member Today!

Click Here For Details

Sponsor Links

Banner image
Back
Top